EDIT:
Folks kept asking "can you build me one?" and "are they for sale?," so I sold the clear one a while back, but now I've got a new project I'm working on, so I decided to list the orange one with a LOT of extras!
Check it out here, if you are interested - - http://www.nintendoage.com/forum/messageview.cfm?catid=6&... )
###
Greetings, Nintendarians! (Is that even a word?
)
I finally got around to modding the two GAMECUBEs this weekend that I had been meaning to work on for a while.
I thought these two projects might interest some of you - - there are LOTS of pictures below, with captions on some of them to explain what I was doing.
Here's the tl;dr (Too Long, Didn't Read!) version, though, with a few "vanity" shots immediately after:
-
Crystal Clear QOOB-brand aftermarket case (takes FULL-SIZE DVDs!)
-
Blaze Orange ICEDCUBE-brand aftermarket case (takes FULL-SIZE DVDs!)
-
QOOB Pro Chip
-
XENO Chip
-
Custom BLACK Vinyl Dye Paint Job on Controller and Memory Card Ports
-
Enable/Disable Switches for XENOGC Chip
-
JPN/USA BIOS Switch, Because Why Not?
-
"Sleeved" Wires on the QOOB Pro for Appearance
-
INTEC 5.6" Portable Gaming Screen for "Bling"
If you want the FULL story ("modification log"), every case screw by case screw and soldered point by soldered point, then read on AFTER all these "vanity" shots!


I really like the contrasting black and crystal clear look of the QOOB case, and so I have added the black INTEC 5.6" portable screen to this unit - -


###
Still with me? GREAT!
Here's the full mod log below, if you want ALL the details:
THE ORIGINAL GAMECUBES
I had two DOL-001 Gamecube units (the first models, with the component output on the back, "REV A" if you prefer)


Someone had applied what appeared to be automotive paint, in a sparkly purplish-blue hue, on this one - -


Actually, it wasn't too bad of a paint job, although it looked like they had applied a clear coat that was now coming off?
It had come to me through GOODWILL, and had been my main GAMECUBE for some time. It's always been a rock-solid Koopa Troopa', so I never minded the appearance.
There was even a simple mod installed in it that it actually CAME with (I know, interesting for a GOODWILL score, right?), which was the JPN/USA BIOS switch mod - -

Interesting technique . . . no solder, just wrapped around the switch . . . !

Here's where it connects to the motherboard.
I kept the mod on the final built, although I correctly re-soldered it to the board, and installed a REAL switch (keep reading, it's all down below)
 THE CASES
I can't even BEGIN to tell you how difficult it is to find GAMECUBE aftermarket cases now.
I literally spent over a month tracking a few down, and finally they had to come from OUTSIDE of the U.S.
It was worth the hunt, though.
I wanted to try the two reputedly "best" cases out there, the ICEDCUBE case and the "official" QOOB case that was sometimes bundled with the QOOB chip (mine was not).
The ICEDCUBE, as delivered, with stickers and extras


And, the QOOB case, as delivered

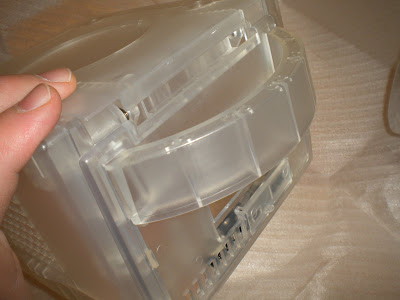
TWO of these trippy Frensel-lens optical illusion top "jewels" came with the case - - I used one on the ICEDCUBE, since I acutally did put a QOOB chip in that one!
 VINYL DYE
I started the projects by painting the controller and memory card panels with my old standby, VHT VINYL DYE
I did not like the stock grey look, and one of them had that classic NINTENDO plastic yellowing that happens sometimes.


"Vinyl dye," you say? It's amazing stuff. It literally alters the chemistry of the plastic so that an industrial dye can penetrate the plastic and permanently stain it. This is NOT spray paint (although it is aerosol delivered!), and it will NOT flake off, scrape off, chip, and it does't add "bulk" the plastic and fill in details.

Wear your respirator. It's serious.
I love the stuff. Here's a shot of a SUPER NINTENDO unit I used vinyl dye on last year - -


ANYways!
Back to the GAMECUBEs!
Here's the next day, after the vinyl dye has completely dried - -


It's like they came out of the factory that way . . . vinyl dye is great stuff.
THE XENO CHIP
What a chip! It has no features of the more advanced chips like the QOOB and the VIPER, but it is amazingly effective at handling all media types, and it all installs in one easy place on the motherboard.
It is also smaller than a postage stamp, and a fiddly little thing to install!

This is the installation spot on the motherboard

I chose to use 30 AMG Kynar wire to install the XENO, rather than the typical "direct to motherboard" install. You can actully just solder it RIGHT to the motherboard, that's why the holes on the chip are large, and have solder pads around them.

I wanted an ENABLE / DISABLE switch on this mod, though, so I didn't do the direct solder method.
It is ALWAYS nice to be able to "turn off" your mod chip - - not all homebrew programs like "seeing" the chip, and apparently (although I have not encountered it), some backups don't like it either.
I wanted ALL the options on this puppy, so I put a SPST switch on the "VCC" (voltage) line, and that would act as the "ON / OFF" !
The switch installation is down below, at the end of the case assembly section.
QOOB CASE ASSEMBLY
Here's the QOOB case going together, with a view of the vinyl dye memory cart slots and controller ports first - -


Here's the installation of the JPN/USA BIOS switch and ON / OFF switch for the XENO chip installation.
I went with some CLASSIC metal toggle switches from RADIO SHACK, which I think look stylish - -

Soldering them up - -

And, the end result, with some labels I made, because, well . . . LABELS! (I like my labeler)


Yes, ladies and gentlemen, a full-sized DVD will fit in there! It's glorious . . .

Last finishing touches - - transferring the original label and serial number from the old case

 THE QOOB PRO CHIP

(Frensel lens is from the QOOB case, it didn't come with the chip)
I wanted to try the QOOB Pro chip, since it is more advanced and can hold applications on board in its memory, like emulators, or even an alternate BIOS that you can boot to.
I had to order the thing from Australia! Again, it was a long hunt to get it. It's getting strangely HARD to find this GAMECUBE stuff!

It comes with the chip, the "wiring harness", and the cable for the USB adapter.
I didn't like the loose wires of the harness, so I decided to "sleeve" the cables for a cleaner look.
For those that don't know, "sleeving" is a computer case modder trick that puts wires inside a fibre sheath, and seals the ends with heat-shrink tubing.
Here's the un-sleeved wiring harness in the middle, with some sleeving coiled around it, and then a long length of heat-shink tubing around it all - -

Detail of the sleeving material - -

And, what it looks like (the far right wires are not sleeved yet) - -


(I sleeved the other wires, too, but you don't see that until down below, where I am connecting the QOOB Pro to the motherboard)
Taking the GAMECUBE apart to access the motherboard - -

Heatsink removed, time to solder!

And, all soldered up (it took a lot longer to do than that simple phrase . . . ).
I am VERY zoomed in here - - these solder points are ridicuously small.


Re-assembled, and the starting to put it all back into the ICEDCUBE case - -

Here we are almost assembled, with the sleeving nicely shown and the QOOB Pro chip in place. I think the sleeving makes it cleaner, and you can't see the multi-colored wires through the clear case.

Showing off the vinyl dye memory card ports


All buttoned up!

Good to see that it boots, of course - -

Finishing touches - - moving the serial number and model stickers from the old case - -

And that's it!
Not shown in here is adjusting the POTENTIOMETER for the laser, which is crucial to getting a chipped GAMECUBE to read media.
I set the lasers to 200 Ohms, which was read using a digital multi-meter, and that laser level has worked well.
The XENO has been a rock-star, and played all the DVD-R media that I have thrown at it, which is about six different types of mini AND full-sized DVD-R brands.
The QOOB Pro (or the laser in the unit) seems to be more picky. I may re-adjust the laser on the QOOB Pro unit a bit more, and take it down to 190 Ohms, see if it boots faster, and has less issues. Right now it won't always boot the same discs that the XENO will always boot.
Testing has been fun - - I have played for hours on both units to see if the the laser strength drops or if there are any incompatibilities! (I had to play for hours, really! I swear! It was important testing, not just gaming!
)
Works great on retail DVDs too, of course.
Thanks for watching, I hope you enjoyed!
-atari2atari