Skip navigation
NintendoAge
Welcome, Guest! Please Login or Join
Loading...

Game Engine Building #7: Background Collision Detection NintendoAge Programming Resources

Sep 17, 2010 at 10:46:13 AM
Mario's Right Nut (352)
avatar
(Cunt Punch) < Bowser >
Posts: 6634 - Joined: 11/21/2008
Texas
Profile

INTRODUCTION

This time we are going to add in the (in my opinion) hardest part so far.  This one takes some math skills, the ability to visualize exactly what the program is doing, and a complete understanding of how our pointers/data tables are set up.  If you understand everything up to this point, you should be okay.  If not, you're Fucked.  But don't dispair, if you get stuck or don't understand, just ask questions. 

A couple things that I need to say before we get started:

1.  The concept for this routine is 100% original, as is the actual code and the process.  I had hints from people on NA and nesdev (mostly it was them telling me that I was attempting to do it wrong at the start), but this I came up with pretty much on my own.

2.  There are a couple things that could be corrected in the program.  Mainly that there are no walls in certain places and the routine doesn't exactly know what to do with the end of the screen, so it makes the NPCs jump to a random point when it hits the edge of the screen.  Easily corrected though.

3.  This program is easily modified for use in a platformer.  If I get time in the near future, I'll go through that as well.

4.  This program could also be modified to support scrolling.  I might do this too if I ever get around to it.

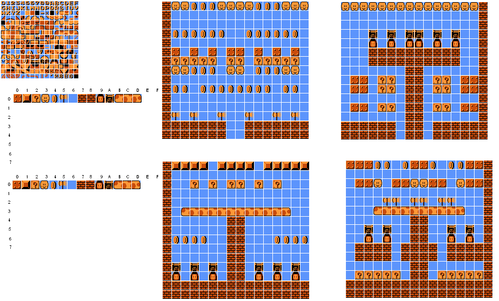
5.  Other than the collision routine its self, which isn't all that complex, all the PRG space that this takes up is what we need in the way of collision data: one (1) byte per meta tile. 

6.  This routine is based on the meta tiles and meta sprites that we've built up to this point.  You could modify it to support different ways of doing things, but then you'd loose the compression effects.

7.  Ever thus to deadbeats.


CONCEPTS

First we need to lay out what we're aiming for.  We want some sort of routine that will detect when a sprite comes into contact with a piece of background that we define as "solid" and/or do something when it impacts a certain part of the screen.  Then we need to tell the program what to do when this impact(s) occur(s).  So, if we think about this, we need to somehow have the following steps.

1.  Calculate the meta sprite's position on the screen.

2.  Pull some sort of collision data based on this position and the current background.

3.  Determine from this collision data if we need to move the character (or do something else).

4.  Move the character.

5.  Reset the graphics.

6.  Repeat for each character/meta tile.

7.  ???

8.  Profit.

Note that we are not going to cover anything besides "simple collision" here.  Once you have the program working that pulls the collision data, the various add ons (or op-codes) are fairly simple to input.


COLLISION DATA

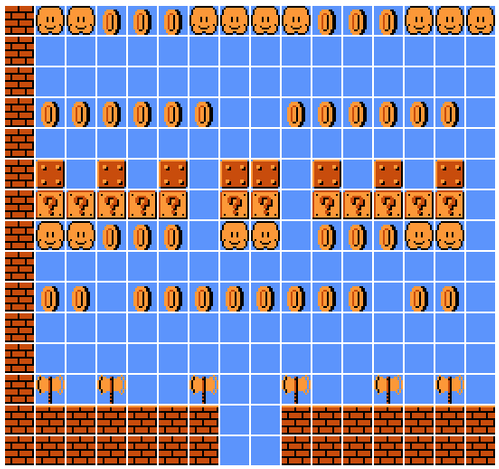
I suppose that the best place to start would be for us to decide how we are going to define our collision data.  Well, this is pretty simple.  Remember our meta tiles??  Let's jump back to them.  Remember this picture:

0

Here, we are going to keep everything simple.  "Solid" meta tile blocks and "hollow" meta tile blocks, however the process is exactly the same for something that only impacts in one direction.  (Think the bricks in Mario Bros. that you can jump up through, but can't fall down through.)  We are going to store all the data for each meta tile in one byte.  Basically:

%0,0,0,0,0,0,0,0

%Op-Code,Op-Code,Op-Code,Op-Code,Up,Down,Right,Left

Where, for each bit:
0 = hollow
-and-
1 = solid

-or-

0 = do nothing
-and-
1 = activate op-code (Note that this limits you to 4 op codes, you may add more pretty easily.)

So, if we wanted something to only register an impact when we are:

-going up,              %00001000
-going down,         %00000100 (heh, going down, get it?)
-going right,          %00000010
-going left,             %00000001
-going up/down,     %00001100
-goint right/left,     %00000011
-etc.

Nice and simple.  And it keeps our data easy to read, which is always a plus. 


META TILE COLLISION DATA

Again, for our purposes, we are going to keep it simple.  While the program fully supports the various settings described in the previous section, we are going to stick with %00000000 and %00001111, hollow or solid.  Once you complete this, you should go back and change some of these settings to see what it actually does.

So, if we make the only "hollow" meta tile the "sky" tile and the rest of them "solid", our meta tile bank turns into this:

;------------------------------------------------------------------------------------

MetaTileSeta00
  .db $44,$49,$5F,$7A,%00001111

MetaTileSeta01
  .db $AB,$AD,$AC,$AE,%00001111

MetaTileSeta02
  .db $53,$54,$55,$56,%00001111

MetaTileSeta03
  .db $B0,$B2,$B1,$B3,%00001111

MetaTileSeta04
  .db $A5,$A6,$A7,$A8,%00001111

MetaTileSeta05
  .db $7B,$7C,$7D,$7E,%00001111

MetaTileSeta06
  .db $24,$24,$24,$24,%00000000

MetaTileSeta07
  .db $45,$45,$47,$47,%00001111

MetaTileSeta08
  .db $47,$47,$47,$47,%00001111

MetaTileSeta09
  .db $CA,$CB,$CC,$CD,%00001111

MetaTileSeta0A
  .db $C6,$C7,$C8,$C9,%00001111

MetaTileSeta0B
  .db $6B,$6C,$70,$71,%00001111

MetaTileSeta0C
  .db $6D,$6C,$72,$71,%00001111

MetaTileSeta0D
  .db $6D,$6F,$72,$74,%00001111

;----------------------------------------------------------------------------------

See, this is all we have to specify our collision data.  You could either have this monstorous set of "CMP"s for each direction (as in the sprite collisions), that takes on the order of 750 bytes per room, or one byte per meta tile.  You decide.


THE "collideptr" POINTER

One thing that we need to add that is kind of random is a pointer that supports the collision routine.  This needs to be set up in the "Room Loading" routine.  Note that technically here you could use the "ptr1" that we are using in the decompression routine, but as your program gets more complex...well, it's just better to have something as important as collision detection use its own variables.  So, in the "LoadbgBackground" routine:

;----------------------------------------------------------------------------------

;;;;;;;;;;;;;insert;;;;;;;;;;;;;

  ASL A                                ;indexing to a table of words

  STA room_index
 
  LDX room_index                       ;using the room index, load the pointer to the correct background data
  LDA backgroundpointer,X
  STA ptr1
  LDA backgroundpointer+1,X
  STA ptr1+1

;;;;;;;;;;;;;insert;;;;;;;;;;;;;

-becomes-

;;;;;;;;;;;;;insert;;;;;;;;;;;;;

  ASL A                                ;indexing to a table of words

  STA room_index
 
  LDX room_index                       ;using the room index, load the pointer to the correct background data
  LDA backgroundpointer,X
  STA ptr1
  STA collideptr                       ;store the room data for collision detection
  LDA backgroundpointer+1,X
  STA ptr1+1
  STA collideptr+1

;;;;;;;;;;;;;insert;;;;;;;;;;;;;

;----------------------------------------------------------------------------------

Notice that our collideptr is pointing to the background data table for the room that we are loading!  i.e. the table of meta tiles...see where we are going??


COLLISION POSITION REQUIREMENTS

If we take a step back and think about this for a moment, we have a bit of a problem.  Consider the following picture:

0

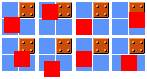
Assume that the red square represents our metasprite and that the block/sky is the space that it is currently occupying over the background.  You can see in each example picture, we are impacting the same 4 background meta tiles, but depending on EXACTLY where the 4 corners of our metasprite are, we would require completely different results from our collision routine. 

Take the upper left hand example in the picture.  If we used the bottom of the meta sprite as the collision coordinates for moving to the right, we wouldn't register an impact, but the top would.  Same with the upper, 2nd from the left.  Or, if we were trying to move up, if we used the coordinates of the left side of the meta sprite, we wouldn't register a hit but the left side would.  Work your way through each of the 8 pictures to be sure you understand this point.  So what do we do about this little problem?

Panic?  Sure.  Next take a breather and consider the following.  We just need our program to compute the location of each of the 4 corners.  Then if we were using the upper left picture and moving right, we would simply say:

-Look at the bottom, right corner.  No impact. 
-Look at the top, right corner.  Oh shit!  An impact!!

Simple.  Understand?  Same with moving up:

-Look at the top, left corner.  No impact.
-Look at the top, right corner.  COLLISION! Slap ass crazy.

So, now that we know that we have to compute the location of 4 different corners, we can define a few variables to help us along our way.  I'm just going to put these out there and define them better as we go along.

;----------------------------------------------------------------------------------

collision_index  .rs 4        ;indexes for the look up of meta tile info in the main collision routine
collide_metatile  .rs 4       ;place to store collision meta tile data
collide_vertical  .rs 4       ;store the index data for the sprite positions in the main collision routine
collide_horizontal  .rs 4

collide_data  .rs 4           ;actual data from the meta tile streams
collide_position  .rs 4       ;the location to set him to if he hits something

;----------------------------------------------------------------------------------


DEFINING THE META SPRITE COLLISION BOUNDARIES

First, we need to find the positions that we will be using to define our collision coordinates for these 4 corners.  Remember how before we referenced everything to the "sprite_vertical" and "sprite_horizontal"?  Well this is why.  When we loop our different characters through this routine, we will be using all of our registers in another fashion.  So, we need to simply transfer their coordinates to these variables before we call the collision routine, then, if there is a collision, modify these variables, then use these variables to transfer the data back into the RAM space. 

In this routine, we are going to need to use these two variables to specify the location of each of the 4 corners.  Note that here we are assuming that all of our meta sprites are the same.  If you use different sizes, you'll have to add something based on enemy type for this.  Consider this picture and the variables that we introduced above:

0

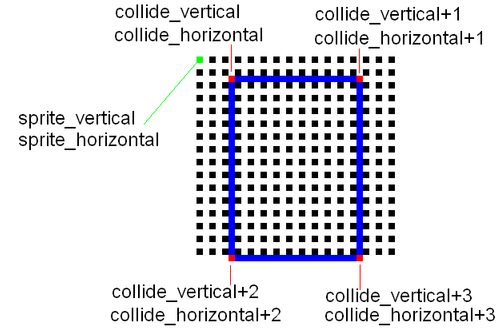
You can set your boundaries however you want, but if you don't set the bottom to the bottom of the feet, your character will "float" and if you don't leave a couple pixels at the top, your character will have trouble fitting between meta tiles.  Sameish for the right/left.  So, to load our values for our collide_horizontal and collide_vertical variables, we simply write:

;----------------------------------------------------------------------------------

.sprite_transferBGCD:

  LDA sprite_vertical              ;transfer correct collision box coords
  CLC
  ADC #$02                         ;to change this, must change DEC below to keep him from flashing (comes later)
  STA collide_vertical             ;here we set the boundries of the collision detection for the metasprites
  STA collide_vertical+1           ;note that here we assume that all of the sprites are the same size

  LDA sprite_vertical              ;if your sprites are different, you'll have to add a subroutine here
  CLC
  ADC #$10
  STA collide_vertical+2
  STA collide_vertical+3

  LDA sprite_horizontal
  CLC
  ADC #$03
  STA collide_horizontal
  STA collide_horizontal+2

  LDA sprite_horizontal
  CLC
  ADC #$0C
  STA collide_horizontal+1
  STA collide_horizontal+3

;----------------------------------------------------------------------------------

Note that in the following, some of this is not necessary.  However, I'm leaving it in here because if you expand the program, you will need all these variables later.


FINDING META TILES

Now that we have our dude's location on the background entered in temporary variables, we need to use them to calculate some sort of index to pull the meta tile information from our room data.  And after we have the meta tile info, we use that to pull the collision data we specified eariler...but one thing at a time. 

Let's start with the top left corner of our meta sprite and a picture. 

0

We see that a room is composed of 16x16 (or $10x$10) pixel meta tiles.  Consider this room and the data table that the room loading routine pulls data from.  We see that each $10 pixels we go down, we are going another $10 entries into this table (or 1 row down, hence formatting the room data talbes this way)...or, for the left most meta tile:

-row 0 (top row) = $00
-row 1 = $10
-row 2 = $20
-etc. 

So, to specify which meta tile the collision coordinates are occupying in the vertical direction, we simply take the vertical position:

-compare it to $10
      -if lower, we have found our meta tile
      -if higher
             -subtract $10 from the vertical position
             -add $10 to our collision_index variable then jump back to the start of the loop

Now, we've specified which row our guy is in, so now we need to account for the horizontal portion of the position.  This is pretty much the same as the vertical part, except that for every $10 you go to the right, you only add $01 entry to our collision_index variable.  Make sense?

Think about it.  If we are in:

-column 0 = $X0
-column 1 = $X1
-column 2 = $X2
-etc. 

So, to add in the horizontal part of our position, we simply take the horizontal position and:

-compare it to $10
      -if lower, we have found our meta tile
      -if higher
             -subtract $10 from the horizontal position
             -add $01 to our collision_index variable then jump back to the start of the loop

So, now we've found the value for "collision_index".  Does this make sense?  This is basically the hardest part, so if you don't get it, stop and ask questions.  All we're doing is using the location of our meta sprite and translating that to an index to pull data from the specific room we are in's background data table. 

Now, we have 4 corners that we need to consider when running collision detection.  So, this implies that we will need to run this little loop 4 times, 1 time for each corner.  However, this is resource intensive, it will basically take our program twice as long to run...so we are going to take a short cut.  Remember how our collision box above always keeps the right side a fixed distance from the left side?  Well, we can use that information to cut the 2nd and 4th loop out of the program.

So, if we take the value for collision_index (upper left corner) and store it in collision_index+1, we can modify collision_index+1 to specify the upper right corner.  Think back to the last time through the loop for the horizontal portion.  We compare the value to $10 and if it is less than this, we just disregard this unused portion and jump down to the next step...however, if we do it correctly, the remainder should still be in the register, in this case "Y".  So, if we take this remainder, add the fixed horizontal distance that we specified in our meta tile collision boundaries, we will come up with the horizontal location of our right corner!!  So now, we simply take this value and:

-compare it to $10
      -if lower, collide_index = collide_index+1 (both sides of the meta sprite are on top of the same meta tile)
      -if higher
             -add $01 to our collision_index+1 variable
             -jump to the next part (we see that collision_index+1 will always equal collision_index or be 1 greater than)

Now if we've done this correctly, we should have an accurate location of each of the top corners with respect to the background data.  However, if we look back at our background data, we have one minor problem...the first entry in the table is always the meta tile bank number.  So we need to INC collision_index and collision_index+1 to account for this fact.

NOW we have the correct location of the data we are seeking.

The next step is simple.  Use these index numbers to pull the meta tiles from the room data.  Then store these meta tiles into the variables we set up, collision_metatile and collision_metatile+1. 

Finally, we jump back to the start and repeat the process for the two bottom corners. 

Simply stated in code, we do the following:

;----------------------------------------------------------------------------------

  LDX #$00

.find_collision_meta_tiles

  LDA collide_vertical,x          ;find the index for the upper left corner of the sprite intersect
;  SEC
;  SBC #$40                       ;take off the HUD if you are using one to save loop time.  You'll have to change the vertical positions as well
.loop
  CMP #$10                        ;Here we use the sprite vertical/horizontal positions to find the look up index in the room data table
  BCC .next                       ;use the vertical position to find the first part
  SEC
  SBC #$10                        ;take one row off of our vertical position
  TAY
  LDA collision_index,x
  CLC
  ADC #$10                        ;add $10 to our index or skip a row in the data table
  STA collision_index,x
  TYA
  INC collide_position,x          ;set up the value of the position marker (vertical_position)
  JMP .loop 

.next                             ;include the horizontal portion of our position
  LDA collide_horizontal,x
.loop2
  CMP #$10                        ;for each meta tile we are from the left, incriment our index
  BCC .next1
  SEC
  SBC #$10
  INC collision_index,x
  INC collide_position+1,x        ;set up the position marker
  JMP .loop2

.next1
  TAY                             ;find the opposite corner, the right corner is always a FIXED distance from the left corner
  LDA collision_index,x
  STA collision_index+1,x        
  TYA
  CLC
  ADC #$09
  CMP #$10
  BCC .next2                      ;are the left and right corners in the same meta tile??
  INC collision_index+1,x

.next2 
  INC collision_index,x           ;skip the meta tile bank entries in the table
  INC collision_index+1,x
                                  ;our index should be correct now!  PowerYay!!
 
.load_meta_tile_data

  LDY collision_index,x           ;load the meta tile number from the room data block
  LDA [collideptr],y
  STA collide_metatile,x          ;store the meta tile info

  LDY collision_index+1,x         ;load the meta tile number from the room data block
  LDA [collideptr],y
  STA collide_metatile+1,x        ;store the meta tile info

  INX                             ;first loop is for the top of the metasprite
  INX                             ;second is for the bottom of the metasprite
  CPX #$04
  BNE .find_collision_meta_tiles

;----------------------------------------------------------------------------------


SPECIFING POSITIONS TO RESET META SPRITES

You'll notice the variable set "collide_position" in this routine.  These are the variables that we use to specify where we want our meta sprite to be reset to given an impact in a certain direction.  You'll see that the values of collide_position and collide_position+1 are modified each time we go through our loops when we try to use the vertical and horizontal parts of our position.  So, we are counting meta tiles towards the bottom from the top of the screen and to the right of the left side of the screen.  Basically, we are setting up a grid that our sprites will snap to if they hit something. 

Note that you only need the data acquired in the first time through the loop but you have to leave it in there cause we are using the "X" index. 

Now, after we've set up a variable to track the position like this, we need some sort of data set that translates this info into pixel coordinates.  Like so:

;----------------------------------------------------------------------------------

vertical_positions:
  .db $00,$0F,$1F,$2F,$3F,$4F,$5F,$6F,$7F,$8F,$9F,$AF,$BF,$CF,$DF        ;this is what we set the position data to when we hit something
horizontal_positions:
  .db $00,$0D,$1D,$2D,$3D,$4D,$5D,$6D,$7D,$8D,$9D,$AD,$BD,$CD,$DD,$ED

;----------------------------------------------------------------------------------

This is a somewhat iterative process that I did by trial and error after freaking error.  I'm sure if you tried hard enough, you could make this part cleaner, but at some point you just say "Fuck It" and move on.  By using the same data sets as described above for, say, up and down collision, you run into a slight "flashing" problem.  Basically, your dude runs through a wall before the program registers the impact, then the next frame the impact registers, then it moves the guy for that frame, then you move into the wall again, on and on, flashing one frame in each location, i.e.:

0

So, we have to make some minor corrections to the vertical_positions and horizontal_positions data to make this flashing stop.  In the end, to save variable space, we overwrite these position variables that we calculated above with the actual values that we will set our meta sprite positions to.  This is a pretty simple part of the routine, suffice it to say that when it's done, you'll end up with this:

collision_position = position to set the meta sprite to if moving DOWN
collision_position+1 = position to set the meta sprite to if moving UP
collision_position+2 = position to set the meta sprite to if moving RIGHT
collision_position+3 = position to set the meta sprite to if moving LEFT

-or, the actual code-

;----------------------------------------------------------------------------------

.position_finder
  LDX collide_position            ;find the various stop places in the grid using our positions above
  LDA vertical_positions,x
  STA collide_position
  INX
  LDA vertical_positions,x
  LDX collide_position+1
  STA collide_position+1
  DEC collide_position+1          ;must change this if guy flashes
  LDA horizontal_positions,x
  CLC
  ADC #$06                        ;must change this if guy flashes
  STA collide_position+2
  INX
  LDA horizontal_positions,x
  STA collide_position+3

;----------------------------------------------------------------------------------


PULLING COLLISION DATA FROM META TILE BANKS

Now that we have everything pretty much set up, we need to do some simple looks ups to pull data from our meta tables.  i.e. the 1 byte per meta tile that we specified in the first part of this write up.  This part of the routine would run as follows:

-load the meta tile bank number (first entry of the room data stream) and store the pointer info in our "meta_tile_sets_ptr" pointer
-start a loop for X = 0, 1, 2, 3
-load the collide_metatile+X that we found above and pull the value from our room data table
-using our meta_tile_sets_ptr and the collide_metatile values, load the pointer meta_tile_ptr with the address of the meta tile we are checking collision with
-pull the 4th entry from the meta tile data stream and store it in the variable collide_data+X for later use
-jump back to the start of the loop unless X = 3

-or-

;----------------------------------------------------------------------------------

  LDY #$00
  LDA [collideptr],y
  AND #%00111111                 ;load the correct meta tile bank address
  ASL A
  TAX

  LDA meta_tile_sets,x           ;load the meta tile set pointer
  STA meta_tile_sets_ptr
  LDA meta_tile_sets+1,x
  STA meta_tile_sets_ptr+1

  LDX #$00                       ;start out at X = zero

.load_collision_data:

  LDA collide_metatile,x         ;load the meta tile found earlier
  ASL A
  TAY

  LDA [meta_tile_sets_ptr],y     ;load the pointer info for that metatile
  STA meta_tile_ptr
  INY
  LDA [meta_tile_sets_ptr],y
  STA meta_tile_ptr+1

  LDY #$04                       ;load the collision data from the meta tile string
  LDA [meta_tile_ptr],y
  STA collide_data,x             ;store it for later use

  INX
  CPX #$04                       ;repeat for each corner of the meta sprite
  BNE .load_collision_data

;----------------------------------------------------------------------------------

Simply put, this uses the data that we've compiled throughout this exercise and finally pulls the collision data from our game's memory.  If we've made it this far, we are just about done!  Just need to tie up some loose ends and viola!  Success. 


COLLISION DETECTION

Now that we've got this, it is a simple matter of checking a couple positions and determining if we need to move our meta sprite or not. 

Each time we run our Collision_Detection subroutine, the first thing we need to do is clear out some variables: the collision_index variable set and the collide_position set.  You'll notice on these variables we never actually store a value to them.  We either INC them or ADC to them.  So, if we don't reset them every time, we'd have some residual data that would fuck up our routine.

;----------------------------------------------------------------------------------

Collision_Detection:

  LDA #$00                        ;clear out the indexes
  STA collision_index
  STA collision_index+1
  STA collision_index+2
  STA collision_index+3
  STA collide_position
  STA collide_position+1
  STA collide_position+2
  STA collide_position+3

;----------------------------------------------------------------------------------

Next, we JSR to the "Find_Collision_Meta_Tiles" subroutine (i.e. find the collision data) that we just constructed above.  Note that you don't need to JSR here, but if you modify this for platformer use, you'll have to.

Then, if you think about it, in this "top-down" type game, you only run in one direction at any given time...so you only need to check collision in the direction you're moving.  This saves us some effort.  (Again, with a platformer, you are moving up/down and right/left at the SAME time...keep that in mind.)  So, we need ot construct a simple routine that tells the program which direction we want to check:

;----------------------------------------------------------------------------------

Collision_Detection:

  LDA #$00                        ;clear out the indexes
  STA collision_index
  STA collision_index+1
  STA collision_index+2
  STA collision_index+3
  STA collide_position
  STA collide_position+1
  STA collide_position+2
  STA collide_position+3

  JSR Find_Collision_Meta_Tiles   ;find the collision data from the meta tiles

  LDX enemy_number                ;we only need to check the direction we are currently traveling
  LDA enemy_direction,x
  BEQ .up
  CMP #$01
  BEQ .down
  CMP #$02
  BEQ .right
  JMP .left

;----------------------------------------------------------------------------------

Then we will jump to the various directions.  Note that these directions are all pretty much the same, so we'll just go over one of them.  But first, remember the AND function that we learned about from MetalSlime?  We use it here.  You'll remember that we specified the solid/hollow collision data with one bit for each direction in a single byte to save space.  So, we'll have to use the AND command to pull the data for a single direction from this byte.  So, to check collision if we are moving UP:

-load the variable "collide_data" into A (note that this is the upper LEFT corner)
-AND #%00001000 (the UP bit)
      -if A=0, there is no collision, jump to "up1"
      -if A is not = 0, we have a collision!!! 
             -load the correct "collide_position" value that we calculated into A (+1 in this case)
             -store A in sprite_vertical (move the meta sprite to the collision boundary)
             -jump to .continue_on
.up1
-load the variable "collide_data+1" into A (note that this is the upper RIGHT corner)
-AND #%00001000 (the UP bit)
      -if A=0, there is no collision, jump to "up2" (a RTS command)
      -if A is not = 0, we have a collision!!! 
             -load the correct "collide_position" value that we calculated into A (+1 in this case)
             -store A in sprite_vertical (move the meta sprite to the collision boundary)
             -jump to .continue_on
.continue_on (this is just to make the meta sprites do something when they hit a wall, otherwise, they'd just sit there and keep running at the wall)
-check to see if it is the PC (if it is, we don't want to mess with it because we control it)
      -yes, RTS
      -no, continue
-JSR to our direction_change subroutine so that the meta sprite "bounces" off the wall.  However, you can put whatever you want here. 
-RTS

We do this for all four directions and we're done!!

;----------------------------------------------------------------------------------

Collision_Detection:

  LDA #$00                        ;clear out the indexes
  STA collision_index
  STA collision_index+1
  STA collision_index+2
  STA collision_index+3
  STA collide_position
  STA collide_position+1
  STA collide_position+2
  STA collide_position+3

  JSR Find_Collision_Meta_Tiles   ;find the collision data from the meta tiles

  LDX enemy_number                ;we only need to check the direction we are currently traveling
  LDA enemy_direction,x
  BEQ .up
  CMP #$01
  BEQ .down
  CMP #$02
  BEQ .right
  JMP .left

.right
  LDA collide_data+1              ;load the data we found
  AND #%00000010                  ;check only the right direction data
  BEQ .right1                     ;no impact, check the bottom of the sprite
  LDA collide_position+2          ;load the position setting we found
  STA sprite_horizontal           ;store it in the horizontal position of the sprite
  JMP .continue_on                ;jump to the next step
.right1
  LDA collide_data+3              ;same thing on the bottom
  AND #%00000010
  BEQ .right2
  LDA collide_position+2
  STA sprite_horizontal
  JMP .continue_on
.right2                           ;no impact?  Don't do shit!!
  RTS

.left
  LDA collide_data                ;same as above.
  AND #%00000001
  BEQ .left1
  LDA collide_position+3
  STA sprite_horizontal
  JMP .continue_on
.left1
  LDA collide_data+2
  AND #%00000001
  BEQ .left2
  LDA collide_position+3
  STA sprite_horizontal
  JMP .continue_on
.left2
  RTS

.up
  LDA collide_data
  AND #%00001000
  BEQ .up1
  LDA collide_position+1
  STA sprite_vertical
  JMP .continue_on
.up1
  LDA collide_data+1
  AND #%00001000
  BEQ .up2
  LDA collide_position+1
  STA sprite_vertical
  JMP .continue_on
.up2
  RTS
 
.down
  LDA collide_data+2
  AND #%00000100
  BEQ .down1
  LDA collide_position
  STA sprite_vertical
  JMP .continue_on
.down1
  LDA collide_data+3
  AND #%00000100
  BEQ .down2
  LDA collide_position
  STA sprite_vertical
  JMP .continue_on
.down2
  RTS

.continue_on
  LDA enemy_number
  BEQ .done
  JSR direction_change                          ;need to add this in here so that the enemies don't just sit there and run at the walls
.done                                           ;errrr....helments!!  
  RTS

;----------------------------------------------------------------------------------


CALLING THE COLLISION DETECTION ROUTINE

Now that we've written the routine, we'll need to call it either in NMI or our Main Program.  Putting lenghtly stuff in NMI is bad, so we'll put it in the main program.  Think about where we should put it.  We'll have one place for our PC JSR group and on place in our NPC loop. 

For the PC, if you think about it, the place that makes sense is right after we "handle_input".  That way we move our dude based on the controller input, check to see if he hits a wall, then run the graphics updates.  If you put it after the graphics updates, you'd have to run them again if you moved the meta sprite during collision which is a waste of time. 

Note that these "transfer_location" routines are necessary to run the Collision_Detection routine we've set up, but you don't have to make them their own routine.  I do it this way because when I make my own programs, I reference EVERYTHING to the sprite_vertical and sprite_horizontal variables (rather than the Sprite_RAM+X stuff we use here).  I think that the Sprite_RAM stuff is easier to grasp and visualize when you are first starting.  It is a little more difficult to grasp when you use the same variables for everything.  But referencing everything to these two variables makes your routines faster and easier to loop through, IMHO.  But to each his own.

Back on topic, we update our PC JSR group as follows:

;----------------------------------------------------------------------------------

;;;;;;;;;;;;;insert;;;;;;;;;;;;;

  LDA #$00
  STA enemy_number
  STA enemy_ptrnumber

  JSR handle_input

  JSR transfer_location_info

  JSR Collision_Detection

  JSR restore_location_info

  JSR Enemys_Animation

  JSR Enemys_Sprite_Loading

  JSR update_enemy_sprites

  JSR transfer_location_info

  JSR arrow

;;;;;;;;;;;;;insert;;;;;;;;;;;;;

;----------------------------------------------------------------------------------

Then it's basically the same thing in the enemy update routine:

;----------------------------------------------------------------------------------

;;;;;;;;;;;;;insert;;;;;;;;;;;;;

UpdateENEMIES:
  LDA #$01                         ;this loop updates the enemies one at a time in a loop
  STA enemy_number                 ;start with enemy one
  LDA #$02
  STA enemy_ptrnumber
.loop
  JSR enemy_update                 ;move the sprites based on which direction they are headed

  JSR transfer_location_info

  JSR Collision_Detection

  JSR restore_location_info

  JSR Enemys_Animation             ;find out which frame the enemy animation is on
  JSR Enemys_Sprite_Loading        ;update the enemy meta tile graphics
  JSR update_enemy_sprites         ;update position

  LDY #$00            ;arrow       ;sprite collision detection routines
  JSR enemy_collision              ;note that 00, 02, and 04 are to specify the variables of each weapon
  LDY #$02            ;mace
  JSR enemy_collision
  LDY #$04            ;Playable Character
  JSR enemy_collision

  INC enemy_number                 ;incriment the enemy number for the next trip through the loop
  INC enemy_ptrnumber              ;these are addresses for the graphics data, so we need to keep it at 2x the enemy number
  INC enemy_ptrnumber
  LDA enemy_number
  CMP #$04                         ;if it is 4, we have updated enemies 0,1,2,3 so we are done
  BNE .loop
UpdateENEMIESdone:

;;;;;;;;;;;;;insert;;;;;;;;;;;;;

;----------------------------------------------------------------------------------


END GAME

I think that's about it.  You should have a pretty good start to a background collision engine.  I would suggest that you take and modify the rooms to see that it infact updates the collision detection automatically.  Then change some of the collision properties of the various meta tiles.  Then add in some simple op-codes like infront/behind some hollow background stuff or something.  Play around and see what you can come up with.  Maybe expand the map to be sure you understand the room loading/switching routines.

Modifying this for use in a platformer is pretty simple.  I'll try to sit down and write something up for that when I get time.  Scrolling is somewhat more complex.  Basically you'd just have to use your scroll values to modify your index that pulls data from the background tables and the collide_position variables will need changing.  If I do this one, it will be a while as scrolling and I don't really see eye to eye...YET! 

Please enjoy and let me know if you have any questions.

Until next time !!


-------------------------

This is my shiny thing, and if you try to take it off me, I may have to eat you.

Check out my dev blog.


Edited: 09/17/2010 at 10:53 AM by Mario's Right Nut

Sep 17, 2010 at 10:59:33 AM
MODERATOR
jonebone (554)
avatar
(Collector Extraordinaire) < Luigi >
Posts: 26634 - Joined: 11/20/2008
Maryland
Profile
I never have touched NES programming, but I remember what a pain in the ass collision detection was as a senior in my Computer Graphics class.

We coded in OpenGL and we had to make a program with "boids", aka artificial birds that exhibit flocking behavior. It was basically a 3D environment where the boids would chase a cursor reticule. But they had to be smart enough to maintain proper distance and position from each other, as well as avoid collisions with the jagged terrain below (mountains).

It was a huge PITA with complex trigonometry for rotations / positions, as well as linear algebra and vectors for recording velocities.

Thank god that is all behind me, but best of luck to anyone pursuing this on the NES. It's difficult but certainly manageable if you remain dedicated and THOROUGHLY TEST YOUR CODE ALL ALONG THE WAY (#1 rule).

-------------------------
WTB CIB MINT Games: NES - SNES - N64 - Sega Genesis - Turbografx 16
Last Beat: West of Loathing (Switch)
Now Playing: Overcooked 2 (Switch) / Spider-Man (PS4)
My eBay 10% off on NintendoAge! 
https://www.ebay.com/sch/jonebone...=

Mar 21, 2012 at 10:23:37 AM
DoNotWant (1)

(Ham Sammich) < Eggplant Wizard >
Posts: 441 - Joined: 12/08/2011
Sweden
Profile
Hey, I'm working on this right now, but I'm making it for a platformer, but it's a little tricky to understand.
I got the background and sprite loading working as it should, and I pretty much just copied the code from this tutorial to
it, and here is where the problems start.


The CollisionDetection sub is a tad bit different:


CollisionDetection:
LDA #$00
STA collisionIndex
STA collisionIndex + 1
STA collisionIndex + 2
STA collisionIndex + 3
STA collidePosition
STA collidePosition + 1
STA collidePosition + 2
STA collidePosition + 3

JSR FindMetaTileCollision

LDA eddieDirection
CMP #$02
BEQ .left
CMP #$03
BEQ .right
JMP .return

.left:
LDA collideData
AND #%00000001
BEQ .left2
LDA collidePosition + 3
STA spriteHorizontal
JMP .return
.left2:
LDA collideData + 2
AND #%00000001
BEQ .return
LDA collidePosition + 3
STA spriteHorizontal
JMP .return

.right:
LDA collideData + 1
AND #%00000010
BEQ .right2
LDA collidePosition + 2
STA spriteHorizontal
JMP .return
.right2:
LDA collideData + 3
AND #%00000010
BEQ .return
LDA collidePosition + 2
STA spriteHorizontal

.return:
RTS


eddieDirection works like this: $00 standing still looking left, $01 standing still looking right
$02 moving left, $03 moving right


When I try to move now tho, I kinda get stuck right away, doesn't matter if I move left or right.
Is it the vertical and horizontal positions that has to be reworked?
I have stripped away the game states, weapons and NPCs in my project as to make the code more noob friendly,
so I don't know if I'm missing something from those parts of the tutorial that is needed here.


Also:


MetaTileSetA00:
.db $04, $04, $04, $04, %00001111


What is it that make the last byte there work as it does(or in my case, as it should but doesn't)?


Thanks!

-------------------------
 

Mar 22, 2012 at 11:22:37 AM
Mario's Right Nut (352)
avatar
(Cunt Punch) < Bowser >
Posts: 6634 - Joined: 11/21/2008
Texas
Profile
Making it work for a platformer is somewhat more complicated.

First, the last byte in that statement is the collision data for that meta tile. One bit for each direction. 1 = solid, 0 = hollow.

Anyway, on paltformer you have to look at order of operations. i.e. if you have gravity, then you are moving at least one pixel down each frame. So, when moving right and left, you will run into the solid blocks that you overlap (the ground) when you sink for gravity IF you test right and left before you correct for this vertical component.

But if you move into a wall while jumping, you'll overlap the wall by moving forward...so if you don't correct for the horizontal component first, you'll be overlapping the wall when you check the vertical component.

Kinda make sense?

Basically, you either have to do the vertical check, relook up the collision meta tiles, and then check horizontal (or vice versa if you are jumping) or correct for the overlap before you seek out the meta tiles.

It's not really that hard to fix, but you just have to sit down and think about what it's doing physically.

I'm really bad at explaining this stuff. Do you understand what I'm saying? It's order of operations because you are checking two directions per frame for platformer rather than just one with the top down.

-------------------------

This is my shiny thing, and if you try to take it off me, I may have to eat you.

Check out my dev blog.


Edited: 03/22/2012 at 11:23 AM by Mario's Right Nut

Mar 22, 2012 at 2:59:25 PM
DoNotWant (1)

(Ham Sammich) < Eggplant Wizard >
Posts: 441 - Joined: 12/08/2011
Sweden
Profile
Hey!
I sort of understand what you are saying, I think I will get it sooner or later, I just have to familiarize myself a little more with your code. Maybe I'll do a flow chart kinda thingy to understand it better.
Thanks a lot!

-------------------------
 

May 28, 2014 at 1:07:34 AM
abyssdoor (0)

< Cherub >
Posts: 4 - Joined: 01/30/2013
Mexico
Profile
I don't know what I'm doing... I'm trying to see if I can work this into a platformer, so I make the player move 1 pixel down each frame:


;;;;;;;;;;;;;;;;;;;;;;;;;;;;;;;;;;;;;;;;;;;;;;;;;;;;;;;;;;;;;;;;;;;;;;;;;;;;;;;;;;;;;;;;;;;;;;;;;;;;;;
;-----NMI ROUTINE, MAIN TOP DOWN VIEW GAME STATE #$00------------------------------------------------;
;;;;;;;;;;;;;;;;;;;;;;;;;;;;;;;;;;;;;;;;;;;;;;;;;;;;;;;;;;;;;;;;;;;;;;;;;;;;;;;;;;;;;;;;;;;;;;;;;;;;;;

GameStateNMI0:

JSR LoadPartialBank ;load the CHR_ROM data into RAM. This can only be done during NMI!!
INC sprite_RAM ;;;<<<<<<<<<<<<
RTS

;-------------------------------


So to compensate for always moving down I made a little change here:


;----------------------------------------------------------------------------------------------------------

Collision_Detection:

LDA #$00 ;clear out the indexes
STA collision_index
STA collision_index+1
STA collision_index+2
STA collision_index+3
STA collide_position
STA collide_position+1
STA collide_position+2
STA collide_position+3

JSR Find_Collision_Meta_Tiles ;find the collision data from the meta tiles

LDX enemy_number ;we only need to check the direction we are currently traveling

;;;;;;;;;;insert;;;;;;;;;;
LDA collide_data+2
AND #%00000100
BEQ .lolo1
LDA collide_position
STA sprite_vertical
JMP .continue_on2
.lolo1
LDA collide_data+3
AND #%00000100
BEQ .continue_on2
LDA collide_position
STA sprite_vertical

.continue_on2

;;;;;;;;;;end insert;;;;;;;;

LDA enemy_direction,x
BEQ .up
CMP #$01
BEQ .down
CMP #$02
BEQ .right
JMP .left

.right
LDA collide_data+1 ;load the data we found
AND #%00000010 ;check only the right direction data
BEQ .right1 ;no impact, check the bottom of the sprite
LDA collide_position+2 ;load the position setting we found
STA sprite_horizontal ;store it in the horizontal position of the sprite
JMP .continue_on ;jump to the next step
.right1
LDA collide_data+3 ;same thing on the bottom
AND #%00000010
BEQ .right2
LDA collide_position+2
STA sprite_horizontal
JMP .continue_on
.right2 ;no impact? Don't do shit!!
RTS

.left
LDA collide_data ;same as above.
AND #%00000001
BEQ .left1
LDA collide_position+3
STA sprite_horizontal
JMP .continue_on
.left1
LDA collide_data+2
AND #%00000001
BEQ .left2
LDA collide_position+3
STA sprite_horizontal
JMP .continue_on
.left2
RTS

.up
LDA collide_data
AND #%00001000
BEQ .up1
LDA collide_position+1
STA sprite_vertical
JMP .continue_on
.up1
LDA collide_data+1
AND #%00001000
BEQ .up2
LDA collide_position+1
STA sprite_vertical
JMP .continue_on
.up2
RTS

.down
LDA collide_data+2
AND #%00000100
BEQ .down1
LDA collide_position
STA sprite_vertical
JMP .continue_on
.down1
LDA collide_data+3
AND #%00000100
BEQ .down2
LDA collide_position
STA sprite_vertical
JMP .continue_on
.down2
RTS

.continue_on
LDA enemy_number
BEQ .done
JSR direction_change ;need to add this in here so that the enemies don't just sit there and run at the walls
.done ;errrr....helments!!
RTS

;-----------------------------------------------------------------------------------------------------


Now it stops when our char reaches the ground (room is a box of bricks, player starts at vert=$10,hor=$78), but moving left and right makes... crazy things (have to see it to believe it...)


Edited: 05/28/2014 at 01:09 AM by abyssdoor

May 28, 2014 at 9:13:14 AM
Mario's Right Nut (352)
avatar
(Cunt Punch) < Bowser >
Posts: 6634 - Joined: 11/21/2008
Texas
Profile
A platformer using this engine is a little more involved, but not too difficult. You basically have to loop the character through the routine twice. Once for up/down and once for left/right. You will have different collision data and collision positions for each direction, so you'll probably have to re-pull the data for each direction. So...

Pull collision position for up/down
Check up/down
Adjust character position -->This is important, don't make all adjustments at the end.
Pull collision position for right/left
Check right/left
Adjust character position

I seem to remember it working better if you checked right/left or up/down first as opposed to the opposite...I just can't remember which it was. But this should get you started.

-------------------------

This is my shiny thing, and if you try to take it off me, I may have to eat you.

Check out my dev blog.


May 28, 2014 at 1:15:19 PM
abyssdoor (0)

< Cherub >
Posts: 4 - Joined: 01/30/2013
Mexico
Profile
thank you

Jun 1, 2015 at 10:32:03 AM
SoleGooseProductions (129)
avatar
(Beau ) < King Solomon >
Posts: 3504 - Joined: 04/22/2013
Michigan
Profile
Bah, this one drives me crazy when it comes to changing the collision box. I was able to get it so that the character moved halfway up the next metatile (to create the illusion of depth), but what about changing the size to say a 6x6 box (i.e. one pixel in on each side of the box). Something about all of this eludes me, and I am not sure why. I get what needs to be changed, I think, but when it comes time to put it together problems arise. The two parts of code that need to be changed, if I am not mistaken are the boundaries of the box:

LDA sprite_vertical ;transfer correct collision box coords
CLC
ADC #$02 ;to change this, must change DEC below to keep him from flashing (comes later)
STA collide_vertical ;here we set the boundries of the collision detection for the metasprites
STA collide_vertical+1 ;note that here we assume that all of the sprites are the same size

LDA sprite_vertical ;if your sprites are different, you'll have to add a subroutine here
CLC
ADC #$10
STA collide_vertical+2
STA collide_vertical+3

LDA sprite_horizontal
CLC
ADC #$03
STA collide_horizontal
STA collide_horizontal+2

LDA sprite_horizontal
CLC
ADC #$0C
STA collide_horizontal+1
STA collide_horizontal+3

;----------------------------------------------------------------------------------


And also our posiiton within the metatile as determined here:

.position_finder
LDX collide_position ;find the various stop places in the grid using our positions above
LDA vertical_positions,x
STA collide_position
INX
LDA vertical_positions,x
LDX collide_position+1
STA collide_position+1
DEC collide_position+1 ;must change this if guy flashes
LDA horizontal_positions,x
CLC
ADC #$06 ;must change this if guy flashes
STA collide_position+2
INX
LDA horizontal_positions,x
STA collide_position+3

;----------------------------------------------------------------------------------

The one part that I am not sure what is happening is with the X vlaue in the position finder section. When it moves from the vertical to the horizontal position, X is not increased. If we dumbed it down (de-optimized it), and wrote it out plainly as a series of additon and subtraction statements to the various collide positions, what would the position finder look like? I guess that I just need to see what exactly is going on, since any changes that I make seem to do more than what I had intended, or not what I had intended. Thanks .

-------------------------
"The light that burns twice as bright burns half as long..." ~ Blade Runner

SoleGooseProductions.com


Jan 14, 2016 at 3:16:30 PM
insomniakc (0)
avatar
< Little Mac >
Posts: 86 - Joined: 01/12/2016
Ontario
Profile
Hi MRN,

First off, thanks for the tutorials. They have been very useful for me in my NES programming.

So I'm trying to wrap my head around Game States in your code. I have a program I made which is an animation with 64 sprites using MMC1, and I want to put that whole program into a game state and use it as an intro...

I'm copy-pasting large sections of my own code, and it breaks down. If you could give me a basic summary of the Game States code, that would be very helpful, as well as suggestions on how to make the bank loading routine work in your program on MMC1. I have some experience doing this with my own program, but when I try to merge your program with mine, well things get really messy really quick.

I have managed to import my own sprites, character data, and metatile arrays into your program, and have figured out large sections of the code, but the gamestate0, gamestate1, gamestate0NMI, gamestate1NMI, etc. How do I add more and get them to work? I'm missing something...

Jan 14, 2016 at 4:41:53 PM
Mega Mario Man (63)
avatar
(Tim ) < Ridley Wrangler >
Posts: 2743 - Joined: 02/13/2014
Nebraska
Profile
Originally posted by: insomniakc

Hi MRN,

First off, thanks for the tutorials. They have been very useful for me in my NES programming.

So I'm trying to wrap my head around Game States in your code. I have a program I made which is an animation with 64 sprites using MMC1, and I want to put that whole program into a game state and use it as an intro...

I'm copy-pasting large sections of my own code, and it breaks down. If you could give me a basic summary of the Game States code, that would be very helpful, as well as suggestions on how to make the bank loading routine work in your program on MMC1. I have some experience doing this with my own program, but when I try to merge your program with mine, well things get really messy really quick.

I have managed to import my own sprites, character data, and metatile arrays into your program, and have figured out large sections of the code, but the gamestate0, gamestate1, gamestate0NMI, gamestate1NMI, etc. How do I add more and get them to work? I'm missing something...
Let's see if I can break this down for you. Make sure you never bankswitch any of this code away or it will bomb your code. Keep this in a fixed bank. This is basically every piece of code related to switching game states.

Start with constants. Each one of those are a game state with a designated number.
;-----------------------------------------------------------
;-------------------DECLARE CONSTANTS-----------------------  <-----This comes right after Variables
;-----------------------------------------------------------
;GAME STATES
STATETITLE     = $00  ; displaying title screen
STATEPLAYING   = $01  ; begin game
STATEGAMEOVER  = $02  ; displaying game over screen
STATEPAUSE     = $03  ; display pause screen
STATEROUND     = $04  ; display round screen
STATEP1MENU       = $05  ; display 1 player Menu Screen
STATEP2MENU       = $06  ; display 2 player Menu Screen
STATERULESMENU = $07  ; display rules menu page
                     <------ADD NEW GAME STATE HERE = $08


Game state code in the Forever Loop. Called every frame and checks to see if the variable GameState has changed. If so, load new game state.

;before we start the game, here are a couple of clean up codes as to make sure you are starting with the first game state.  In this case, we are starting with the Title Screen game state.
  JSR StartTitle     <--Sets the Initial Game State before your main code begins. Do this right before the Forever loop.
 
  LDA #$00           <---CALL GameStateUpdate next to make sure that the JSR StartTitle takes effect before starting the game.
  JSR GameStateUpdate

Forever:
INC sleeping                     ;wait for NMI

.loop
  LDA sleeping
  BNE .loop                        ;wait for NMI to clear out the sleeping flag

;SOME GAME CODE

 JSR GameStateIndirect

  LDA GameState                               <----COMPARE GAME STATE TO SEE IF IT NEEDS TO CHANGE
  CMP GameStateOld
  BEQ .next

  JSR GameStateUpdate                   <-------- IF GAMESTATE CHANGED, THIS ROUTINE WILL UPDATE THE VARIABLES TO SWITCH TO THE PROPER GAME STATE IN THE MAIN CODE

.next

  LDA #$00
  STA updating_background
  JMP Forever     ;jump back to Forever, and go back to sleep


Add the new state to the GameStates: and GameStateNMIs: tables. They correspond to the constants listed above. STATETITLE = EngineTitle and EngineTitleNMI
;----------------------------------------------------------------------------------
;-----------------------GAME STATE LOADING ROUTINE---------------------------------
;----------------------------------------------------------------------------------
GameStateIndirect:         ;indirect jump to main program
  JMP [Main_Pointer]

GameStateNMIIndirect:      ;indirect jump to NMI routine
  JMP [NMI_Pointer]

;;;;;;;;;;;;;;;;;;;
GameStates:
  .word EngineTitle,EnginePlaying,EngineGameOver,EnginePause,EngineRound
  .word EngineP1Menu,EngineP2Menu,EngineRulesMenu  <------ADD NEW GAME STATE HERE

GameStateNMIs:
  .word EngineTitleNMI,EnginePlayingNMI,EngineGameOverNMI,EnginePauseNMI,EngineRoundNMI
  .word EngineP1MenuNMI,EngineP2MenuNMI,EngineRulesMenuNMI <------ADD NEW GAME STATE NMI HERE

;;;;;;;;;;;;;;;;;;;
GameStateUpdate:             ;load the game state and NMI pointers
  LDA GameState
  STA GameStateOld
  ASL A                      ;multiply by two
  TAX

  LDA GameStates,x           ;Load the Main Program Pointer
  STA Main_Pointer
  LDA GameStates+1,x
  STA Main_Pointer+1

  LDA GameStateNMIs,x
  STA NMI_Pointer
  LDA GameStateNMIs+1,x
  STA NMI_Pointer+1

  RTS 


ADD THIS TO THE NMI SECTION BEFORE PPU CLEAN UP. This will jump to the 'GameStateNMI' (ex: EngineTitleNMI) and run code in there every NMI
 JSR GameStateNMIIndirect


This is where the games engines reside. In the main code.
;--------------------------------------------------------------------
;-----------------------GAME ENGINES---------------------------------
;--------------------------------------------------------------------
EngineTitle:            ;Title Engine - Displays Title
        LDA buttons1_pressed       ; player 1 - start
        AND #%00010000           ; only look at bit 5
        BEQ EngineTitleDone
 
                 JSR StartEnginePlaying       ;If start button is press on Title Screen, just to StartEnginePlaying Routine to jump to that game state

EngineTitleDone:
  RTS
 
  EngineTitleNMI:
  RTS

;;;;;;;;;;;;;;;;;;;;;;;;;;;;;;;;;;;;;;;;;;;;;;;;;;;;;;;;;;;;;;;;;;;;;;;;;;;;;;;;;;;;;;;;;;;;;;;;;;;;;;;;;;;;;;;;;;;;;;;;;;;;;;;;;;;;;;;;;;;;;;;;;;;;;;;;;;;;;;;;;;
EnginePlaying:     ;Main Playing Engine - Actual Game Play
    JSR handle_input          ;Subroutine that Checks what buttons are being pressed
    JSR GameOver     ;This routine would check to see if conditions are correct to end the game. If yes, then it would call the next game state.
   
EnginePlayingDone:
  RTS

  EnginePlayingNMI:                   ;This runs from the NMI routine. Included sample code for show
    JSR DrawNumbers                ;;Update the Round Scores
  RTS

;;;;;;;;;;;;;;;;;;;;;;;;;;;;;;;;;;;;;;;;;;;;;;;;;;;;;;;;;;;;;;;;;;;;;;;;;;;;;;;;;;;;;;;;;;;;;;;;;;;;;;;;;;;;;;;;;;;;;;;;;;;;;;;;;;;;;;;;;;;;;;;;;;;;;;;;;;;;;;;;;;
EngineGameOver:         ;Game Over Engine - Displays Game Over Screen
 LDA buttons1_pressed       ; player 1 - start, if pressed, exits EngineGameOver state and loads EngineTitle state
  AND #%00010000             ; only look at bit 5
  BEQ EngineGameOverDone
       JSR StartTitle                     ;When Start is Pressed, Switch to #STATETITLE
    
EngineGameOverDone:
  RTS
 
  EngineGameOverNMI:

  RTS


Here is where you switch game states.
;-----------------------------------------------------------  
;------------------START ENGINE PLAYING---------------------
;-----------------------------------------------------------
StartEnginePlaying:   
  LDA GameState
  STA GameState+1  
        
  LDA #STATEPLAYING
  STA GameState

  JSR DisablePPU                        ;DISABLE PPU
            ;CODE HERE FOR LOADING BACKGROUND AND PALETTE
  INC EnablePPUFlag                ;Tells the NMI to turn the PPU back on
    
StartEnginePlayingDone:
  RTS
;-----------------------------------------------------------  
;------------------------GAME OVER--------------------------
;----------------------------------------------------------- 
GameOver:
  ;CODE TO CHECK IF CONDITIONS ARE RIGHT FOR GAME OVER, IF YES THEN RUN CODE BELOW TO SWITCH GAME STATES TO #STATEGAMEOVER
    LDA GameState
    STA GameState+1
    
    LDA #STATEGAMEOVER
    STA GameState
    
    LDA #$FF                ;Hide Sprites (sample code)
    STA spriteRAM
    STA HitRAM+1
    STA HitRAM+5
    STA HitRAM+9
    STA HitRAM+13    
 
  JSR DisablePPU                        ;DISABLE PPU
            ;CODE HERE FOR LOADING BACKGROUND AND PALETTE
  INC EnablePPUFlag                ;Tells the NMI to turn the PPU back on

GameOverDone:
    RTS

;-----------------------------------------------------------  
;-----------------------START TITLE-------------------------
;-----------------------------------------------------------
StartTitle:    
  LDA GameState
  STA GameState+1
 
  LDA #STATETITLE                     ;Load Title Screen State
  STA GameState   
 
     JSR DisablePPU                        ;DISABLE PPU
            ;CODE HERE FOR LOADING BACKGROUND AND PALETTE
  INC EnablePPUFlag                ;Tells the NMI to turn the PPU back on
 
StartTitleDone:
  RTS

-------------------------
Current Project
Isometric Survival Horror

Older Projects
Tailgate Party, Power Pad Demo, Happy Hour

Links
Store, Facebook, Twitter

Jan 14, 2016 at 5:55:22 PM
insomniakc (0)
avatar
< Little Mac >
Posts: 86 - Joined: 01/12/2016
Ontario
Profile
Thanks, if I have any questions down the road I'll edit this post but wow, outstanding response Mega Mario Man =)


Edit: OK, so I have a chunk of code which runs in the forever loop in my title program that cycles through the sprites for the animation. Do I just stick this code in a subroutine? Also, if that's the case, where do I call that subroutine so that it loops during the intro? This is the code in question:

  ldy #$FF
UpdateFrame:
  iny
  lda [framelow], y
  sty multi
  asl multi
  asl multi
  ldx multi
  sta $0201, x
  cpy #$3F
  bne UpdateFrame


  lda framelow
  clc
  adc #64
  sta framelow

  lda framehigh
  adc #0
  sta framehigh

setPalette:
  ldx bankCounter
  cpx #$24
  bne skip1
  ldy #$01
  jsr changePalette
skip1:
  ldx bankCounter
  cpx #$4F
  bne skip2
  ldy #$00
  jsr changePalette
skip2:

resetFrames:
  ldx bankCounter
  cpx #$6E
  bne skip3
  lda #low(frames)
  sta framelow
  lda #high(frames)
  sta framehigh
  lda #low(bankselector)
  sta banklow
  lda #high(bankselector)
  sta bankhigh
  lda #$FF
  sta bankCounter


skip3:

  inc bankCounter


Wait:
  jsr spinWheels
  jsr spinWheels


The problem I have is where to put this so it only runs during EngineTitle:

Thanks again!


Edited: 01/14/2016 at 06:30 PM by insomniakc

Jan 14, 2016 at 7:30:54 PM
Mega Mario Man (63)
avatar
(Tim ) < Ridley Wrangler >
Posts: 2743 - Joined: 02/13/2014
Nebraska
Profile
Originally posted by: insomniakc

Thanks, if I have any questions down the road I'll edit this post but wow, outstanding response Mega Mario Man =)


Edit: OK, so I have a chunk of code which runs in the forever loop in my title program that cycles through the sprites for the animation. Do I just stick this code in a subroutine? Also, if that's the case, where do I call that subroutine so that it loops during the intro? This is the code in question:


The problem I have is where to put this so it only runs during EngineTitle:

Thanks again!
Place subroutine in the bolded area. This will run your code once every frame.

;--------------------------------------------------------------------
;-----------------------GAME ENGINES---------------------------------
;--------------------------------------------------------------------
EngineTitle:            ;Title Engine - Displays Title
  JSR YourSubRoutine ; PUT THE SUBROUTINE HERE THAT CALLS YOUR CODE


        LDA buttons1_pressed       ; player 1 - start
        AND #%00010000           ; only look at bit 5
        BEQ EngineTitleDone
 
                 JSR StartEnginePlaying       ;If start button is press on Title Screen, just to StartEnginePlaying Routine to jump to that game state

EngineTitleDone:
  RTS
 
  EngineTitleNMI:
  RTS

YourSubRoutine:
   ldy #$FF
UpdateFrame:
  iny
  lda [framelow], y
  sty multi
  asl multi
  asl multi
  ldx multi
  sta $0201, x
  cpy #$3F
  bne UpdateFrame


  lda framelow
  clc
  adc #64
  sta framelow

  lda framehigh
  adc #0
  sta framehigh

setPalette:
  ldx bankCounter
  cpx #$24
  bne skip1
  ldy #$01
  jsr changePalette
skip1:
  ldx bankCounter
  cpx #$4F
  bne skip2
  ldy #$00
  jsr changePalette
skip2:

resetFrames:
  ldx bankCounter
  cpx #$6E
  bne skip3
  lda #low(frames)
  sta framelow
  lda #high(frames)
  sta framehigh
  lda #low(bankselector)
  sta banklow
  lda #high(bankselector)
  sta bankhigh
  lda #$FF
  sta bankCounter


skip3:

  inc bankCounter


Wait:
  jsr spinWheels
  jsr spinWheels

RTS     <----Don't forget that!!!

-------------------------
Current Project
Isometric Survival Horror

Older Projects
Tailgate Party, Power Pad Demo, Happy Hour

Links
Store, Facebook, Twitter

Jan 14, 2016 at 10:37:32 PM
insomniakc (0)
avatar
< Little Mac >
Posts: 86 - Joined: 01/12/2016
Ontario
Profile
The game state is failing to load, as are the graphics and palettes. I know there are several things wrong. Firstly, I need to set up my banks properly, and I have 12 CHR sets that are swapped between in the original intro program I am merging into this subroutine. Secondly, I need those banks to coexist with the graphics data I have included in MRN's program as a replacement for his graphics and tables. I also need to figure out what to send to the bank swap routines for MMC1 given the change in bank locations, and also figure out why there is nothing loaded into the PPU at all. There is an important bin file referenced in this which is an array of bank numbers frame by frame, as frames of animation are reused. I do need to change this info too at some point, but not until I have something showing on the screen and in memory which reflects what I am after.

Attached is a mix of MRN's code, my code, and your snippets incorporated into what I got stuck not knowing where to go with. Please help...

(for some reason, I "broke the internet" and needed to use dropbox. just the asm file included, unless you need to look at anything else referenced in there)

https://db.tt/lTe7d9go...

Jan 14, 2016 at 11:34:36 PM
SoleGooseProductions (129)
avatar
(Beau ) < King Solomon >
Posts: 3504 - Joined: 04/22/2013
Michigan
Profile
Sorry, I can't look at your code at the moment, but are you loading things like background graphics and other PPU writes in a separate state, or all within the same state? It took me a long time to wrap my head around the idea of game states, but you may already have the general idea figured out.

-------------------------
"The light that burns twice as bright burns half as long..." ~ Blade Runner

SoleGooseProductions.com


Jan 15, 2016 at 1:43:18 AM
Mega Mario Man (63)
avatar
(Tim ) < Ridley Wrangler >
Posts: 2743 - Joined: 02/13/2014
Nebraska
Profile
Originally posted by: insomniakc

The game state is failing to load, as are the graphics and palettes. I know there are several things wrong. Firstly, I need to set up my banks properly, and I have 12 CHR sets that are swapped between in the original intro program I am merging into this subroutine. Secondly, I need those banks to coexist with the graphics data I have included in MRN's program as a replacement for his graphics and tables. I also need to figure out what to send to the bank swap routines for MMC1 given the change in bank locations, and also figure out why there is nothing loaded into the PPU at all. There is an important bin file referenced in this which is an array of bank numbers frame by frame, as frames of animation are reused. I do need to change this info too at some point, but not until I have something showing on the screen and in memory which reflects what I am after.

Attached is a mix of MRN's code, my code, and your snippets incorporated into what I got stuck not knowing where to go with. Please help...

(for some reason, I "broke the internet" and needed to use dropbox. just the asm file included, unless you need to look at anything else referenced in there)

https://db.tt/lTe7d9go
EDITTED AN ERROR!!


There looks to be a whole lot wrong with this file with banking. I think you need to have a look over bunnyboy's MMC1 bank switching Advanced Nerdy Nights tutorial before continuing. I honestly have no idea how your code is compiling properly. Your header is wrong and your banks are wrong. I give just a couple quick pointers below, however, you really need to master and understand Advance Nerdy Nights #2 before trying to mearge in MRN's code to MMC1. For the most part, your Game State code looks ok except for a couple minor things with enabling the PPU. You must only enable the PPU during NMI. Doing it in the game code will write undesired results to the screen.

;;;;;;;First fix this;;;;;;;;;;;;;;;;
Game Code

JSR DisablePPU  ;Do all back ground updates with the PPU off  
    ;BACKGROUND AND PAL LOADING CODE
INC EnablePPUFlag                ;Tells the NMI to turn the PPU back on
*Do not do JSR EnablePPU right after this. Once you INC the Flag, the NMI will turn on the PPU as shown in the next code.

NMI Code
  ;Replace this

  LDA #%00011110                   ;enable sprites, enable background, no clipping on left side
  STA $2001


  ;With this
LDA EnablePPUFlag
  BEQ .SKIP
     JSR EnablePPU
    
    DEC EnablePPUFlag    <---I Forgot this so I edited the post to reflect this change.
  .SKIP:


;;;;;;;Study up on MMC1 banking soem more;;;;;;;;;;;;;;;;
Advanced Nerdy Nights #2 (MMC1 CHR and PRG Bank Switching): http://nintendoage.com/forum/mess...

No idea how this is working:
I have no idea how large those .chr files are, but only 8KB can go in a bank. My .chr files are 4kb a piece.
.bank 4
  .org $0000
  .incbin "eclipse1.chr"
  .incbin "eclipse2.chr"
  .incbin "eclipse3.chr"
  .incbin "eclipse4.chr"
  .incbin "eclipse5.chr"
  .incbin "eclipse6.chr"
  .incbin "eclipse7.chr"
  .incbin "eclipse8.chr"
  .incbin "eclipse9.chr"
  .incbin "eclipse10.chr"
  .incbin "eclipse11.chr"
  .incbin "eclipse12.chr"

Banks should look more like this in MMC1 (taken from Advanced Nerdy Nights 2). Each bank is 8KB. Registers $8000-$BFFF are swappable. Registers $C000-$FFFF are fixed (all game code that needs to be fixed needs to go in .bank 15, such as your game engine code.)
  .bank 0
  .org $8000
  .include "bgandpal.asm"

  .bank 1
  .org $A000
 
  .bank 2
  .org $8000

  .bank 3
  .org $A000

  .bank 4
  .org $8000

  .bank 5
  .org $A000

  .bank 6
  .org $8000

  .bank 7
  .org $A000

  .bank 8
  .org $8000

  .bank 9
  .org $A000

  .bank 10
  .org $8000

  .bank 11
  .org $A000

  .bank 12
  .org $8000

  .bank 13
  .org $A000

  .bank 14
  .org $C000   ;;8KB graphics in this fixed bank
Graphics:
  .incbin "cornhole.chr"

  .bank 15    ;all code will go in the last 8KB, which is not a swappable bank
  .org $E000    


;;;;;;;Fix Header;;;;;;;;;;;;;;;;
Your mapper is still set uo for NROM, not MMC1. Also, mirroring is ignored in the header in MMC1. Mirroring must be set in the code. Explained in the MMC1 Bank Switching Tutorial I linked above. I would look into the .inechr part as well, I can't recall what the max is for MMC1. 16 seems like a lot, but it may be right. Personally, I set it to 0, put all my CHR Data into PRG, and just load my graphics into CHRRAM. CHRRAM is touched on in the link Advanced Nerdy Nights 2 tutorial.
  .inesprg $02   ; 2x 16KB PRG code
  .ineschr $16   ; 0x  8KB CHR data
  .inesmap $00   ; mapper 0 = NROM, no bank swapping. Should be mapper 1
  .inesmir $01   ; background mirroring <----Should be .inesmir %10


I hope this all makes a little sense. I'm guessing this has lot to do with your screen loading issues. Only your main file was available to download, so I can't see any of your subfiles or attempt to compile your code to see any errors.
 

-------------------------
Current Project
Isometric Survival Horror

Older Projects
Tailgate Party, Power Pad Demo, Happy Hour

Links
Store, Facebook, Twitter


Edited: 01/15/2016 at 10:52 AM by Mega Mario Man

Jan 15, 2016 at 8:21:12 AM
insomniakc (0)
avatar
< Little Mac >
Posts: 86 - Joined: 01/12/2016
Ontario
Profile
Good morning, and thanks for another excellent response. Part of the problem is that I figured out most of that stuff like a year ago then put NES programming down and did other things, so now a lot of that info is fading and yes, I do need to study up on my nerdy nights once again. Actually, I couldn't figure out why it was assembling earlier, which is why I attached the ASM file here last night. I'll PM you with a zipped project folder in roughly 2-4 hours time, just gonna put some solid work into not only understanding, but implementing your advice and revisiting the NN tutorials.

About the CHR-ROM banks, they are 4kb x2 files merged into 8kb banks, and then the 4 kb sections are swapped between using the bank swapping SRs. At least that's what is supposed to happen (and it works in my original Eclipse7.asm file).

Jan 15, 2016 at 9:37:41 AM
Mega Mario Man (63)
avatar
(Tim ) < Ridley Wrangler >
Posts: 2743 - Joined: 02/13/2014
Nebraska
Profile
Originally posted by: insomniakc

Good morning, and thanks for another excellent response. Part of the problem is that I figured out most of that stuff like a year ago then put NES programming down and did other things, so now a lot of that info is fading and yes, I do need to study up on my nerdy nights once again. Actually, I couldn't figure out why it was assembling earlier, which is why I attached the ASM file here last night. I'll PM you with a zipped project folder in roughly 2-4 hours time, just gonna put some solid work into not only understanding, but implementing your advice and revisiting the NN tutorials.

About the CHR-ROM banks, they are 4kb x2 files merged into 8kb banks, and then the 4 kb sections are swapped between using the bank swapping SRs. At least that's what is supposed to happen (and it works in my original Eclipse7.asm file).


I got to thinking about this in the middle of the night (instead of sleeping) and with what it looks like you are trying to do, CHRRAM is probably not going to work. I assume you are trying to animate the background with bankswitching by swapping CHRROM files.

Feel free to pm me. It may not be until late tonight, but I will try to look at it. I am in about the same boat as you, started learning and life forced me to break for about a year. Then came back to it a couple of months ago and learned back switching. I still don't have mappers grasped 100%, but I slowly understand a bit more every day. KHAN probably dreads checking his messages knowing it it likely me asking for help again!

-------------------------
Current Project
Isometric Survival Horror

Older Projects
Tailgate Party, Power Pad Demo, Happy Hour

Links
Store, Facebook, Twitter

Jan 15, 2016 at 10:33:42 AM
insomniakc (0)
avatar
< Little Mac >
Posts: 86 - Joined: 01/12/2016
Ontario
Profile
The CHR-ROM bankswitching routine works smoothely in the original eclipse title and yes, I bank switch once per frame to the next frame of animation data, then increment an index pointing to an array of sprite update tables, if that makes any sense. I'd be happy to share that code along with an assemble folder. The eclipse animation actually plays on original NES hardware without any problems, so I know it's a good program, but merging it into this more advanced program is doing my head in %_%

It's been 2 years on and off for me with 6502. I did programming in JAVA, Visual Basic, Basic, and a few other things back in the 90s when my 3-years older brother was a programming child prodigy and I tinkered with stuff in my spare time but didn't put in the hours he did to properly learn everything. That's why I'm sort of forcing myself to only use assembly languages for everything for the next while, because I only have so much hobby time and it's divided between music, 3d animation, and programming, as well as gaming hahaha.  ASM is the most bank for your buck in the learning department Thanks for the assistance! Will PM you a zip folder today sometime, I'm going to take my time to get this right hopefully.

Jan 15, 2016 at 10:54:10 AM
Mega Mario Man (63)
avatar
(Tim ) < Ridley Wrangler >
Posts: 2743 - Joined: 02/13/2014
Nebraska
Profile
Originally posted by: Mega Mario Man
 
Originally posted by: insomniakc

The game state is failing to load, as are the graphics and palettes. I know there are several things wrong. Firstly, I need to set up my banks properly, and I have 12 CHR sets that are swapped between in the original intro program I am merging into this subroutine. Secondly, I need those banks to coexist with the graphics data I have included in MRN's program as a replacement for his graphics and tables. I also need to figure out what to send to the bank swap routines for MMC1 given the change in bank locations, and also figure out why there is nothing loaded into the PPU at all. There is an important bin file referenced in this which is an array of bank numbers frame by frame, as frames of animation are reused. I do need to change this info too at some point, but not until I have something showing on the screen and in memory which reflects what I am after.

Attached is a mix of MRN's code, my code, and your snippets incorporated into what I got stuck not knowing where to go with. Please help...

(for some reason, I "broke the internet" and needed to use dropbox. just the asm file included, unless you need to look at anything else referenced in there)

https://db.tt/lTe7d9go
EDITTED AN ERROR!!


NMI Code
  ;Replace this

  LDA #%00011110                   ;enable sprites, enable background, no clipping on left side
  STA $2001


  ;With this
LDA EnablePPUFlag
  BEQ .SKIP
     JSR EnablePPU
    
    DEC EnablePPUFlag    <---I Forgot this so I edited the post to reflect this change.
  .SKIP:
 

Don't forget to DEC the EnablePPUFlag! I forgot this code last night! Sorry if you put in the bad code and it caused issues. I was pretty tired when I replied.
 

-------------------------
Current Project
Isometric Survival Horror

Older Projects
Tailgate Party, Power Pad Demo, Happy Hour

Links
Store, Facebook, Twitter

Jan 17, 2016 at 3:39:40 PM
Mega Mario Man (63)
avatar
(Tim ) < Ridley Wrangler >
Posts: 2743 - Joined: 02/13/2014
Nebraska
Profile
For any one following this, we have this solved through a series of PMs. If you get a chance, welcome insomniakc to the community. He's got a talent for this!

-------------------------
Current Project
Isometric Survival Horror

Older Projects
Tailgate Party, Power Pad Demo, Happy Hour

Links
Store, Facebook, Twitter

Jan 17, 2016 at 6:16:30 PM
insomniakc (0)
avatar
< Little Mac >
Posts: 86 - Joined: 01/12/2016
Ontario
Profile
Awh, thanks Mega Mario Man. I'm going to make a thread for the eclipse animation in a min if anyone wants to check out the code and the finished version of the rom I'll edit and link here.

Nov 1, 2017 at 11:03:32 PM
brilliancenp (1)
avatar
(Nick Pruitt) < Little Mac >
Posts: 57 - Joined: 08/15/2017
Kansas
Profile
So I did manage to implement this into a platformer! It took a couple of days to figure it out and some help from previous questions about it in this thread. I was almost there, but my character kept sliding across the screen when it hit the ground. I finally realized that I was transferring the player horizontal and vertical before the collision for vertical and again before the collision for the horizontal and then restore after each. The problem was that I was transferring them both and restoring them both each time. After separating each of those methods into 2, 1 for horizontal and 1 for vertical and only transferring and restoring the pertinent data, it fixed the problem.

Thanks so much for these tutorials! I am learning a ton!

Nov 6, 2017 at 10:56:09 AM
brilliancenp (1)
avatar
(Nick Pruitt) < Little Mac >
Posts: 57 - Joined: 08/15/2017
Kansas
Profile
I have a question. I have been fighting a problem for three days. If anyone knows this BG collision fairly well I could use your opinion.

So I have transitioned this into a platformer and I have my player collision detection working nicely. The problem is I am trying to incorporate this into the player "bullets" as well so they will destroy if they hit the background. It works in some instances but in others it causes the player to move. Sometimes he moves up, sometimes he falls through the floor, sometimes he moves to the side. If I take out the BG collision detection, obviously the bullets go through walls but the player is not affected (this is how I narrowed it down.)

My question is, since the player"bullet" is only 1 sprite and I am trying to run it through the BG collision detection, is the fact that the sprite is not a metasprite (4 sprites) possibly causing the player to move? I do only transfer the horizontal collision of the bullet since they only shoot left or right at the moment.

I know this is probably not an easy question without seeing the code, just wondering if this is a possibility.

Thanks in advance

Nov 6, 2017 at 12:39:19 PM
Mega Mario Man (63)
avatar
(Tim ) < Ridley Wrangler >
Posts: 2743 - Joined: 02/13/2014
Nebraska
Profile
Man, I wish I could help here. But, I'm not very well versed in this tutorial or collisions. Only thing I can think of is that you may be running out of CPU time and getting odd glitches or maybe an order of operation issue. Hope someone has a better answer than that.

-------------------------
Current Project
Isometric Survival Horror

Older Projects
Tailgate Party, Power Pad Demo, Happy Hour

Links
Store, Facebook, Twitter