I fogot to post a reply here when I made my first vid, but since this is NINTEDOAge and not AtariAge I'll start posting on this thread now.
First vid -
Now I have more parts so I can do some more work, like cutting up the case and adding video ouput.
2nd vid -
I'm having some major issues though. The component video output is crap, diagonal wavy moving interference, very hard to capture on camera but it's bad! As seen in the vid i'm using my own rgb to component encoder board so rgb ppu pin 21 sync and cleaning is not the issue. I also do not connect rgb ppu pin 17 to anything. Not had this issue on any of the nes-001 or nes-101 consoles i've used the board on.
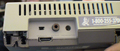
The cart is way too close to the back of the case. You've basically rendered %70 of the rear panel useless for mounting jacks etc since it's too close to the cart, there's only like 9mm between the back of the cart and the rear panel. It's really only possible to use the little bit of area towards the outsides. I'm sure you noticed this, but it really sucks and you should see about moving the connector inward.
While you're at it, add a multi out footprint to the back. That can carry rgb, sync, svideo, composite, and stereo. And cords are still plentifull and ppl prefer them. They can get a multiout/scart cord and have an external video encoder, i.e. component, if they want or just feed rgb to a monitor with another scart to ??? conversion cord.
If you have the room for the multi out there will be room for other stuff like a pcb mounted power input jack, another almost essential item.
Moving the cart connector forward would help with dust flap mounting for the cart slot as well, you'll see what I mean in the vid. Still not sure i'll be able to pull it off...
Another idea was to have the front loader's power/reset/led assembly mounted to the front of the pcb so you could notch the front of the case to fit them. I didn't investigate this too much though.