BACKGROUND
Sorry, this one got kind of long. 
This is the "front view" of one of the sprites. We'll go through the picture row by row.
First row, we make the three views that we need to animate our sprite. Notice that the second and third
frame are mirrors of each other. This will save space and save us the trouble of having to come up with
more art. And you can't really tell it is a mirror while playing the game.
Second row, this puts the frames in order. i.e. legs together, step forward with one leg, legs together,
step forward with the other leg. So, we only need to come up with 2 frames to make a smooth, four frame
animation.
Third row, here we simply split the sprites into the individual tiles that will be encoded into the
PPU.
Forth row, if we look back up to the "attributes" that we have to assign to each sprite tile, we notice
that we can "mirror" them. This allows us to not only use the mirror of each sprite for the various frames
of our animation, but allows us to mirror each side of the sprite on its own. Here, we just delete all
the sprite tiles that are not unique and we see that the number of actual tiles condenses down quickly.
Fifth, row. Here we organize the tiles into a simple row. This is what we program into a graphics editor
such as Tile Molester.
META SPRITES
The above picture shows a plain example of a "meta sprite". Here, we are going to keep it simple
and use meta sprites that are 2 tiles x 2 tiles. In the Building Sprites section, I may have incorrectly
used "sprite" and "meta sprite" interchangeably, but from here on, a "sprite" will refer to a 8 pixel x
8 pixel tile that is entered into the PPU and a "meta sprite" will be a 16 pixel x 16 pixel image
made up of 4 sprites. "Most" games use the 16x16 meta sprites, but you could really apply the technique
that follows to whatever meta sprite you want.
First, the position of the sprites within the meta sprite. For the sake of example, we will number our
sprites within the meta sprite as follows: 1,2,3,4. So as displayed on the screen, it would look like:
1 2
3 4
When we move these sprites around, we want to ALWAYS keep them in the same relative position to each other.
If we don't, then there are potential problems with collision detection, movement, animation, etc. This
technique should rule this problem out, but you never know. Basically, this is bad:
1 2 move right 2 1
------------->
3 4 4 3
|
| move
| down
|
3 4
2 1
This is good:
1 2 1 2
--------->
3 4 3 4
|
|
|
1 2
3 4
You will notice in what follows that all position information is measured relative to the sprite #1. So,
we need to keep the order the same throughout the process.
Next, we will introduce the concept of "constants" in sprite manipulation. If we "hard code" in the addresses
for sprite data, we would have to write a separate routine for each sprite and if we ever wanted to change
the sprite address within the $0200 block of RAM, we would have to spend a large amount of time going back through
our code and changing every place that we have an address. This is a PITA and can lead to difficult bugs. Let's
fix this problem. If we declare a constant for the beginning address of our sprites, we need only change this
number and the assembler will automatically update all the subsequent addresses. Observe:
;------------------------------------
sprite_RAM = $0200
;------------------------------------
That's it. So, every where we want to put an address, we just put it relative to this constant. For
the first sprite:
sprite_RAM ;vertical position address
sprite_RAM+1 ;tile number address
sprite_RAM+2 ;attribute address
sprite_RAM+3 ;horizontal position address
Second sprite:
sprite_RAM+4 ;vertical position address
sprite_RAM+5 ;tile number address
sprite_RAM+6 ;attribute address
sprite_RAM+7 ;horizontal position address
and so on.
For example, sprite_RAM+7 means $0200+7 = $0207 to the assembler.
If you have different sprite blocks you want to keep separate, like enemies, your hero,
weapons, enemy weapons, etc., you can declare multiple constants and Bob's your uncle.
Now that we have that figured out, we ask why we're doing it. Well, as I said before, everything is
measured relative to the sprite #1 and as our sprites will always be in the same relative position
as each other, we can write:
;------------------------------------
update_enemy_sprites: ;this routine updates the position of the meta sprites relative to each other
LDA sprite_RAM ;vertical updates
STA sprite_RAM+4
CLC
ADC #$08
STA sprite_RAM+8
STA sprite_RAM+12
LDA sprite_RAM+3 ;horizontal updates
STA sprite_RAM+11
CLC
ADC #$08
STA sprite_RAM+7
STA sprite_RAM+15
RTS
;------------------------------------
This routine will update our sprites 1,2,3 and 4 relative to sprite 1, i.e. moving as a meta sprite.
If we do this every frame, our sprite will move together and we will only have to specify
the translation of sprite 1. This keeps everything neat, orderly, and together.
MULTIPLE META SPRITES
Now, say that we had multiple enemies going after us at once?? Do we have to write a separate
routine for each meta sprite? No. We can use what is help from our friend, the "x" register.
If we continue our sprite numbering we have:
Meta Sprite 1 - sprites 1,2,3,4 - starting address $0200
Meta Sprite 2 - sprites 5,6,7,8 - starting address $0210
Meta Sprite 3 - sprites 9,10,11,12 - starting address $0220
Meta Sprite 4 - sprites 13,14,15,16 - starting address $0230
etc.
Here, we'll construct a routine that will update 4 meta sprites with only a slight modification to the
code block above. Look at the starting addresses of the sprites in the meta sprite groups above.
Notice the pattern?
Remember that in hex, things start at 0. So, if we change the numbering system a little bit:
Meta Sprite 0 - sprites 1,2,3,4 - starting address $0200
Meta Sprite 1 - sprites 5,6,7,8 - starting address $0210
Meta Sprite 2 - sprites 9,10,11,12 - starting address $0220
Meta Sprite 3 - sprites 13,14,15,16 - starting address $0230
Now, if we keep in mind everything that we have learned so far about meta sprites and apply
them to the other 3 meta sprites, we notice that the addresses are exactly the
same...only offset by $10. So, naturally, if we want to keep our numbering scheme the same,
we would declare some "updating constants" that would allow us to use loops for each meta sprite.
;------------------------------------
updateconstants: ;constants for the use of the sprite_RAM constant
.db $00,$10,$20,$30 ;4 sprites for each meta sprite, so add $10 for each meta sprite we process
;------------------------------------
Notice that if we use the meta sprite numbers to look up values in the table and add them to our
constant, sprite_RAM, we get the starting addresses for each meta sprite. It follows then that:
-Load the meta sprite number, $03, into x
-Look up meta sprite 3's update constant using "update constants" and x
-Store this value, $30, in the x register
-Add x to each value in the above "update_enemy_sprites" routine
This allows us to update all 4 enemies using this one routine:
;------------------------------------
update_enemy_sprites: ;this routine updates the position of the meta sprites relative to each other
LDX enemy_number ;this is a variable used to specify our "meta sprite number" within the loop
LDA updateconstants,x
TAX
LDA sprite_RAM,x ;vertical updates
STA sprite_RAM+4,x
CLC
ADC #$08
STA sprite_RAM+8,x
STA sprite_RAM+12,x
LDA sprite_RAM+3,x ;horizontal updates
STA sprite_RAM+11,x
CLC
ADC #$08
STA sprite_RAM+7,x
STA sprite_RAM+15,x
RTS
;------------------------------------
Savvy?
While this is a useful tool, it doesn't really do much if nothing moves and there is no animation.
MOVING SPRITES
Now that we know how to update sprites, and that we only need to move around the first sprite in
our meta sprite, we can move onto more exciting things like moving the sprites around the screen.
Again, in this write-up we will use the top down view, so the animation will have the front, back,
left, and right side views.
First, we need some way to specify to the program which way the sprite is currently moving. Here
we will assign the following:
Up - $00
Down - $01
Right - $02
Left - $03
This allows us to write the necessary code for each of the 4 directions and makes it easy to figure out
which way things are moving. It follows then that we would need to reserve a variable for each
meta sprite that specifies direction. (We will include the enemy_number here for completeness.)
;------------------------------------
enemy_number .rs 1
enemy_direction .rs 4
;------------------------------------
Note that when we reserve multiple variables like this, it will allow us to pull the directions of
the various enemies using the variable "enemy_number" while in a loop.
Normally, a change in direction would be triggered by a collision or other random event, but here
we don't have any of that. So I have inserted a basic "random" direction change routine to make the
example more interesting. I think that you can figure out what it does, so I won't waste time on it.
Enemy animation, which we will get into later, is usually only active when your dudes are moving. But
as in this example they are always moving, we will just keep updating the "animation counter" all the
time. If you expand on this program, you need to expand when the animation counter is updated, and when
it is not, or your dude will do the Moon Walk while standing still. So, and this is a little redundant
when the sprites are all moving all the time, but later we will need another variable for each enemy
that specifies its position in the animation routine. Since it appears in the sprite movement routine,
we will introduce it now.
;------------------------------------
Enemy_Animation .rs 4
;------------------------------------
I assume that the reader has been through the tutorial on basic sprite movement, so I won't cover that.
So, after we have all of this information, we write:
;-------------------------------------
randomenemydirection: ;these are random numbers used with the random_direction2 to make enemies switch direction
.db $57,$CD,$AF,$05,$BC
;;;;;;;;;;;;;;;;;;;;;;;;;;;;;;;;;;;;
enemy_update:
LDX enemy_number
INC Enemy_Animation,x ;increment the counter for the animation routine
LDA random_direction2 ;check random_direction2 with the values stored in randomenemydirection
CMP randomenemydirection,x ;this is in place of the routine you would have in collision detection
BEQ .down
CMP randomenemydirection+1,x
BNE .done
.down
LDA random_direction1 ;if the values match, switch direction the counter random_direction1
STA enemy_direction,x
.done
LDA enemy_direction,x ;for the various directions, move the sprites around the background
BNE .next
JMP enemy_up ;note JMP not JSR
.next
CMP #$01
BNE .next1
JMP enemy_down
.next1
CMP #$02
BNE .next2
JMP enemy_right
.next2
JMP enemy_left
;;;;;;;;;;;;;;;;;;;;;;;;;;;;;;;;;;;;
enemy_up:
LDX enemy_number ;move the sprite up
LDY updateconstants,x
LDA sprite_RAM,y
SEC
SBC #enemy_speed
STA sprite_RAM,y
RTS
;;;;;;;;;;;;;;;;;;;;;;;;;;;;;;;;;;;;
enemy_down:
LDX enemy_number ;move the sprite down
LDY updateconstants,x
LDA sprite_RAM,y
CLC
ADC #enemy_speed
STA sprite_RAM,y
RTS
;;;;;;;;;;;;;;;;;;;;;;;;;;;;;;;;;;;;
enemy_right:
LDX enemy_number ;move the sprite right
LDY updateconstants,x
LDA sprite_RAM+3,y
CLC
ADC #enemy_speed
STA sprite_RAM+3,y
RTS
;;;;;;;;;;;;;;;;;;;;;;;;;;;;;;;;;;;;
enemy_left:
LDX enemy_number ;move the sprite left
LDY updateconstants,x
LDA sprite_RAM+3,y
SEC
SBC #enemy_speed
STA sprite_RAM+3,y
RTS
;-------------------------------------
Notes:
-The enemy direction is used to specify which update we want to use.
-Both the X and Y registers are used.
-Normally for "enemy_speed" you wouldn't use a constant, you would have a variable for each meta sprite,
but here we just keep it simple. This would be another thing you should mess around with (and is the
reason for the y register usage). (If you had variables for the enemy_speed, you would need the
"enemy_number", stored in x, to pull the values from RAM. The y value holds our "updateconstants".)
-The random direction routine and redundant calls of the enemy_number are included to help you
avoid errors when expanding the program.
META SPRITE ANIMATION SET UP
Before we can completely jump into animation, we need to specify a few things. Namely, how do we
tell the program which animation frame to display given the specified direction and when to switch
frames based on the afore mentioned "Enemy_Animation" counters. You may want to specify separate
"reset" points for each enemy’s counter, but I've never really found it necessary. You can pick
whatever resets you want, just use them so that the animation "looks right". So, we will
write the following:
;-------------------------------------
Enemy_Frame .rs 4 ;Animation Frame Number
enemyFrames1 = $0C ;enemy's counter resets
enemyFrames2 = $18
enemyFrames3 = $24
enemyFrames4 = $30
;-------------------------------------
Now that we have all this information in place, we use a simple series of compares, counter resets,
and branches to keep our animation frames updated throughout the process. Note that this routine
does not update the animation frame number every frame as it is not really needed. Go through the
routine and figure out the animation sequence and how it relates to the picture above. Assume here
that frame $00 = "legs together".
So, we simply write:
;-------------------------------------
Enemys_Animation: ;this routine updates the frame that is displayed for each enemy 1,2,1,or 3
LDX enemy_number
LDA Enemy_Animation,x ;compare to constants
CMP #enemyFrames1 ;you can change these around to make the animation faster or slower on the constants page
BEQ .Animation1
CMP #enemyFrames2
BEQ .Animation2
CMP #enemyFrames3
BEQ .Animation1
CMP #enemyFrames4
BEQ .Animation3
JMP .AnimationDone
.Animation1: ;load the various frames
LDA #$00
STA Enemy_Frame,x
JMP .AnimationDone
.Animation2:
LDA #$01
STA Enemy_Frame,x
JMP .AnimationDone
.Animation3:
LDA #$02
STA Enemy_Frame,x
.AnimationDone
LDA Enemy_Animation,x ;reset the counter when it gets to the end
CMP #enemyFrames4
BNE .AnimationFinished
SEC
SBC #enemyFrames4
STA Enemy_Animation,x
.AnimationFinished
RTS
;-------------------------------------
You'll notice so far that this is simply a series of subroutines. I write this way to allow myself
to edit certain parts of the overall routine as needed. i.e. if you had this all in one long ass
sub-routine, you would have difficulty updating direction changes, variable movement, enemy weapons,
hit/shoot poses, and on and on.
Okay, now that we have a basic engine in place to move our meta sprites around as one and an engine
to drive the basic animation, we can move on to some more complex stuff.
FORMATING GRAPHICS
This is where it can get confusing as this is the "meat" of the whole process. Here we are going to put
our graphics data in a format that can be read by the program and displayed on screen. You'll note that
we have already been through movement, so we have covered the "vertical position" and "horizontal
position" of the sprites. Now it is time to focus on the sprite "attributes" and "tile number".
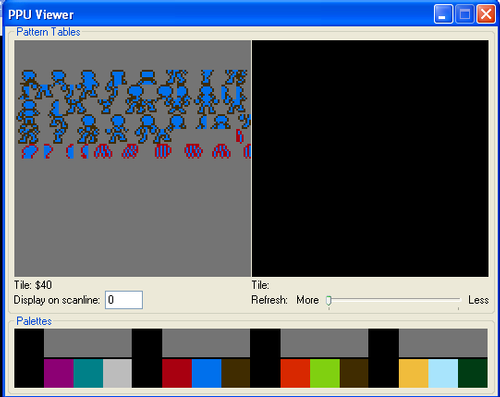
First, when working with graphics, sprites or background, I recommend putting them into a "demo" program
so that you can view your tiles in the PPU Viewer. The reason for this is simple. Well, the screen shot
didn't capture the mouse, but you can still observe my point. Reading tiles from the PPU viewer is
quick and easy. Simply put your mouse over the tile in question and the emulator displays the tile
number at the bottom.
Let's look at the picture above again and our sprite numbering inside of the meta sprite shown in the
graphic above. See how it goes 1,2,3,4? This is how we are going to specify the data in our meta sprites.
If you load the PPU viewer from the attached program, it will be a little easier to follow along here.
We are going to format our graphics as follows:
tile 1, tile 2, tile 3, tile 4, attribute 1, attribute 2, attribute 3, attribute 4
We will need to do this for each frame, for each direction, for each enemy type we want to use.
Let's start with the example in the picture above. This, combined with the PPU viewer, will give us:
;-------------------------------------
.db $5C,$5C,$68,$68,%00000010,%01000010,%00000010,%01000010 ;Down, Frame 1 and 3
.db $5A,$5B,$66,$67,%00000010,%00000010,%00000010,%00000010 ;Down, Frame 2
.db $5B,$5A,$67,$66,%01000010,%01000010,%01000010,%01000010 ;Down, Frame 4
;-------------------------------------
Personally, I keep the tiles stored in hex, since that is how they are displayed in the PPU viewer,
and the attributes stored as binary just to make it easier to read. To make this data format a
little clearer, let's examine it a little closer.
We have our meta sprite format from above:
1 2
3 4
If we look at frame 1 in the data stream above, we see that we are specifying the tiles to be
displayed as:
$5C $5C
$68 $68
and the attributes as:
%00000010 %01000010
%00000010 %01000010
If we look at it like this, we can see the mirroring in effect. Do this for the other
two frames, and you will see an even better example of the mirroring in action!!
If we do this for each of the 12 frames required to completely animate the meta sprite in all
directions, we are left with a table that looks like this:
;-------------------------------------
McBoobins_graphics:
.db $5D,$5D,$5F,$5F,%00000010,%01000010,%00000010,%01000010 ;Up, Frame 1 and 3
.db $5D,$5E,$69,$6A,%00000010,%00000010,%00000010,%00000010 ;Up, Frame 2
.db $5E,$5D,$6A,$69,%01000010,%01000010,%01000010,%01000010 ;Up, Frame 4
.db $5C,$5C,$68,$68,%00000010,%01000010,%00000010,%01000010 ;Down, Frame 1 and 3
.db $5A,$5B,$66,$67,%00000010,%00000010,%00000010,%00000010 ;Down, Frame 2
.db $5B,$5A,$67,$66,%01000010,%01000010,%01000010,%01000010 ;Down, Frame 4
.db $57,$56,$63,$62,%01000010,%01000010,%01000010,%01000010 ;Right, Frame 1 and 3
.db $55,$54,$61,$60,%01000010,%01000010,%01000010,%01000010 ;Right, Frame 2
.db $59,$58,$65,$64,%01000010,%01000010,%01000010,%01000010 ;Right, Frame 4
.db $56,$57,$62,$63,%00000010,%00000010,%00000010,%00000010 ;Left, Frame 1 and 3
.db $54,$55,$60,$61,%00000010,%00000010,%00000010,%00000010 ;Left, Frame 2
.db $58,$59,$64,$65,%00000010,%00000010,%00000010,%00000010 ;Left, Frame 4
;-------------------------------------
On a personal note, and I suppose that I'll catch shit for doing this if I don't
address it, the sprites used in this write-up are "dumbed down" versions of the sprites
that Miss Clawful made for use in my personal game. I used them mainly because I had
the above tables already built and was too lazy to go and find new sprites, build
the tables, and make it work. I trust that everyone that actually uses this information
will be original and make their own work.
Okay, now that we have this built, and presumably, the tables for the other required
enemies, we are ready to start the animation. If construction of this table is not
making sense to you, please review it and make sure you understand. If not, please
ask questions.
Now, if we look at the above table we need to specify some way to pull graphic information
from a certain point in the table.... Pretty simple, right? We just specify the starting
position of every frame in the array for each frame of animation. We will use the variable
defined in the "Enemys_Animation" routine to pick the required number from the table...but
what about direction? We simply use the "enemy_direction" variable to specify which look
up table we want to look in? Lost? This might make it clearer:
;-------------------------------------
NM_up:
.db $00,$08,$10 ;the indexes to the various frames in the spritegraphics file
NM_down:
.db $18,$20,$28
NM_right:
.db $30,$38,$40
NM_left:
.db $48,$50,$58
;-------------------------------------
For the moment assume that each of the numbers in that array is specifying the starting
position of the frame in question and try to understand. If it's not clear, you'll have to
forgive me, I'm not the best teacher. I'll assume you got it, so if not, ask questions.
ANIMATING SPRITES
Now that we have a fancy table set up with all of our graphics information and another array
set up that holds the starting place in that table for each animation frame, we are ready to
write a routine to use this stuff.
You'll note that if we use the frame counter set up that we have above, it does not reset the
counters when the direction changes...i.e. if your dude is taking a step when he changes directions,
he will be taking a step when he starts in the other direction. You can set it up to reset the
counters and force him to start walking when he switches directions, but there's really no need.
It would make the code much more complex and you won't be able to tell the difference.
Okay, for now, take it on faith that we need to load the appropriate value in that array up there
into the Y register. To do that, it is pretty simple. Rather than explain it, I think that I will
just post the code script, and you can go through it real quick:
;-------------------------------------
Enemys_Sprite_Loading: ;this routine updates the sprite graphics every frame based on data set by the other routines
LDX enemy_number
LDA enemy_direction,x
BEQ .next ;up ;find out which direction it is going
CMP #$01
BEQ .next1 ;down
CMP #$02
BEQ .next2 ;right
JMP .next3 ;left
.next ;UP
LDA Enemy_Frame,x ;load the spritegraphics index based on the frame number set in the animation routine
TAX ;some of this is redundant because I removed some of the more complex code here
LDA NM_up,x
TAY
JMP enemyspritesupdate ;update graphics
.next1 ;DOWN
LDA Enemy_Frame,x
TAX
LDA NM_down,x
TAY
JMP enemyspritesupdate
.next2 ;RIGHT
LDA Enemy_Frame,x
TAX
LDA NM_right,x
TAY
JMP enemyspritesupdate
.next3 ;LEFT
LDA Enemy_Frame,x
TAX
LDA NM_left,x
TAY
JMP enemyspritesupdate
;-------------------------------------
Pretty simple right?
Well, here we have to go a little out of order. In this simple example, we lack background, room loading,
collision detection, starting positions for sprites, etc. This is all beyond the scope of this document.
So, what we need to do here is hard code some things you would normally load when entering a room.
If we are going to use the same code for multiple enemy types, we are going to need pointers. If you don't
know how to use pointers, there are several tutorials on this site that explain them.
This isn't really necessary, as if we don't do it, the sprites will just start off screen and walk on...but
we'll do it anyway. Specify starting positions for the sprites in the reset routine:
;-------------------------------------
LDA #$80 ;here we set up any start points for enemies
STA sprite_RAM ;in practice, these locations would be determined by your background
STA sprite_RAM+3
LDA #$90
STA sprite_RAM+16
STA sprite_RAM+19
LDA #$A0
STA sprite_RAM+32
STA sprite_RAM+35
LDA #$B0
STA sprite_RAM+48
STA sprite_RAM+51
;-------------------------------------
Next, for the various enemy types, we will need to set up pointers to the graphics in the "spritegraphics"
file. We need to define a pointer variable to compliment the enemy_number. You can just "multiply by 2"
every time you use it, but here we're going to do this:
;-------------------------------------
enemygraphicspointer .rs 02 ;pointer for the graphics updates
enemy_pointer .rs $08 ;pointer for the graphics data for Enemies
;-------------------------------------
Basically, the enemygraphicspointer is the pointer that the routine will use each time through the loop
to find the graphics data. enemy_pointer is a series of numbers (or addresses) that we set up in our
loading routine to make the various meta sprites look like we want them to. We will need two bytes for
each enemy, so that is a total of 8 bytes. A little confusing, but it will clear up in a minute.
Like I said before, you would do this in your room loading routine in practice, here we will hard code
these addresses in the reset routine:
;-------------------------------------
LDA #LOW(crewman_graphics) ;here we set up the pointer data for the different enemy types
STA enemy_pointer ;in practice, you wouldn't hard code these, they would be part of the loading routines
LDA #HIGH(crewman_graphics) ;note that this notation is probably WRONG in the actual program.
STA enemy_pointer+1
LDA #LOW(Punisher_graphics)
STA enemy_pointer+2
LDA #HIGH(Punisher_graphics)
STA enemy_pointer+3
LDA #LOW(McBoobins_graphics)
STA enemy_pointer+4
LDA #HIGH(McBoobins_graphics)
STA enemy_pointer+5
LDA #LOW(ArseFace_graphics)
STA enemy_pointer+6
LDA #HIGH(ArseFace_graphics)
STA enemy_pointer+7
;-------------------------------------
The last subroutine we need will load the graphics pointer for the current enemy, read the graphics tables
we have set up, and store them to the appropriate place in RAM. Then the next frame, the NMI routine will
transfer them to the PPU and life will be grand.
Again, this is pretty simple if you've been paying attention so far. Note that the y register was
set up in the "Enemys_Sprite_Loading" routine.
;-------------------------------------
enemyspritesupdate: ;this routine updates the tiles and attributes for the enemies
LDX enemy_ptrnumber ;load in the pointer for the graphics data
LDA enemy_pointer,x
STA enemygraphicspointer
INX
LDA enemy_pointer,x
STA enemygraphicspointer+1
subenemyspritesupdate: ;we put this here in case we want to have some sort of special update,
LDX enemy_number ;like shooting graphics, it is not used here
LDA updateconstants,x
TAX
LDA [enemygraphicspointer],y ;read the tile from the "spritegraphics" sub file and store it in memory
STA sprite_RAM+1, x
INY
LDA [enemygraphicspointer],y
STA sprite_RAM+5, x
INY
LDA [enemygraphicspointer],y
STA sprite_RAM+9, x
INY
LDA [enemygraphicspointer],y
STA sprite_RAM+13, x
INY
LDA [enemygraphicspointer],y
STA sprite_RAM+2, x
INY
LDA [enemygraphicspointer],y
STA sprite_RAM+6, x
INY
LDA [enemygraphicspointer],y
STA sprite_RAM+10, x
INY
LDA [enemygraphicspointer],y
STA sprite_RAM+14, x
RTS
;-------------------------------------
NMI AND THE MAIN PROGRAM
So far, we have acquired all the tools we need to make our enemies run. As I said up top, all you need
for NMI is:
;-------------------------------------
LDA #$02
STA $4014 ;set the high byte (02) of the RAM address, start the transfer
;-------------------------------------
The main program is pretty simple as well. Really, we just need to make a loop and it one time for
each of our 4 enemies.
-Set up the enemy number/enemy pointer
-Loop it through our subroutines here
-Run it once for each of our 4 (or however many you have) enemies
Pretty simple:
;-------------------------------------
UpdateENEMIES:
LDA #$00 ;this loop updates the enemies one at a time in a loop
STA enemy_number ;start with enemy zero
STA enemy_ptrnumber
.loop
JSR enemy_update ;move the sprites based on which direction they are headed
JSR Enemys_Animation ;find out which frame the enemy animation is on
JSR Enemys_Sprite_Loading ;update the enemy meta tile graphics
JSR update_enemy_sprites ;update position
INC enemy_number ;increment the enemy number for the next trip through the loop
INC enemy_ptrnumber ;these are addresses for the graphics data, so we need to keep it at 2x the enemy number
INC enemy_ptrnumber
LDA enemy_number
CMP #$04 ;if it is 4, we have updated enemies 0,1,2,3 so we are done
BNE .loop
UpdateENEMIESdone:
;-------------------------------------
ONE LAST THING
I don't think that this has been introduced yet. It is pretty simple, again, but the code for the
Batch File that runs NESASM3 is as follows:
;-------------------------------------
NESASM3 SpriteMovement.asm -s
pause
;-------------------------------------
As simple as run NESASM3 on the file SpriteMovement.asm. -s tells the program that you want it to
display the memory usage in each bank when the MS-DOS window pops up. This is extremely useful
in larger programs. Then, pause simply tells the program that you are done.
CONCLUSIONS
It is my personal style, but you can do it however you want. I try to keep my playable character
code separate from my NPC code. This is generally because when you get something like this big enough
to where it does something ... well, interesting, the playable character code will be so different
than the NPC code, that you will have a shit ton of compares or branches and it will just be a mess.
However, the code is pretty similar.
For "homework", I would say that you should:
1. Make your own characters and input them into these routines
2. Modify the code to accept input from the controllers
3. Add code so that your enemy can do something special if it runs into a wall or gets hit, like flip
people the bird.
4. Vary the enemy speed and/or animation frame speed.
5. etc.
Attached is a file showing the working example that I put together as well as various other things.
I hope you enjoy this and it wasn't too long. 'Till next time....

This is my shiny thing, and if you try to take it off me, I may have to eat you.
Check out my dev blog.
This is my shiny thing, and if you try to take it off me, I may have to eat you.
Check out my dev blog.
LDA #LOW(background)
STA pointerLo
LDA #HIGH(background)
STA pointerHi
so is really LDA #HIGH(crewman_graphics+1) the plus one needed there? And if that's the case, what would be the difference between this and bunnyboy's stuff?
gauauu: look, we all paid $10K at some point in our lives for the privilege of hanging out with Kevin