Hello all!
I have been a Nintendo lover, well, the majority of my life, and creating NES games was the second idea that I had for what I would like to do for a job, right after fighter pilot.
Anyway, I started experimenting with programming at a young age, primarily with BASIC, as that was what was available to me. My interests in designing games waned as game technology shifted away from 2D graphics, and I found myself involved with other interests. Sadly, as a child in the early 90s, I didn't have access to wonderful resources such as this site on 6502 assembly or even knowledge of what was actually entailed to program an NES game. Had I known, I would never have started with BASIC and would have jumped straight into 6502.
Now, as an adult, I find myself very fond of the games from my childhood and assembled a pretty nice NES and SNES collection. But playing these games once again stirred the desire to make my own contribution to the gaming library of my favorite consoles. Luckily, this time, I'm armed with the internet and thirty years of information dissemination on programming for them.
So, I've started on the trek of learning the code, and I've began reading and rereading tutorials and familiarizing myself with the syntax. It's a lot, yes, but the simple fact alone that the information necessary to create functioning programs for an NES console is available, is thrilling to me, and would have blown the mind of my childhood self. One can actually commit themselves to learning to create an NES game, as many have. That concept is very exciting and that excitement has brought me here. I've been reading through the wiki and forums for a while now and I would like to be a part of the community.
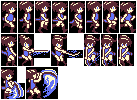
So, what has brought me here for my first post are some sprite graphics that I did yesterday. This is about the better part of a day's work here, but it was my first one and there was a lot of redoing. By the time I got familiar with the constrictions of designing in 16 x 32 with 3 colors, I did the last ones much faster.
So, the first ones that I designed were the attack animations 1 - 4. I was having troubling visualizing how to portray my character with so few pixels, so I actually started with 64 x 64, then reduced the size by half. That honestly, looked like crap, BUT, it helped me figure out where the few pixels I have to work with should go, then I reworked those, and from then on started designing in 16 x 32.
For the walk cycle, I adapted frames from Moon Crystal. This is a beautifully animated game with a not too dissimilar character style from mine, so after some adjustments I feel like it looks pretty decent. I found the Moon Crystal sprites on Spriter's Resource, and it appears that they were ripped by a fellow named Domobot, so thank you for that.
Now, I realize that having so many animations is going to eat up my CHR space pretty quickly, so I started considering how to design things most efficiently. I went through my frames and tried to identify any that were very similar, and if possible without hurting the animation, I modifying some of these to be the same. So, I believe there are 15 duplicate 8x8 tiles in the 8 frame walk cycle. Am I correct in assuming that I could reuse the other tiles to save space?
When I placed the images in a 32 x 16 space, I aligned the feet to the bottom, and basically, the head moves one pixel counter-clockwise each frame. So it goes up, then left, then down, then right. The tiles that I reused are the ones where her head is in the same position. Her arms and legs are in different spots, but sometimes I could reuse the bottom of her feet too. I'm wondering though, since her head mostly stays the same and just moves a pixel, if this is more efficiently done by drawing a new tile, as I did, or by shifting some existing tile. I'm not even sure if this would work, as it seems there would be a gap, but basically I'm just trying to consider if I am doing things as most efficiently as possible.
I'm hoping that after I draw a couple more animations, I'll have tiles for most of the body positions, so hopefully I can give her a lot of varied moves without using too many tiles. I don't know how many moves I'm going to give her, but essentially as many as is practical. Any thoughts on a common amount of tiles to use for the main character in a 1-player NES game? I'll probably exceed common, but I don't want to go so far that all of my enemies and locations feel generic.
Now, I know that the colors are not NES colors. I just kind of picked what looked decent to help me design. I can always change them easily later when I find out exactly what colors I have. But then again, the color information won't really be stored the same as in a graphics file so I'm not sure if that really matters for this step, other than for art direction.
This is my first draft but I hope to get any feedback that I can early so that I can start on good habits. The idea for the animations is that when she walks, her sword is sheathed, but after she attacks and her sword is out, I'd like to give her different combo attacks where she could move from one attack to another. So the uppercut attack animation is meant to follow the normal attack. If there are any suggestions that anyone has for making these work more efficiently, look better, or just anything at all, I'd love to hear it. Thank you very much for looking!
Looking good so far.
darryl.revok wrote:
Now, I realize that having so many animations is going to eat up my CHR space pretty quickly
That can pose a problem with NROM. It's not quite as much of a problem with bigger cartridges such as UNROM/MMC1 class or MMC3/FME-7 class. With UNROM or SGROM/SNROM, you can stream tiles from the ROM into video memory as they're needed. And with MMC3 or FME-7, you can break the 256-tile sprite area into four 64-tile windows that you can switch individually, one for the heroine and one for each of three enemies on the screen.
darryl.revok wrote:
So, I believe there are 15 duplicate 8x8 tiles in the 8 frame walk cycle. Am I correct in assuming that I could reuse the other tiles to save space?
Yes, you can reuse them. Some engines prefer to reuse 8x16 tiles for various reasons. You can even reuse tiles if they're not at the same relative position within a 16x32 pixel bounding box because each 8x8 or 8x16 pixel piece can be placed individually.
darryl.revok wrote:
Any thoughts on a common amount of tiles to use for the main character in a 1-player NES game?
Nowadays, with memory being so cheap, you can have almost as many tiles as you want, so long as you don't go through them faster than about 12 fps.
darryl.revok wrote:
I can always change them easily later when I find out exactly what colors I have.
This is why you'll never see a 50 Shades of Grey game for NES
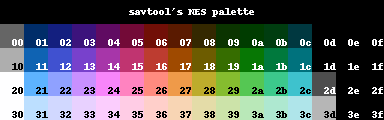
05-11-36 would be the closest, right? (actually not 36 since in the original it's white but let's liven up the colors a bit =P)
EDIT: actually maybe 37 is better. We'll see.
EDIT 2: there, added the graphics with the palettes I mentioned. Yeah, 37 looks better indeed. OK honestly it's just subjective. Also I just realized I forgot to remove a line... whoops >.<
It looks absolutely awesome for a first design.
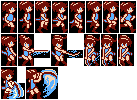
Really, the only criticism I can come up with is that the boots appear to shrink in some of the slashing frames vs. the walking ones, but other than that, it looks really good. (Also, on one of the slashing frames, the outline on the legs disappear.)
Thanks everyone!
I've done some more. I'm constantly going back and revising the old frames, so I'm going to hold up on putting them up frame by frame until I hit a wall, just in case someone was to do an edit and I already edited mine.
For the colors, I picked 6-37-21. 36 looked a little too pinky to me. My original palette was really dull and bland, so of the NES colors I tried, I preferred those to ones which were closer to my original colors.
Yeah, I agree with the boots. That's something that I just now noticed but I haven't tweaked it yet. I think I'm about done for the day. The walk and jump frames I adapted from moon crystal where his boots were much bigger, but the problem I'm having with the shoes is making them both A) define her foot position and create a sense of movement, and B) fit the anime SD chibi style of the drawing which has extremely small feet. I'm not sure exactly how to tackle them on the walk, and I think that issue is even more obvious on the jump. Another thing that was bothering me was the sheath. On my jump animation it was changing size, which I believe I just fixed, but it doesn't seem rigid in all of the animations, especially jump. It looks floppy. I'll fix that shortly. I noticed some of the outline issues yesterday and fixed most of them. Sometimes I find more though, especially when I realized that I had drawn in a layer other than the one at which I was looking. Originally I didn't have an online on my first drawings. The outline was throwing me off at first but now I feel it really helps define the shapes in a limited number of pixel.
tepples wrote:
That can pose a problem with NROM. It's not quite as much of a problem with bigger cartridges such as UNROM/MMC1 class or MMC3/FME-7 class. With UNROM or SGROM/SNROM, you can stream tiles from the ROM into video memory as they're needed. And with MMC3 or FME-7, you can break the 256-tile sprite area into four 64-tile windows that you can switch individually, one for the heroine and one for each of three enemies on the screen.
So, I'm still fuzzy about my limitations, but I suppose I'll worry about that when I get to the game engine and just worry about making good animations while I'm doing that. Even if I had 64 tiles per character, my walk cycle alone is 64 minus duplicate frames, so there may be some issues loading up the next animation. However, these kind of things have been accomplished with the NES on numerous games so I'm sure it's possible.
Here's an animation of her jump cycle, then jump attack, landing with her sword back, then going between standing and crouching with her sword back, then a crouch attack from behind. That may sound a little confusing but I'm sure it will make since when you see it.
I've made a flowchart of all of the moves I want to give her and what she would be able to do from each position. I'll post the animations up as I get them done.
darryl.revok wrote:
For the colors, I picked 6-37-21. 36 looked a little too pinky to me.
I guess it depends on the intended ethnicity.
Quote:
the problem I'm having with the shoes is making them both A) define her foot position and create a sense of movement, and B) fit the anime SD chibi style of the drawing which has extremely small feet.
An SD-proportioned character can swing a weapon, but she'll need feet big enough to put some power behind it.

Michael "Dark Ness" [Fisher-Price Little People]

Charlie "The Bat-Man" [Peanuts]

"Swing for the Fences" [Precious Moments]
Quote:
So, I'm still fuzzy about my limitations, but I suppose I'll worry about that when I get to the game engine and just worry about making good animations while I'm doing that. Even if I had 64 tiles per character
With an MMC3-class CHR ROM board, you can use multiple 64-tile banks because you can switch to another bank at any time, even in the middle of one animation.
Quote:
my walk cycle alone is 64 minus duplicate frames, so there may be some issues loading up the next animation.
I've had success with the
Battletoads technique. With a CHR RAM board, you can load in tiles continuously and switch to the next frame once it's loaded. An 8-tile walk cycle can be loaded in one frame; the sword swing frames with 12-16 tiles would take two frames to load. With Disney-quality 12 fps animation, you get 5 NES frames per animation frame. So this is fine so long as you don't try to go excessively fluid on the enemies too.
Quote:
Here's an animation of her jump cycle, then jump attack, landing with her sword back, then going between standing and crouching with her sword back, then a crouch attack from behind.
Looking great so far.
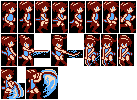
This is the old palette (it was the only picture that was the right size, and it can be easily changed) but the frame without the outlines was fixed (some of the others where actually missing in some random spots)
Attachment:
 Outlines.png [ 5.8 KiB | Viewed 6076 times ]
Also, I'm sure you know this, but if some 8x8 tiles in different frames are exactly the same, they can be reused, like the hair in the walk cycle. Also, depending on how you are planning on making your metasprite code, everything still needs to be made out of 8x8 tiles, but they don't really need to be on a "grid", if that makes sense.
Also, this is just my opinion, but I like the thicker boots better. The other ones are unnaturally small. Also, if you plan on using a blue that light, you might want to consider making the eyes brown because it is hard to see them now because there isn't enough contrast between the face and the eyes. I do think the light blue looks a lot better for the sword slash though.
Quote:
Michael "Dark Ness" [Fisher-Price Little People]
That name is certainly something...
tepples wrote:
I've had success with the Battletoads technique. With a CHR RAM board, you can load in tiles continuously and switch to the next frame once it's loaded. An 8-tile walk cycle can be loaded in one frame; the sword swing frames with 12-16 tiles would take two frames to load. With Disney-quality 12 fps animation, you get 5 NES frames per animation frame. So this is fine so long as you don't try to go excessively on the enemies too.
I was reading about the
Battletoads technique last night, and a post you made about predictive loading. It was very interesting.
So let me see if I've got this right. So, 8 tiles per NES frame.
I'm drawing at 6 fps which to me looks pretty fluid for NES. That should be 10 NES frames per animation frame.
So between each drawn frame, I have the potential to load 80 tiles.
When you consider all of the options for the animation that could happen next, say, will the player walk, attack, crouch, get hit, attack upward, the first frame of which is usually at least 8 tiles, and then the enemies, I can see where an idea like the predictive loading could come in handy.
Does that tile load include for the background as well? Am I correct that the PPU can have 256 sprite tiles, and 256 background tiles at once? If that load speed is separate from the background tiles, then it seems a pretty workable limitation.
Thank you so much for all of your help and feedback and for the color palette file!
Espozo wrote:
This is the old palette (it was the only picture that was the right size, and it can be easily changed) but the frame without the outlines was fixed (some of the others where actually missing in some random spots)
Hey thanks! I'll compare them to the changes I already made. I've probably fixed a lot of that stuff but you may have had some different ideas about how to do it. It may be helpful to check out.
Espozo wrote:
Also, this is just my opinion, but I like the thicker boots better. The other ones are unnaturally small. Also, if you plan on using a blue that light, you might want to consider making the eyes brown because it is hard to see them now because there isn't enough contrast between the face and the eyes. I do think the light blue looks a lot better for the sword slash though.
I definitely agree about the eyes. It was okay when I had it blown up but now I can't see them. I can't make them brown or then they won't be visible against the hair. I think I'm just going to have to find a better blue. As for the feet, I guess I'll have to do some side-by-sides. I tended to prefer the smaller ones but I understand the reasoning why others would prefer the big ones. On one hand though, the larger boots become a little tougher to draw in a small space without making a mush. I had highlights on them in my original design so that might be an option. One of the most important things in animation and platform games is for the character to have a sense of weight, and bigger boots might actually help a little at that. At the same time though, I want her to feel really agile, kind of like Mega Man X, and having small feet she could dance around with might help with that. Sometimes SD anime characters just have like little points for feet and that's what I had drawn first.
Thanks again!
darryl.revok wrote:
Does that tile load include for the background as well?
It doesn't matter if the tiles you're loading are for the background or for sprites (the same tile can even be used for both, under certain circumstances), a tile is a tile. If your engine can update 8 tiles per frame, it's up to you to define how many of those are for the background and how many are for sprites.
Quote:
Am I correct that the PPU can have 256 sprite tiles, and 256 background tiles at once?
Yes. Some mappers allow access to more tiles, but generally it's better to work within the limits you mentioned.
Tile and nametable updates goes through the same interface ($2007) and timing (vblank), so it's a shared resource. You can very easily send 64 bytes in one vblank. If you're skilled you can probably manage 128. There are some advanced techniques to get even more.
You'll spend about half your vblank uploading sprite and palette and probably some other upkeep. An efficient routine could push 128 bytes in what's left of the vblank.
For a scrolling background, you might get away with as little as 32 bytes per frame dedicated to it, but 64 might be more convenient. You might have enough left over for 4-6 tiles.
I made the character a bit less wonky looking in my opinion. I think the sword swipes can be improved to look more like the latter ones you made, but I don't feel like doing that right now. You could try to find a color somewhat in between the two, so the eyes and the sword swipe look good.
Attachment:
 More Proportional.png [ 5.81 KiB | Viewed 6053 times ]
tokumaru wrote:
Yes. Some mappers allow access to more tiles, but generally it's better to work within the limits you mentioned.
Well, I'd say if you're not doing too much, try to use the stock NES, but I wouldn't constrain myself if you end up planning on making something really crazy. I'd really like to see something like Metal Slug on the NES in that you have large elaborate backgrounds made of tons of unique tiles and lots of frames of animation for objects.
darryl.revok wrote:
Does that tile load include for the background as well? Am I correct that the PPU can have 256 sprite tiles, and 256 background tiles at once? If that load speed is separate from the background tiles, then it seems a pretty workable limitation.
Most of the time, you'll be changing only the map. An 8-pixel-wide column of map spaces is 30 bytes; a row is 32 bytes. Each of these is 2 tiles of vblank time, plus about another tile's worth of time to upload updated attributes for the new tiles. Actually uploading new tiles for the background most often happens once the camera gets to a new area.
rainwarrior wrote:
If you're skilled you can probably manage 128.
The code I posted in the other thread will manage 128 no sweat.
Do you plan to scroll in 2 directions on each map (like SMB2, Metroid, and Mega Man) or in 4 directions (like SMB3)?
So about the sprite cels: It might be easier to see the boots if you include some non-brown detail on them.

That's why Sonic's red sneakers have a white stripe across them.DRW would be pleased with the direction of this project.
Espozo wrote:
I made the character a bit less wonky looking in my opinion. I think the sword swipes can be improved to look more like the latter ones you made, but I don't feel like doing that right now. You could try to find a color somewhat in between the two, so the eyes and the sword swipe look good.
I think you found a good balance for the feet. Asides from the outline, is that all you changed? I think I'll integrate these changes with my design, and try incorporating a non-brown element, or a highlight into the boots. The file you're working with has a couple other weird mistakes I fixed yesterday, so I wouldn't worry about errant pixels unless you're bored.

Another weird little thing is that the boots are knee-high in the attack images but they're shorter in the walk. I think I'm going to make them all knee-high. I feel like it works better for a lot of frames because it separates the upper and lower leg into two easily distinguishable elements.
I redid the slash on the normal attack yesterday, actually. As I do this more, I feel like I get closer to what I actually want, so I go back and adjust it. The regular slash is a little weaker than the other ones, so it has a little less blue action, but I found that the nice contour curves look way better than the little twinkly thing I had for the first one I drew.
tepples wrote:
Do you plan to scroll in 2 directions on each map (like SMB2, Metroid, and Mega Man) or in 4 directions (like SMB3)?
I'm not certain, but I think I could design for either if I better knew what the trade-offs would be for a game to have 4-directional scrolling. Mr. Gimmick is one of the most advanced games for the system and it only has 2-directional scrolling. I would prefer though, if it's not too much trouble, to at least have an engine capable of vertical scrolling. More like Metroid, where it will scroll vertically in a vertical shaft, unlike Mega Man 2, for example, which never scrolls vertically even if it's appropriate for the level design. With all of that said, if it fits within other design considerations, 4-directional scrolling would be the best.
darryl.revok wrote:
Asides from the outline, is that all you changed?
I did a bunch of random stuff, like in some frames, the legs where bent really weird to where it looked like there where 2 knees and weird stuff like that.
darryl.revok wrote:
try incorporating a non-brown element, or a highlight into the boots.
I personally think they look fine. The skin color is too bright for a highlight for the boots.
darryl.revok wrote:
The file you're working with has a couple other weird mistakes I fixed yesterday, so I wouldn't worry about errant pixels unless you're bored.
Wait, why didn't you just post the newest file you've made?
darryl.revok wrote:
Another weird little thing is that the boots are knee-high in the attack images but they're shorter in the walk. I think I'm going to make them all knee-high. I feel like it works better for a lot of frames because it separates the upper and lower leg into two easily distinguishable elements.
I made the boots a little higher just now:
Attachment:
 Slightly Better.png [ 5.68 KiB | Viewed 2108 times ]
darryl.revok wrote:
I found that the nice contour curves look way better than the little twinkly thing I had for the first one I drew.
I agree.
Espozo wrote:
Wait, why didn't you just post the newest file you've made?
Sorry about that. I posted the first one when I made it, and then kept working on it. I mentioned earlier I was going to hold off of posting the individual frames while I was still tweaking them. Everybody's been so helpful though, so I don't mind. It just gets confusing when there are multiple versions.
Right now this is what I have for the walk and normal attack animations. I left off the uppercut attack because I want to rework it quite a bit and add in a few more frames. This image doesn't include any of your suggestions yet.
I'm thinking I'm going to time the speed of the attacks by their number of animation frames. So, since I'll consistently make these for 1/6th of a second, I want to add more frames at the start of the uppercut swing so it's slower to initiate. I'm going to think about how fast vs. strong I want these attacks to be when I'm animating them.
darryl.revok wrote:
Even if I had 64 tiles per character, my walk cycle alone is 64 minus duplicate frames, so there may be some issues loading up the next animation.
Most mappers are ROM-based (meaning you just change banks), and banks contain several tiles, so you're just looking at writing a few bytes.
Added a new frame for the crouch back attack animation. Here are the individual frames for it. That made it a little smoother, but also made it slightly slower vs. a normal attack which was my main intention.
Next I'm going to do a new animation for drawing her sword, and figure out how I'm going to handle animation for attacking with sword sheathed vs. attacking with sword drawn. I want it to be a little quicker if the sword is already drawn, but drawing the sword early would limit her mobility.
Quote:
But playing these games once again stirred the desire to make my own contribution to the gaming library of my favorite consoles.
This is exactly how I feel. As if making a new game is a contribution to gaming.
These all look pretty neat. Smooth animations, but not impossible within NES limits.
I wouldn't be opposed to putting some sort of design on her boots, but I also think it's fine how it is—Up to you really. Her wearing a leotard already makes her arms and legs visible, kind of like Mario's overalls and Link's tunic
Pik wrote:
These all look pretty neat. Smooth animations, but not impossible within NES limits.
I'm honestly jealous of CHR rom on the NES. Really, with a mapper chip, you can have just about as many frames of animation you want, can't you? Not even the SNES can do that, all because of vram and how slow it is to update it...
Pik wrote:
I wouldn't be opposed to putting some sort of design on her boots
I really just don't have a clue what the design would be.
Espozo wrote:
I'm honestly jealous of CHR rom on the NES. Really, with a mapper chip, you can have just about as many frames of animation you want, can't you? Not even the SNES can do that, all because of vram and how slow it is to update it...
On the Super NES, you're also typically displaying far more and larger sprites. An NES scene can have up to 128 tiles' worth of sprites. On Super NES, 128 distinct sprite tiles take up 4096 bytes, which is well within what can be DMA'd to the PPU.
You can still animate backgrounds.

Having something like a Metal Slug style boss on the NES would be awesome, even if it would obviously take the background.
This is what I mean:
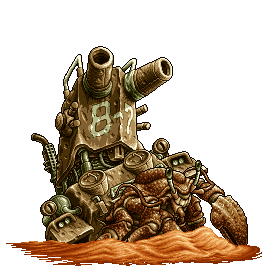
A boss of that scale on the NES would be the coolest thing ever. I doubt it could go full-on Metal Slug, but I'd like to see where it goes.
Quote:
I really just don't have a clue what the design would be.
Maybe adding shine would work? A bright pixel or two to represent some gleam. It's not a design, but it's something.
Espozo wrote:
You can still animate backgrounds.
For the record, you reminded me how After Burner literally has the nametables in CHR-ROM (which makes it much faster to change them, at the cost of needing more ROM =P)
Hey ya'll. Still working on this. I've only got a few more animations I want to add before I start working on getting her into a game engine.
Here are some of the new and improved animations. Any thoughts?
How the heck can you animate so fast?
It kinda looks like she's not wearing anything below the waist but thong underwear, and after she pulls the sword out, she's not so much walking, but shimmying and shaking her butt. Just saying'.
Espozo wrote:
How the heck can you animate so fast?
I felt like this was taking a while.
I dunno if my techniques are the best way but these are some of the things I've been doing:
Keeping each frame of a my project as an individual layer in a single file, so I can always flip between my frames and see the previous frame or the next frame.
Keep a layer that's green (you can use blue if there's a lot of green in your images) and have it set to low opacity. I put it underneath of the frame on which I'm working, and put the frame I'm looking at for reference under the green one. That way I can see my last frame and still draw over it at the same time. This is a common animation technique from the cel-drawing days but I don't know what the sheet was called.
After I drew her head in several positions I haven't had to redraw that completely for a while. I'll copy the head usually.
I've taken to drawing her body, head, and legs first, with no arms or sword. It's way easier this way, rather than trying to figure out how to make the shapes you want in a mismatch of pixels overlapping one another.
If you have a longer animation, draw your key frames first, and then do your in-between frames after. It's easier a lot of times if you know, okay, "I have to get this pixel over here within two frames"
If you're doing an animation that occurs while your character is moving across the screen, it seems to help for me sometimes to actually shift the image that many pixels per frame while drawing. Then you can know exactly where her feet should be. I did this while drawing the scoot animation, and that one equals one pixel of movement per frame of a four-frame animation.
Hope any of this helps!
I'm being given the impression that the GIFs are misleading since most likely they aren't animating at the intended speed (I bet those attacks are meant to be much faster, but look awful at the speed shown here).
dougeff wrote:
It kinda looks like she's not wearing anything below the waist but thong underwear
She has boots. Those are below the waist.
dougeff wrote:
and after she pulls the sword out, she's not so much walking, but shimmying and shaking her butt. Just saying'.
That's kind of the idea. If her sword is sheathed, she can walk but would attack slower. If she draws, she can attack quicker but her mobility is lowered. It's not so much of a walk as a scoot, and slightly over exaggerated for cartoon purposes. I did a few different tries on that one, and in reality, she wouldn't have to kneel down like that to move in that way, but with her short little cartoon legs she kind of does, plus the up and down really added a lot of movement to the character so I left it in.
Sik wrote:
I'm being given the impression that the GIFs are misleading since most likely they aren't animating at the intended speed (I bet those attacks are meant to be much faster, but look awful at the speed shown here).
Any browsers that's I've seen them on seem to play the intended speed, 1/10th of a second per frame. What don't you like about them?
The speed looks fine on my browser.
darryl.revok wrote:
Sik wrote:
I'm being given the impression that the GIFs are misleading since most likely they aren't animating at the intended speed (I bet those attacks are meant to be much faster, but look awful at the speed shown here).
Any browsers that's I've seen them on seem to play the intended speed, 1/10th of a second per frame. What don't you like about them?
Huh, that'd be 6 frames for every sprite... that looks like it'd be quite slow for the attack animations (at least when her weapon is moving, not all sprites necessarily have to appear the same amount of frames).
darryl.revok wrote:
I'm drawing at 6 fps which to me looks pretty fluid for NES. That should be 10 NES frames per animation frame.
The sword slashing animations feel pretty slow at 6 FPS, but maybe that's just me.
You don't have to stick to exactly 6 FPS; you can always make some frames faster or slower than others. Of course, you're still limited by bandwidth, but you might be able to relax that limitation somewhat by delaying other tasks that require bandwidth.
Joe wrote:
The sword slashing animations feel pretty slow at 6 FPS, but maybe that's just me.
I was thinking the same thing.
Joe wrote:
You don't have to stick to exactly 6 FPS; you can always make some frames faster or slower than others. Of course, you're still limited by bandwidth, but you might be able to relax that limitation somewhat by delaying other tasks that require bandwidth.
Aren't you only concerned about that if you're using chr ram? I thought he would have been using a special mapper that allows you to access more tiles in chr rom.
I'll definitely try tweaking the attack speeds. On the stronger attacks, I actually want them to be slower. It's the trade-off of using a more powerful attack. Kind of like the smash moves in smash bros.
I may actually redo a lot of the animations. When I did some of the first ones, especially the attacks, I wasn't putting too much thought into her movements. I feel like I've become more conscious of it during the project.
Right now I'm plugging some of these animations into my first NES software project, so we'll see how that goes.
I was actually wrong about the 6 fps. They're all at 10 fps, expect for some of the frames I held out to 1/2 second for animations sake. That's pretty fast. I don't know if I'll be able to go much faster with two or three enemies on the screen simultaneously.
From what I understand, the 64 displayable sprites are DMAed from system memory to the PPU every frame, so that won't be a bottleneck.
If there is a bottleneck it would either be in transferring images from CHR to RAM, or in bank-switching, but I'll have to see.
I need to reread earlier responses to this post now that I believe I have a better understanding of the technical advice.
darryl.revok wrote:
If there is a bottleneck it would either be in transferring images from CHR to RAM, or in bank-switching, but I'll have to see.
Bank switching is instantaneous (except for a few cycles spent to switch banks), so there's no bottleneck if you use CHR-ROM. There are other limitations, but none that would force you to reduce animation speed.
Uploading tiles to CHR-RAM does take time, and this is where your animation speed might be limited.
It's possible to have both CHR-ROM and CHR-RAM on the same cartridge. I'm not sure why you would need that, but it's an option.
Joe wrote:
darryl.revok wrote:
If there is a bottleneck it would either be in transferring images from CHR to RAM, or in bank-switching, but I'll have to see.
Bank switching is instantaneous (except for a few cycles spent to switch banks), so there's no bottleneck if you use CHR-ROM. There are other limitations, but none that would force you to reduce animation speed.
Say you do like SMB2 and SMB3, both of which use the MMC3 with CHR ROM, and bankswitch the player's tiles at PPU $1000-$13FF. You can do one of three things, one of which does reduce enemies' animation speed:
- Bankswitch each of three enemies' tiles into $1400-$17FF, $1800-$1BFF, and $1C00-$1FFF. This will limit you to three simultaneous enemies. This can be perfectly fine for a one-on-one fighting game, a Final Fight-style beat-em-up, or a platformer with DKC-sized enemies.
- Bankswitch an entire enemy set's tiles into $1400-$1FFF. This will limit the fluidity of the enemy animations that can be stored in a 192-tile enemy set.
- Pay big bucks to design a mapper with finer-grained CHR ROM bankswitching.
Quote:
It's possible to have both CHR-ROM and CHR-RAM on the same cartridge.
Outside of China, only two games did this:
Pinbot and
High Speed. They were on the TQROM board. It's more common on Chinese MMC3 clones because the Chinese language uses far too many characters to fit in a single CHR ROM bank.
tepples wrote:
Say you do like SMB2 and SMB3, both of which use the MMC3 with CHR ROM, and bankswitch the player's tiles at PPU $1000-$13FF. You can do one of three things, one of which does reduce enemies' animation speed:
Bankswitch each of three enemies' tiles into $1400-$17FF, $1800-$1BFF, and $1C00-$1FFF. This will limit you to three simultaneous enemies. This can be perfectly fine for a one-on-one fighting game, a Final Fight-style beat-em-up, or a platformer with DKC-sized enemies.
Bankswitch an entire enemy set's tiles into $1400-$1FFF. This will limit the fluidity of the enemy animations that can be stored in a 192-tile enemy set.
Pay big bucks to design a mapper with finer-grained CHR ROM bankswitching.
I'm liking the idea of having 4 switchable banks. That way I don't have to be limited with my enemy design and placement. I'll only be able to have one animation cycle per bank, and in some cases I may even have to split up bigger animations into two banks, but that should still be okay. I always have time to switch a bank between a frame if I'm expecting it. I feel like the tricky part will be interrupting animations, such as if a player got hit or decided to move. I want to see if I can possibly fit the first frame of all or most animation paths a player could take from an animation cycle into the 64 tile bank. So, for example, every bank would need to have the first frame to getting hit, and the taking damage bank should have the first frame of whatever the player might decide to do after given control back.
My first question about this is exactly how many switchable 64 tile banks I can have.
My second question is concerning the fact that this is dubbed the "Battletoads" technique, and I'm wondering if anyone else has seen a high rate of bugginess with Battletoad carts. They seem to do okay if the carts cleaned up, but I feel like almost every time I've seen this game in the wild, it's ended up glitching a lot by the end of level one and level two is where it usually goes to hell. Now that I think about the way it works, it seems like the glitching that I often see could result from loading the improper banks, as tiles start to glitch out wildly. Has anyone else seen much of this? Did many other games use this technique?
Third question would be whether or not the remaining 4K tile bank for backgrounds is bank switchable.
I guess my fourth question would be what the downsides are to using this technique, because I'm not sure if I really see any to be honest, except for the crashing I mentioned. I can't think of too many games on the NES that had more than three simultaneous enemies on the screen of a different type. I'm thinking about shooters which have a lot of simultaneous enemies, and they're usually a lot of the same thing at any given time. If I can ever think of an example that would, it would be that genre, however, you could still cram multiple small enemy animation sets into 64 tiles. It seems like with using this technique with some experimentation, even in a shmup you could even have more varied enemies, and if you want, cram the three tilesets together at the end of a level for a boss, right?
Thanks so much for your help! I'm having a lot of fun with the code. Still trying to properly cycle multiple animations right now. Is it hard to integrate bank switching into a project?
Quote:
So, for example, every bank would need to have the first frame to getting hit
This won't be needed. With CHR ROM and a 1K bank mapper such as FME-7 or MMC3, you can put each frame of animation in a separate 64-tile bank if you want. You'd queue up the bank numbers in RAM while building the display list and actually perform them right after setting the scroll position.
Quote:
My first question about this is exactly how many switchable 64 tile banks I can have.
[...]
Third question would be whether or not the remaining 4K tile bank for backgrounds is bank switchable.
MMC3 has two modes, each with six CHR windows. In CHR bank mode $00:
- 128 tile window at $0000
- 128 tile window at $0800
- 64 tile window at $1000
- 64 tile window at $1400
- 64 tile window at $1800
- 64 tile window at $1C00
MMC3 CHR bank mode $80 inverts A12 before passing it to the bank switching circuit. Use it when you want to switch backgrounds (at $0000) with finer granularity than sprites (at $1000).
- 128 tile window at $1000
- 128 tile window at $1800
- 64 tile window at $0000
- 64 tile window at $0400
- 64 tile window at $0800
- 64 tile window at $0C00
FME-7 is simpler, with eight 64-tile windows at $0000, $0400, $0800, $0C00, $1000, $1400, $1800, and $1C00. Only one NES game was released on FME-7 in North America, so you'll probably want to forgo donors in favor of new CPLD-based boards if you go that route.
darryl.revok wrote:
I feel like the tricky part will be interrupting animations, such as if a player got hit or decided to move. I want to see if I can possibly fit the first frame of all or most animation paths a player could take from an animation cycle into the 64 tile bank.
Bankswitching is nearly instanteneous, just a couple of mapper writes and the new tiles are in. You can literally change all 512 tiles from one frame to the next without problems. This means you can easily start any anymation at any time, and they can be as fast as you want, don't worry about this.
Quote:
My first question about this is exactly how many switchable 64 tile banks I can have.
All mappers I know of that switch 1KB (64 tiles) use 1 byte to index the banks, so they can address a total of 256 banks. That should be enough for most NES sized games.
Quote:
My second question is concerning the fact that this is dubbed the "Battletoads" technique
What? No, the Battletoads technique is all about updating CHR-RAM, it doesn't have anything to do with CHR-ROM bankswitching.
Quote:
Has anyone else seen much of this?
I had never heard about Battletoads having a tendency to glitch graphics, no.
Quote:
Did many other games use this technique?
Not many, because CHR-ROM was really popular with later NES games. Some examples that come to mind are Alfred Chicken, Smurfs and Asterix. Some games using this technique are PAL only, and make use of the extended PAL VBlank to update tiles.
Again, this has nothing to do with CHR-ROM bankswitching. If you want examples of that, you can look at high profile games like SMB3 or Kirby's Adventure, but really, there are countless examples of that. Nearly all MMC3 games using CHR-ROM will use bankswitching to animate the main character.
Quote:
Third question would be whether or not the remaining 4K tile bank for backgrounds is bank switchable.
Why wouldn't it be?
Quote:
I guess my fourth question would be what the downsides are to using this technique
Only that the smallest unit you can switch is 1KB, so you have to arrange your tiles according to that. This will often result in a few unused tiles in some banks, or repeated tiles in others, wasting a little space.
Quote:
however, you could still cram multiple small enemy animation sets into 64 tiles.
Sure. Not all games have huge enemies all requiring several frames of animation.
Quote:
and if you want, cram the three tilesets together at the end of a level for a boss, right?
Definitely.
I've noticed that Mike Tyson's Punch out switches banks every few frames for the opponent (rendered as background) and I believe also switches banks mid-frame because the top of the screen uses a different tile set than the opponent. It uses MMC2, which is also an option.
dougeff wrote:
I've noticed that Mike Tyson's Punch out switches banks every few frames for the opponent (rendered as background) and I believe also switches banks mid-frame because the top of the screen uses a different tile set than the opponent. It uses MMC2, which is also an option.
The MMC2 lets you create an automatic mid-screen bankswitch by placing a special tile at the point on the screen you want to switch (there are two swiching units, one for sprites and one for background), allowing up to double the onscreen tile count without requiring any use of the CPU or timing during the frame.
Is there a good reference around for coding for the MMC3?
I found a simple tutorial for the MMC1 on the wiki and I'm trying to gain an understanding of it.
So, I see the instructions to perform these commands, but I don't get why:
Quote:
lda #$0E ; vertical mirroring, fixed $C000, 8 KB CHR pages
sta $8000 ; (use $0F instead for horizontal mirroring)
lsr a
sta $8000
lsr a
sta $8000
lsr a
sta $8000
lsr a
sta $8000
So, I get that you change the mirroring on the system by addressing the PPU, but this one is addressing the very start of program ROM, so I'm guessing $8000 is a special location for addressing the mapper. Is that correct?
So, in decimal format, the bytes sent to $8000 are:
%00001110
%00000111
%00000011 (carry set)
%00000001 (carry set)
%00000000 (carry set)
What does any of this do, and why does it have to be LSRed and written five times?
Then to switch banks, you have to do this:
Code:
mmc1_load_prg_bank:
sta $E000
lsr a
sta $E000
lsr a
sta $E000
lsr a
sta $E000
lsr a
sta $E000
rts
So this time we're addressing $E000 which I imagine is a special address for telling the mapper to switch banks. I get how the accumulator is a value from $00-$0F, except for the fact that it LSRs and writes 5 times. Seems like a common theme for addressing this mapper, but can anyone tell me why?
Then there's this bit that I'm trying to wrap my head around:
Code:
reset_stub:
sei
ldx #$FF
txs ; set the stack pointer
stx $8000 ; reset the mapper
jmp reset ; must be in $C000-$FFED
.addr nmiHandler, reset_stub, irqHandler
So, let me see if I understand what's happening here.
First off, it says that with some versions of this mapper, the end of the program is switchable. That makes me think that any bank which could be at the end of the program needs to include addresses for NMI, RESET, and IRQ starting at $FFFA. Is that correct?
Then, if your program changes, the instructions for your vectors need to be located at the same addresses, right?
So it's saying to put the above code at the last 16 bytes of a bank. So that would be like, $BFF0, right? Why does it only tell you to put the reset vector at the end of each switchable bank? Why not NMI and IRQ as well? Wouldn't those addresses need to stay the same as the banks switch?
Also it says that writing %11111111 to $8000 will reset the mapper but I don't understand why. Is there a document on the mapper instructions, particularly for MMC3?
I see now that the above code isn't a reset, but a reset stub, and I'm even more confused.
First off, wouldn't NMI, RESET, and IRQ have to be .org-ed to the same addresses in each bank?
Second, I don't really get the purpose for the above code now that I realize it's not actually the reset vector. When is this reset_stub supposed to be called? Why does it disable interrupts and set the stack to $FF when this is going to happen again anyway when it JMPs to reset?
I hope that's not too much to ask. I thought I was ready to understand this and start integrating mapper features but I need a little help. I don't even think I'm going to need to switch program banks but I'd like to understand the concepts.
Thanks for all of your help getting started!
darryl.revok wrote:
Is there a good reference around for coding for the MMC3?
There's a
reference page in the wiki, but I don't think there are any examples.
Quote:
So, I get that you change the mirroring on the system by addressing the PPU, but this one is addressing the very start of program ROM, so I'm guessing $8000 is a special location for addressing the mapper. Is that correct?
The way the program communicates with the mappers is kind of a trick: since PRG-ROM is not writable, most mappers intercept attempts to write to PRG-ROM, and use the value being written for purposes related to the mapper function. Which addresses are used for what purposes depends on the mapper.
Quote:
What does any of this do, and why does it have to be LSRed and written five times?
Because in an attempt to make the MMC1 chip cheaper, it only has 1 input bit, so you need multiple writes to send all the bits.
Each mapper switches banks completely differently, so learning how MMC1 works teaches you nothing about how MMC3 works. I wrote up some test programs for the basics of MMC3 bankswapping. I'll post it or PM it to you later, when I get back to my computer.
MMC3 - bankswapping basics.
At startup, the first 2 PRG banks are loaded to $8000-bfff, and the last 2 PRG banks are loaded at $c000-ffff.
$8000-9fff and $c000-dfff are swappable. The other 2 are fixed. I would prefer to keep c000 fixed, unless you have a lot of dmc sound files (as they need to go above $c000.)To swap PRG bank 1 (the second one) into $8000-9fff
lda #$06
sta $8000
lda #$01
sta $8001
To swap PRG bank 2 (the third one) into $8000-9fff
lda #$06
sta $8000
lda #$02
sta $8001
Etc.
MMC3 divides CHR-ROM banks into chunks of $400 bytes.
Thus 1 full set of tiles ($2000 bytes) = banks 0-7. The next set would be 8-f.
To swap a second set (8-f) into the PPU...
lda #$00 ;destination $000-7ff
sta $8000
lda #$08 ;banks 8-9
sta $8001
lda #$01 ;destination $800-fff
sta $8000
lda #$0a ;banks a-b
sta $8001
lda #$02 ;destination $1000-13ff
sta $8000
lda #$0c ;bank c
sta $8001
lda #$03 ;destination $1400-17ff
sta $8000
lda #$0d ;bank d
sta $8001
lda #$04 ;destination $1800-1bff
sta $8000
lda #$0e ;bank e
sta $8001
lda #$05 ;destination $1c00-1fff
sta $8000
lda #$0f ;bank f
sta $8001
If you want to know how the scanline IRQ works, see this tutorial...
http://bobrost.com/nes/files/mmc3irqs.txtHope this helps. BTW, these swaps happen instantaneously, and can be done anytime.
dougeff wrote:
At startup, the first 2 PRG banks are loaded to $8000-bfff
Says who? I was under the impression that bank registers 6 and 7 had unspecified values at power-on, as did the bit in $8000 for swapping windows $C000 and $8000. This means your code in $E000-$FFFF must initialize these.
Quote:
BTW, these swaps happen instantaneously, and can be done anytime.
However, trying to swap in both the main program and the NMI handler takes a bit of planning, as the main program and NMI handler have to share port $8000.
How do you initialize that? (Source code please) or is it the same as I wrote, but with the banks different?
darryl.revok wrote:
Then there's this bit that I'm trying to wrap my head around:
Code:
reset_stub:
sei
ldx #$FF
txs ; set the stack pointer
stx $8000 ; reset the mapper
jmp reset ; must be in $C000-$FFED
.addr nmiHandler, reset_stub, irqHandler
So, let me see if I understand what's happening here.
First off, it says that with some versions of this mapper, the end of the program is switchable. That makes me think that any bank which could be at the end of the program needs to include addresses for NMI, RESET, and IRQ starting at $FFFA. Is that correct?
That is correct.
Quote:
Then, if your program changes, the instructions for your vectors need to be located at the same addresses, right?
At reset, the CPU begins executing from the address stored at $FFFC. This is all that matters to the CPU. The reset vector is whatever two bytes happen to be stored $FFFC at reset/poweron. The NMI vector is whatever two bytes happen to be stored at $FFFA when the NMI fires. The IRQ vector is whatever two bytes happen to be stored at $FFFE when an IRQ fires.
There
could be a different two bytes stored at $FFFC in every bank. It's better for consistency that it's always the same, but it doesn't
need to be that way. The CPU just reads the two bytes and starts executing from that address.
Quote:
So it's saying to put the above code at the last 16 bytes of a bank. So that would be like, $BFF0, right?
Well... no and yes. Consider a bank that you .org to $8000-$BFFF. That bank can still be swapped to occupy $C000-$FFFF instead. So... yes, while code mapped to $BFF0 could end up there, you really want it in $FFF0.
The idea is to have that setup code in a part of the ROM that can't possibly be swapped "out of sync" with the vector the CPU starts executing from which will always be whatever address is at $FFFC. Using the knowledge that the reset_stub will be with a vector in the same bank, regardless of which bank that is, allows you to safely initialize the mapper to a known state using the reset_stub. Then your program can run normally.
Quote:
Why does it only tell you to put the reset vector at the end of each switchable bank? Why not NMI and IRQ as well? Wouldn't those addresses need to stay the same as the banks switch?
I don't see where you're seeing to only put the reset vector. Yes, you should have a valid IRQ and NMI vector as well. The jmp reset in
the example code is not a vector at all. The reset vector is reset_stub, and the CPU has already begun executing from there by the time jmp reset is executed. reset is just a label name. It could be jmp initialize or jmp anywhereelse you wanted to go after you knew the mapper was in a known state.
I think you're getting confused by the labels. The CPU has no knowledge of what you called reset_stub or reset or anything. It only knows what address is at $FFFC. you could call "reset_stub" "homersimpson" instead, and "reset" "supermario" and the code could still work the same. It's not like C where execution starts at a given named thing. (main.)
Quote:
Also it says that writing %11111111 to $8000 will reset the mapper but I don't understand why. Is there a document on the mapper instructions, particularly for MMC3?
You can read about MMC1
here and you can read about MMC3
here.
Quote:
I see now that the above code isn't a reset, but a reset stub, and I'm even more confused.
All the CPU does when it starts is go to the address stored at $FFFC. In the example code, that address is reset_stub. The code below reset_stub just runs normally after reset.
Quote:
First off, wouldn't NMI, RESET, and IRQ have to be .org-ed to the same addresses in each bank?
Yes. As stated above, all the CPU does is read from the address at $FFFC at reset. It will treat whatever two bytes are there as the address to start executing from, so no other kind of thing should occupy that space.
Quote:
Second, I don't really get the purpose for the above code now that I realize it's not actually the reset vector. When is this reset_stub supposed to be called? Why does it disable interrupts and set the stack to $FF when this is going to happen again anyway when it JMPs to reset?
The vector is just the address at $FFFC. The CPU starts executing from whatever address is at $FFFC, always. After that, the program runs normally. So it wouldn't disable interrupts or set the stack to $FF again unless you also put those things under the reset label in the example. (And you shouldn't, because as you said it was already done.)
So in the example case, reset_stub is the very first thing executed, always.
Quote:
I thought I was ready to understand this and start integrating mapper features but I need a little help. I don't even think I'm going to need to switch program banks but I'd like to understand the concepts.
I don't think it's too worth thinking about mappers until your game is about to be larger than 24 KB. At that point you can still make it larger without a mapper, but if you plan to use a mapper that's when you have to being to plan how you'll lay out your banks so you don't end up relying on too much of it being in a fixed bank.
Edit: I should note that some mappers start with a known state, in which case you have to worry less about this stuff. But it is very worth understanding even if you use those mappers.
OK, revision...after reviewing the init code for a MMC3 game (Batman)...
Although the emulator I've been testing MMC3 automatically loads the ROMs at startup as I described. The game does this near start-up...
07:EF66:A2 06 LDX #$06
07:EF68:8E 00 80 STX $8000
07:EF6B:A0 1C LDY #$1C
07:EF6D:8C 01 80 STY $8001
07:EF70:E8 INX
07:EF71:8E 00 80 STX $8000
07:EF74:C8 INY
07:EF75:8C 01 80 STY $8001
which has the effect of defining which bank goes at 8000-9fff, which bank goes at a000-bfff, and making c000-ffff fixed, and that the last 2 banks will be at c000-ffff.
I have to assume that actual hardware only has e000-ffff set for certain at start-up, to the last bank on the ROM.
I can't test this, because I don't have burnable/flashable cartridges, and my NES is at my dad's house.
Edit: alternatively, you could set 8000 and e000 as the fixed banks - and a000 and c000 as the swapped banks.
Quote:
I don't think it's too worth thinking about mappers until your game is about to be larger than 24 KB. At that point you can still make it larger without a mapper, but if you plan to use a mapper that's when you have to being to plan how you'll lay out your banks so you don't end up relying on too much of it being in a fixed bank.
I don't want to get ahead of myself. I'm still sticking to my animation engine until I get that perfected. I suppose I don't need to understand everything about the mapper functionality just yet, but I need to know enough to integrate it into my animation engine or I'm going to have to rewrite major portions of that down the line. I think I'm about to do a rewrite of the animation engine anyway so it seems like it would be a good time add bank support now and hopefully not have to make any big structural changes to that routine again. Plus, I already have enough animations for my main character to justify a bank swap.
Quote:
I don't see where you're seeing to only put the reset vector. Yes, you should have a valid IRQ and NMI vector as well. The jmp reset in the example code is not a vector at all. The reset vector is reset_stub, and the CPU has already begun executing from there by the time jmp reset is executed. reset is just a label name. It could be jmp initialize or jmp anywhereelse you wanted to go after you knew the mapper was in a known state.
I think you're getting confused by the labels. The CPU has no knowledge of what you called reset_stub or reset or anything. It only knows what address is at $FFFC. you could call "reset_stub" "homersimpson" instead, and "reset" "supermario" and the code could still work the same. It's not like C where execution starts at a given named thing. (main.)
Alright, I feel like I've almost got this. ALMOST. I don't plan to use MMC1 so it doesn't matter TOO much, but I would like to understand it.
Okay, the reason why I'm saying that it says to only put the reset vector is this:
Quote:
Some revisions of the MMC1 IC might power up in a mode other than fixed-$C000, requiring that the vectors and the start of the init code be placed in all banks, much as in BxROM or AxROM or GxROM. Other revisions guarantee that the fixed bank is loaded at power on. To make sure your code works on all MMC1 revisions, put the following code in the last 16 bytes of each 16384 byte bank. (Barbie uses almost identical code.)
reset_stub:
sei
ldx #$FF
txs ; set the stack pointer
stx $8000 ; reset the mapper
jmp reset ; must be in $C000-$FFED
.addr nmiHandler, reset_stub, irqHandler
It tells you to put that code at the end of each 16384 bank. That's the only code it tells you to put there. It doesn't say to put the NMI handler or anything like that there.
1. Now, what I have learned is to put a .org statement at the end of your code so you can put the vectors at the right location in the PRG ROM. This, if I understand correctly, tells you to put those addresses for the vector at the end of each bank. So i imagine you couldn't .org $FFFA, because it might be in the first bank. So how would you make sure that what you're writing actually occupies the last 16 bytes without a .org? And when you're writing with extra program banks, how are you supposed to write code in memory spaces that are identical addresses to ones you've already written in the same program? Wouldn't the assembler throw up a flag? It's not like it understands that you're using a mapper. Do you write it in a different file and include it as a bin?
2. So if you have that at the last 16 bytes of your first bank, it won't address the vectors because they're not at the actual vector address. You will, however, have an identical label for a memory location called reset_stub as the one that lies in your second bank. Now, I know that name is only for coding and is interpreted by the assembler and doesn't make it to the actual program. but won't the assembler say, "You have two labels for reset_stub and I can't put both of them at $FFFC."?
3. I'm going to guess that when you write a bank, even if you can't know for sure if it will be booted on startup, then you'll know for sure that if it will be loaded into the top or bottom. That's gotta be true, right? Well, you said that this could actually happen.
4. It says that reset (the rest of the reset instruction not in the stub) must be located in $C000-$FFED. What about the nmi instructions and the irq instructions? Won't those have to be at the same point in all four banks in case any of those banks landed to where the vector addresses are pointing? If you could put a bank in the top that goes in the bottom, it seems like you're going to have to put copies of all of your interrupt instructions in every single bank. Why would you ever want to switch a bank between the top and bottom of your code? I can't imagine a situation in which a program would benefit from flipping the top and bottom halves in a way that couldn't be better achieved through branching and subroutines.
While writing that last paragraph I also got so frustrated that I canceled this whole post until I realized that I had spent way too long writing it and trying to understand it to just give up now. If I could hear that there is no way a person could ever want to switch a bank between the top and the bottom and it's just a glitch in the mapper that you have to account for then I'd feel decent at least about getting it. I can't imagine why it would be done on purpose.
I'm going to make another reply for a more productive and hopefully less aggravating topic, getting my game to function with MMC3 CHR switching.
Thank you for the instructions on bank switching. The MMC3 doesn't seem near as confusing at least when it comes to that.
So, the CHR-ROM part seems pretty simple. You write the number of the bank you're switching out, 0-8, to $8000, then write the bank you're switching in, 0-FF, to $8001. When I see that, it's simple, but when I look at the reference page in the wiki it's almost too much information to process at once. I'll try to break this down a little at a time.
Quote:
The MMC3 has 4 pairs of registers at $8000-$9FFF, $A000-$BFFF, $C000-$DFFF, and $E000-$FFFF - even addresses ($8000, $8002, etc.) select the low register and odd addresses ($8001, $8003, etc.) select the high register in each pair.
Okay, I don't get any of this. I thought a register was like the x register and the y register and the accumulator.
So when you say to STA $00 to $8000 you are addressing the low register, and when you STA $08 to $8001 you are addressing the high register. What does that mean?
Also, the MMC3 doesn't have an option for a save battery, does it? That's unfortunate, I was really hoping my game could let you save. It looks like it does have support for 4-screen nametables though. Could they put RAM in the reproduction MMC3s for 4-screen nametables? Just curious. It would make bi-directional scrolling a lot less hassle.
darryl.revok wrote:
Quote:
The MMC3 has 4 pairs of registers at $8000-$9FFF, $A000-$BFFF, $C000-$DFFF, and $E000-$FFFF - even addresses ($8000, $8002, etc.) select the low register and odd addresses ($8001, $8003, etc.) select the high register in each pair.
Okay, I don't get any of this. I thought a register was like the x register and the y register and the accumulator.
They're
memory-mapped I/O ports. Lately, in my own work, I have tried to use "port" for addresses that refer to something other than byte-addressed memory. What it's trying to say is that $8000, $8001, $A000, $A001, $C000, $C001, $E000, and $E001 are the actually unique ports, and all other addresses in $8002-$FFFF are mirrors of those ports.
Quote:
So when you say to STA $00 to $8000 you are addressing the low register, and when you STA $08 to $8001 you are addressing the high register. What does that mean?
The extent to which we must explain this depends on the extent to which you understand memory-mapped I/O.
Quote:
Also, the MMC3 doesn't have an option for a save battery, does it?
Kirby's Adventure saves to battery RAM, as do some hacks of
Super Mario Bros. 3 that are intended to run on
Kirby's Adventure circuit boards.
Quote:
Could they put RAM in the reproduction MMC3s for 4-screen nametables?
Yes, but it'd cost more.
tepples wrote:
The extent to which we must explain this depends on the extent to which you understand memory-mapped I/O.
Well I understand that things like the CPU and PPU have two-byte addresses that are exposed for the program to send instructions to the hardware. I don't know if I need to understand it too much more than that right now other than how the processors respond to the bits they're sent.
So $8000 and $8001 are two different ports and you write to them to perform different functions?
I will say that there are almost no pages online about NES development that are not intimidating to a beginner. There are definitely helpful people in the forums and helpful posts if you dig for them, but I would bet 9 out of 10 people who might be interested in this hobby are deterred from even starting when they look online and can't understand anything they read.
I'm not saying the information should be dumbed down. I'm a n00b and I'm not to the point where I read something like that and understand it right off. A week ago I couldn't have read 6502 assembly and understood the instructions. I'm just saying there's a huge gap in the area of information on the topic of NES programming which isn't directed to someone with a background in assembly programming. There's like one tutorial for beginners and you have to dig through forums and find people talking about it to even find that.
Is there anything I need to put at the start of my file other than changing the iNES header?
At least the $E000-$FFFF PRG-ROM bank is fixed. Whew. So I don't have to worry about sticking the interrupt vectors everywhere. Should I just put the instructions for NMI, RESET, and IRQ in here as well so I don't have to worry about them moving?
darryl.revok wrote:
So, the CHR-ROM part seems pretty simple. You write the number of the bank you're switching out, 0-8, to $8000, then write the bank you're switching in, 0-FF, to $8001.
Instead of "the number of the bank you're switching out" it would be more accurate to say "the slot where the bank will be switched in". That's how the MMC3 works: you first tell it what slot to use, and then what bank to put in that slot.
Quote:
Quote:
The MMC3 has 4 pairs of registers at $8000-$9FFF, $A000-$BFFF, $C000-$DFFF, and $E000-$FFFF - even addresses ($8000, $8002, etc.) select the low register and odd addresses ($8001, $8003, etc.) select the high register in each pair.
Okay, I don't get any of this. I thought a register was like the x register and the y register and the accumulator.
X, Y and A (and also the stack pointer, the program counter and the status flags) are CPU registers, this is talking about mapper registers. A register is simply a small unit of memory inside a chip. The same way the CPU uses its registers to perform tasks, the mapper has to keep track of things like which banks are loaded where and the current value of the scanline counter, and this information is stored in its registers.
In order to have the mapper do what we want, we have to send it data to populate these registers, and this is done through memory mapped IO. This means that memory addresses are used for communication with different parts of the system, rather than for actual memory. There are chips inside the NES and inside the cartridges that are constantly watching the addresses that are accessed by the CPU and PPU, and they can redirect these accesses to different parts of the hardware depending on what the addresses are. For example, when you do "STA $0405", how does the CPU know that the value is supposed to go to the internal 2KB of RAM, and not to the PPU or to the cartridge? It looks at the address. Any address between $0000 and $1FFF will activate the internal RAM. Anything between $2000-$3FFF will activate the PPU ports. Anything between $8000-$FFFF will activate the PRG-ROM in the cartridge. This process of selecting a device or a register based on a memory address is called address decoding.
As far as the NES is concerned, $8000-$FFFF is just a flat memory space, but mappers have the capacity to take different actions depending on which address is accessed. Each mapper will divide the memory range differently depending on its needs and implementation limitations. The MMC3 breaks the space up in 4 parts, since it has 4 pairs of registers, and alternates even and odd addresses to select a registers within the pair.
The way the registers are arranged in memory is just a side effect of using the address bits that the MMC3 designers decided to use. The MMC3 has 8 accessible registers. To address 8 positions, we need 3 bits (enough to count from 0 to 7). The guys who designed the MMC3 could have picked any 3 bits out of the 16 that form an address, but they picked bits 0, which selects between even and odd, and bits 13 and 14, which select between $8000-$9FFF, $A000-$BFFF, $C000-$DFFF or $E000-$FFFF. They could have picked other bits, but they picked these, resulting in the register layout you see in the wiki.
Quote:
Also, the MMC3 doesn't have an option for a save battery, does it? That's unfortunate, I was really hoping my game could let you save.
Several MMC3 games have battery-backed SRAM.
darryl.revok wrote:
I will say that there are almost no pages online about NES development that are not intimidating to a beginner. There are definitely helpful people in the forums and helpful posts if you dig for them, but I would bet 9 out of 10 people who might be interested in this hobby are deterred from even starting when they look online and can't understand anything they read.
Can you just imagine how things were before the internet? These days it seems like people want everything to be handed to them in a silver platter. Well, back in the 80's and 90's people didn't have video tutorials on YouTube detailing every little thing they had to do and somehow people still managed to learn assembly and make games.
Retro software development is a niche thing, it's not profitable, so there's obviously not gonna be as much material about it as there is for current technologies. Whatever is out there is the work of hobbyists, who don't always have a lot of free time.
Quote:
I'm a n00b and I'm not to the point where I read something like that and understand it right off.
That's because this is not a simple subject. To understand memory mapping and mirroring you have to understand the binary system, computer architecture, and a bit of electronics, things that most new programmers don't care about. There's too much knowledge involved and there's no amount of dumbing down that will make anyone understand these concepts right off the bat... it takes years to master all of that! The good news is that you don't have to master everything in order to make games... so don't feel bad if you don't understand every single word in a wiki page. As long as you start small (e.g. don't expect to code SMB3 as your first NES project) and do things according to the book, with help from people in this forum, things will slowly fall into place as you go. There's no rushing that process.
Quote:
Is there anything I need to put at the start of my file other than changing the iNES header?
It's not so much "changing" as it is "creating" the iNES header. Anyway, I don't remember you mentioning which assembler you're using, so I can't say much about how to set things up.
Quote:
Should I just put the instructions for NMI, RESET, and IRQ in here as well so I don't have to worry about them moving?
Definitely. If you need to access other banks from the NMI or IRQ handlers (such as the NMI needing music code and data), they can switch in whatever they need (just be careful to restore whatever banks you change, so as to not break things after you return from the interrupts).
Reading the whole initialization stuff... Something I'd like to remark: you should never rely on startup values from a mapper because it's likely they won't get restored when the Reset button is pressed. It's annoying when a game doesn't respond properly to the Reset button =P
Sik wrote:
It's annoying when a game doesn't respond properly to the Reset button =P
Even more annoying is when the game uses the Reset button to exit a particular level, as in that
X-Men game for Sega Genesis. If you're in that level, it goes to the next level. If you're in any other level, it starts the game over.
Then the other problem is in a multicart like
Super Mario Bros./Duck Hunt. Should Reset go back to the game select or to the game's own menu? In
SMB/DH, it goes back to game select. In
Action 52, it goes back to an unskippable cut scene followed by game select. In
Action 53, it's a bit inconsistent: NROM games go back to game select, while bigger games go back to the game's title screen and are expected to have "quit" on the menu.
Quote:
And when you're writing with extra program banks, how are you supposed to write code in memory spaces that are identical addresses to ones you've already written in the same program? Wouldn't the assembler throw up a flag? It's not like it understands that you're using a mapper. Do you write it in a different file and include it as a bin?
I was going to answer this, but I think I'll leave this to the more experienced people here. Do you guys compile each bank separately and have a final file with a bunch of 'incbin' statements, or do you have each bank in separate ASM files and have a final file with a bunch of 'include' statements?
I have .asm files dedicated to each need (player, metasprite, sprite cel loading, background loading, menus, etc.), and each file places data into the segments associated with separate banks as needed.
Quote:
It tells you to put that code at the end of each 16384 bank. That's the only code it tells you to put there. It doesn't say to put the NMI handler or anything like that there.
Well, because it doesn't need the NMI handler at the end of every bank. What is guaranteed to happen when the console turns on? The game starts executing from the RESET vector's address.
The very first instruction SEI makes it so an IRQ won't fire. Yes, it might be
possible for an NMI to fire in the very few instructions (probably less than 4) before you disable them, and then the game might crash. But usually the user would just think, "Oh, I need to blow on my cartridge."

Quote:
So i imagine you couldn't .org $FFFA, because it might be in the first bank. So how would you make sure that what you're writing actually occupies the last 16 bytes without a .org? And when you're writing with extra program banks, how are you supposed to write code in memory spaces that are identical addresses to ones you've already written in the same program? Wouldn't the assembler throw up a flag? It's not like it understands that you're using a mapper. Do you write it in a different file and include it as a bin?
Most of this isn't terribly important if you're not using MMC1, and a lot of solutions to the potential problems you lay out are assembler specific. But the one question to answer is, "How are you supposed to write code in memory spaces that are identical addresses to ones you've already written in the same program?"
And the answer is, you just do. .org $8000 in multiple banks and just write code. How the assembler knows whether or not that's a new bank varies a lot between assemblers.
Quote:
Now, I know that name is only for coding and is interpreted by the assembler and doesn't make it to the actual program. but won't the assembler say, "You have two labels for reset_stub and I can't put both of them at $FFFC."?
Depends on the assembler.
Quote:
3. I'm going to guess that when you write a bank, even if you can't know for sure if it will be booted on startup, then you'll know for sure that if it will be loaded into the top or bottom. That's gotta be true, right? Well, you said that this could actually happen.
No, you don't necessarily even know that at startup for some mappers. So that reset stub really does need to be in all banks.
That said, when you design your bank layout, you do design it so that it would always be swapped in at a particular place. (Whereever it's .org'd to.)
Quote:
It says that reset (the rest of the reset instruction not in the stub) must be located in $C000-$FFED. What about the nmi instructions and the irq instructions? Won't those have to be at the same point in all four banks in case any of those banks landed to where the vector addresses are pointing? If you could put a bank in the top that goes in the bottom, it seems like you're going to have to put copies of all of your interrupt instructions in every single bank. Why would you ever want to switch a bank between the top and bottom of your code? I can't imagine a situation in which a program would benefit from flipping the top and bottom halves in a way that couldn't be better achieved through branching and subroutines.
This may make more sense if you read the MMC1 documentation, specifically load:
http://wiki.nesdev.com/w/index.php/MMC1 ... .24FFFF.29When you write a set high bit to $8000, it ensures that mapped to $C000-$FFFF is the last 16 kilobytes of your PRG ROM. So if you've got sixteen 16KB banks, bank15 now occupies $C000-$FFFF. Another way to say it is the reset label needs to be in that bank. But that initialize code only ensures $C000-$FFFF. Nothing is guaranteed about $8000-$BFFF, but reset should take care of that. And yes, it's possible for an NMI to fire but typically reset would just disable it. You could put a disable NMI under reset_stub, but because that's duplicated everywhere, it becomes a waste. reset_stub is designed the do the absolute minimum to ensure the rest of the reset is only done once. THAT should set up $8000-$BFFF and then NMIs could be reenabled and everything would be cool.
Quote:
If I could hear that there is no way a person could ever want to switch a bank between the top and the bottom and it's just a glitch in the mapper that you have to account for then I'd feel decent at least about getting it.
There are reasons you might want to do that. And even if not, some people would prefer to have their code fixed at $8000 all the time, and some people would prefer their code fixed at $C000 all the time so the mapper supports both. And people aren't responsible for which of those two behaviors the mapper boots with. It's "random". The reset_stub ensures that $C000 is fixed to the last bank. Less random. Then reset would set it up exactly how you like.
I could swear I saved the draft I typed earlier. Ugh. I'll get back to the off topic things later. You guys did actually answer my questions, as convoluted as they were. Thank you for taking the time to help a confused n00b.
So, I'm just going to see if I can break down what I need to get MMC3 functionality and how to start coding CHR bank switches. I'll start with the iNES header.
tokumaru wrote:
It's not so much "changing" as it is "creating" the iNES header. Anyway, I don't remember you mentioning which assembler you're using, so I can't say much about how to set things up.
I am using ASM6. I hear people say CA65 is better. I'm honestly not opposed to switching, I just started with ASM6 because I found a version of the Nerdy Nights tutorial for ASM6 so I had a place to start there. I did find more documentation on CA65 however, and I can see that it has a more robust directives list, so that's one benefit I can see from it, but other than that I'm not sure how the assemblers differ.
So from the iNES NESDEV Wiki Page, I see:
Quote:
An iNES file consists of the following sections, in order:
Header (16 bytes)
Trainer, if present (0 or 512 bytes)
PRG ROM data (16384 * x bytes)
CHR ROM data, if present (8192 * y bytes)
PlayChoice INST-ROM, if present (0 or 8192 bytes)
PlayChoice PROM, if present (16 bytes Data, 16 bytes CounterOut) (this is often missing, see PC10 ROM-Images for details)
So, on my program, taken from Nerdy Nights, I have:
Code:
byte "NES",$1a ; basically "NES" plus a terminator
byte $01 ; 1x16 PRG-ROM block ($c000)
byte $01 ; 1 CHR-ROM block
byte $00 ; dontcare
byte $00 ; dontcare
dsb 8 ; 8 bytes padding
Hopefully now I'm ready to come back to this part and understand it. This is all in the first 16 bytes so obviously it's just the header. From the wiki, I see:
Quote:
The format of the header is as follows:
0-3: Constant $4E $45 $53 $1A ("NES" followed by MS-DOS end-of-file)
4: Size of PRG ROM in 16 KB units
5: Size of CHR ROM in 8 KB units (Value 0 means the board uses CHR RAM)
6: Flags 6
7: Flags 7
8: Size of PRG RAM in 8 KB units (Value 0 infers 8 KB for compatibility; see PRG RAM circuit)
9: Flags 9
10: Flags 10 (unofficial)
11-15: Zero filled
So 0-3 are ALWAYS "NES",$1a because that's what it expects. That's easy enough to remember. I don't think there's any practical reason why I'd need to understand that better.
4- So, at this point, I have just the basic non-switch PRG ROM, but I feel I need to understand this. My program has $01 as the entry, so what is 00? Just a non-existent program? I guess the big question for this is, "If my banks are switchable but not loaded, are they included in this total?" Instinctually I would think no, because they're not part of the program loaded by the CPU as $8000-$FFFF, however after a little more thought, I'm thinking the answer is yes, since this is just telling an emulator how large of ROM space it has to draw PRG code from, so I'm going to guess yes. Is that correct? If I had a total of 64KB of program data between all of my banks, would the answer be 07?
5- This seems to be the largely same formula as PRG ROM except with 8 KB, but this is where I'll actually be making adjustments for what I'm doing. Now with my MMC3 individual banks will be smaller than 8KB each, but it looks like I need to add them to my program in 8K chunks. Seems there's no option to do otherwise. So does this mean that I need to create 2 2K blocks for every 4 1K blocks? And would I need to order them a certain way so that they would be loaded properly? I'm getting ahead of myself from the header here, but I'll certainly need to know that much.
I'm imagining that I have to structure my CHR-ROM in 2 x 2KB blocks followed by 4 x 1KB block. So, if I just needed to add more 1KB blocks, I'd have to add an extra 4KB at the beginning for filler. Is that correct, or could I dedicate an entire 8K chunk to 1K character animation blocks?
6- Okay this is where it gets trickier. My program just says $00 for now. Okay, so bit zero is for mirroring, I get that. If bit 3 is 1, then it looks like it ignores bit 0. Bit 1 means that it contains a battery backed RAM, so I'll skip over that for now. Same with Bit 2 and the trainer. I don't even know what the trainer is. (explains later in the article; don't need it) Then there's the lower nybble of the mapper number. So a nybble is 4 bits. Mapper number is 04, 118, or 119. I'm going to just guess 04 is the most common one. So, the lower nybble of 04 is 0100, right? If that's correct, how would the software distinguish between mappers numbered greater than 0-15? Maybe I'll answer that myself before I get to the end of this post.
7-Alright, another byte. This one looks like a lot of stuff that I don't need at all. Bit 0, VS Unisystem, no, 0. PlayChoice-10, no, 0. NES 2.0, no, 0. Then there's that upper nybble. All zeros for this one. Okay so that's all zeros in this byte.
8- Okay, now the PRG-RAM. I have to admit, I am confused on PRG-RAM. That's where you write your data for battery-backed save games, right? Is there any other reason that you'd use it? I see it would get addressed at $6000-$7FFF. This is completely separate from extra VRAM for 4-screen mirroring isn't it?
9- Basically looks like it should just be zero. Even if designing for PAL it says it doesn't really do much.
10- It says this byte is not part of the official specification. Should I just fill it with 0s or try to answer the questions in it? TV system, NTSC, so 0 for bits 0 and 1, PRG RAM, not present I imagine? As I said, program RAM isn't something that I understand the idea of too well other than for saving games. And as far as bus conflicts on my board, I'm going to hope that my virtual board has so bus conflicts, so I'd go with 0 on that one too.
11-15- Zero filled. Simple. It looks like in ASM6, I just use dsb 5 to fill that space zeroes.
So if I have figured this correctly, this should be the header I need:
Code:
byte "NES",$1a ; basically "NES" plus a terminator
byte $01 ; 1x16 PRG-ROM block ($c000)
byte $02 ; 2 CHR-ROM blocks
byte $%01000001 ; vertical mirroring, mapper #004
dsb 9 ; 9 bytes padding
So as long as I'm correct I feel like I have most of an understanding on how to build the header, although I am confused on a few things like PRG-RAM and arrangement of CHR banks.
Thanks again for all of the assistance!
darryl.revok wrote:
So 0-3 are ALWAYS "NES",$1a because that's what it expects. That's easy enough to remember. I don't think there's any practical reason why I'd need to understand that better.
4- So, at this point, I have just the basic non-switch PRG ROM, but I feel I need to understand this. My program has $01 as the entry, so what is 00?
The meaning of $00 in this byte is not defined in original iNES format.
darryl.revok wrote:
If I had a total of 64KB of program data between all of my banks, would the answer be 07?
A 65536 byte PRG ROM would be $04, as it is measured in 16384 byte units.
Quote:
Now with my MMC3 individual banks will be smaller than 8KB each, but it looks like I need to add them to my program in 8K chunks.
It's actually stricter than that. Existing MMC3 boards require the size of CHR ROM to be a power of 2: 32768 bytes, 65536 bytes, 131072 bytes, or 262144 bytes.
Quote:
Seems there's no option to do otherwise. So does this mean that I need to create 2 2K blocks for every 4 1K blocks?
Not necessarily. It's fine to have a game that only ever uses two 2K blocks and sixty 1K blocks. This would be a 65536 byte CHR ROM: 64 1K blocks, and $08 in byte 5 of the header.
Quote:
And would I need to order them a certain way so that they would be loaded properly?
Other than that each 2K block starts on a 2K boundary (no straddling, say, $07-$08), order doesn't matter in standard MMC3 boards (mapper 4).
Quote:
could I dedicate an entire 8K chunk to 1K character animation blocks?
Yes.
Quote:
6- Okay this is where it gets trickier. My program just says $00 for now. Okay, so bit zero is for mirroring, I get that. If bit 3 is 1, then it looks like it ignores bit 0.
Correct. In fact, bit 0 never matters for existing MMC3 games, as MMC3 games are supposed to configure mirroring at runtime. Only one MMC3 game was ever released with bit 3 turned on:
Rad Racer II.
Quote:
8- Okay, now the PRG-RAM. I have to admit, I am confused on PRG-RAM. That's where you write your data for battery-backed save games, right? Is there any other reason that you'd use it?
The battery-less PRG RAM in a TSROM is just an extra block of RAM that a game can use for any purpose.
Super Mario Bros. 3 and
M.C. Kids use it to cache the decompressed level maps. Some other games were engineered not to need it, as it's an extra cost option at manufacturing time.
Quote:
[PRG RAM] is completely separate from extra VRAM for 4-screen mirroring isn't it?
Yes. PRG RAM is on the CPU side of the bus, and 4-screen VRAM is on the PPU side.
Quote:
And as far as bus conflicts on my board, I'm going to hope that my virtual board has so bus conflicts, so I'd go with 0 on that one too.
MMC3 never has bus conflicts.
Quote:
So if I have figured this correctly, this should be the header I need:
Code:
byte "NES",$1a ; basically "NES" plus a terminator
byte $01 ; 1x16 PRG-ROM block ($c000)
byte $02 ; 2 CHR-ROM blocks
byte $%01000001 ; vertical mirroring, mapper #004
dsb 9 ; 9 bytes padding
This looks reasonable. It gives you 16384 bytes PRG ROM, 16384 bytes CHR ROM, and the most common MMC3 configuration.
tepples wrote:
darryl.revok wrote:
If I had a total of 64KB of program data between all of my banks, would the answer be 07?
A 65536 byte PRG ROM would be $04, as it is measured in 16384 byte units.
My mistake. I got the CHR and PRG mixed up.
Quote:
It's actually stricter than that. Existing MMC3 boards require the size of CHR ROM to be a power of 2: 32768 bytes, 65536 bytes, 131072 bytes, or 262144 bytes.
Okay, I just noticed something I should have asked. 00 infers 8 KB, so does 01 infer 8 KB or 16 KB? I wrote my header in the last post as if it 00 and 01 would both infer 8 KB,
So does this mean there are only 6 valid options; $00, $01, $04, $08, $10, $20, and $40?
Does this restriction also apply to the PRG ROM? If not, what values does the board allow for that?
That would make the header I wrote of $02 invalid, correct?
Quote:
And would I need to order them a certain way so that they would be loaded properly?
Other than that each 2K block starts on a 2K boundary (no straddling, say, $07-$08), order doesn't matter in standard MMC3 boards (mapper 4).
Gotcha. I need to get past the header before I can break down and understand how the bank #s are assigned to a 2K or 1K slot, but since our only options with this one are 1K blocks or 2K blocks, that could be simplified in a sense to say that a 2K block always needs to be on an even # of kilobytes in ROM space, correct?
Like, say you were at 9K position and you need to add another 2K block, you'd have to add 1K block first?
It would make more sense I can imagine to have all of the 2K and then the 1K, but I could see where somebody might not want to go back and change everything if they already built their program and just need another bank.
Quote:
Correct. In fact, bit 0 never matters for existing MMC3 games, as MMC3 games are supposed to configure mirroring at runtime. Only one MMC3 game was ever released with bit 3 turned on: Rad Racer II.
I can understand why this was rarely used during the NES life because of the expense, but I'm curious how expensive it would be to do this on a cart today, with the drop of RAM prices. Just seems like an under utilized feature.
Also, would this be able to share physical memory with PRG-RAM? Like, could you assign part of the RAM to the CPU and part to the PPU?
Quote:
Super Mario Bros. 3 and M.C. Kids use it to cache the decompressed level maps. Some other games were engineered not to need it, as it's an extra cost option at manufacturing time.
So they just needed to store more information than they had room for in CPU memory space?
Quote:
This looks reasonable. It gives you 16384 bytes PRG ROM, 16384 bytes CHR ROM, and the most common MMC3 configuration.
But invalid if used on extra hardware because of the improper CHR ROM size, correct?
Quote:
Okay, I just noticed something I should have asked. 00 infers 8 KB
0 refers to 0 KB. Which means the game is using RAM, not ROM for its graphics.
Quote:
That would make the header I wrote of $02 invalid, correct?
No. 2 * 8 = 16. Which is 2^4, so it's a power of 2.
Quote:
Does this restriction also apply to the PRG ROM? If not, what values does the board allow for that?
Max PRG ROM for standard MMC3 boards is 512 KB.
So 16, 32, 64, 128, 256 and 512 are all valid.
Which by extension means
1, 2, 4, 8, 16, and 32 are all valid numbers for the number of 16KB PRG banks.
Max CHR is 256KB.
1, 2, 4, 8, 16, 32 are all valid for the number of CHR Banks. (And 0, which is CHR RAM)
Quote:
Gotcha. I need to get past the header before I can break down and understand how the bank #s are assigned to a 2K or 1K slot, but since our only options with this one are 1K blocks or 2K blocks, that could be simplified in a sense to say that a 2K block always needs to be on an even # of kilobytes in ROM space, correct?
That's pretty much it. So... 256 values are available. For 1KB switching obviously each one corresponds exactly to that block. For 2KB, every two values gets the same results.
Writing 0 to the 2KB side gives you the first two KB. Writing 1 also gives you the first two KB. 2 gives you the next two KB. etc.
Quote:
Like, say you were at 9K position and you need to add another 2K block, you'd have to add 1K block first?
Right. And your logic about putting all 2KB blocks first is also sound design. What I do is have a define for the 2KB blocks end. So I don't have to change anything in my program even if I add more 2KB banks.
Quote:
So they just needed to store more information than they had room for in CPU memory space?
Or they just wanted it. It's possible to design a game that does similar things to those two without it, I think.
Quote:
But invalid if used on extra hardware because of the improper CHR ROM size, correct?
2 is valid. See above.
darryl.revok wrote:
Okay, I just noticed something I should have asked. 00 infers 8 KB, so does 01 infer 8 KB or 16 KB? I wrote my header in the last post as if it 00 and 01 would both infer 8 KB,
00 means CHR RAM in the typical size for the mapper, and on most mappers this is 8192 bytes. (It's larger on CPROM, Oeka Kids, and RacerMate mappers.)
$01 means 8192 byte CHR ROM. $02 means 16384 byte CHR ROM.
Quote:
So does this mean there are only 6 valid options; $00, $01, $04, $08, $10, $20, and $40?
You forgot $02. For common mappers, this is true.
Quote:
Does this restriction also apply to the PRG ROM?
For common mappers, this is true. There are only a few uncommon boards that allow non-power-of-2 PRG ROM sizes.
Quote:
That would make the header I wrote of $02 invalid, correct?
2 is a power of 2, so 2 is valid. PRG ROM size = 2 means 32768 bytes. CHR ROM size = 2 means 16384 bytes.
Tetris by Tengen and
Tetris by Nintendo are examples of games with PRG ROM size = 2 and CHR ROM size = 2.
Quote:
a 2K block always needs to be on an even # of kilobytes in ROM space, correct?
Yes.
Quote:
Like, say you were at 9K position and you need to add another 2K block, you'd have to add 1K block first?
Yes.
Quote:
Also, would this be able to share physical memory with PRG-RAM? Like, could you assign part of the RAM to the CPU and part to the PPU?
That would be expensive to put in an actual game, as one memory controller would have to sit in front of a fast memory serving requests from both buses. Nevertheless,
kevtris's forthcoming NES flash adapter has an FPGA acting as the memory controller, going to both buses and a big, fast DRAM. This FPGA does the mappers and the Game Boy emulation.
tepples wrote:
Even more annoying is when the game uses the Reset button to exit a particular level, as in that X-Men game for Sega Genesis. If you're in that level, it goes to the next level. If you're in any other level, it starts the game over.
For the record, originally you were just supposed to do something in-game but playtesters would keep resetting the console instead, so they changed the solution to that level... (doesn't hide the fact it's bullshit and that they should have modified the instructions instead)
At least it doesn't crash...
tepples wrote:
Then the other problem is in a multicart like Super Mario Bros./Duck Hunt. Should Reset go back to the game select or to the game's own menu? In SMB/DH, it goes back to game select. In Action 52, it goes back to an unskippable cut scene followed by game select. In Action 53, it's a bit inconsistent: NROM games go back to game select, while bigger games go back to the game's title screen and are expected to have "quit" on the menu.
Honestly, I'd expect a multicart to always return to the game select (like it was power on).
tokumaru wrote:
Can you just imagine how things were before the internet? These days it seems like people want everything to be handed to them in a silver platter. Well, back in the 80's and 90's people didn't have video tutorials on YouTube detailing every little thing they had to do and somehow people still managed to learn assembly and make games.
I wanted to get back to this when I got a chance. The last thing I want to do is express disrespect for the people who have gone before me and put this information out to make it even possible to learn. If I can't understand the technical sheets, that's my own fault for not being experienced enough, and it will come with time. The information is priceless to those who wish to develop for the console.
Not everybody that wanted to learn 6502 assembly in the 80s and 90s was able to do so. I say this because making games for the NES or SNES was the biggest thing I wanted to do. I was a kid and I honestly had no idea what was required to do so. I started playing with BASIC because it's what was available to me. It was literally on the computer we had so it was what I had. That was just about the only place I could go. There wasn't anywhere a kid like me in Kentucky could go to speak with fellow nerds and be handed the esoteric knowledge passed down from the Atari generation. I really had no clue.
I could go to the book store and pick up a book on BASIC, but I didn't see a book on NES programming or I would have taken that route instead. There could have been a book sitting right there on 6502 Assembly and I wouldn't have had a clue what it was. Was it my fault for not knowing that? Maybe, but at that age, and during that time, it's hard to imagine how I would have found out. Nintendo Power didn't explicitly mention it, not at least that I can recall. At the time, it may not have been feasible anyway. Sure, the code hasn't changed, but there were no emulators, or CHR convertors, at least most likely that weren't proprietary.
I guess I have a somewhat selfish perspective because what I really want are more new games to play and more people making new games. I think the idea of an obsolete video game console is challenged when new games are being developed for them that can be just as entertaining as ones developed for modern consoles, and the development is actual feasible for the "little guy". Once I'm here, and I've taken the plunge, it's my responsibility to learn and understand the more technical aspects. I'm glad the reference material is available. What I mean to say is that I almost didn't think it was possible, and I bet a lot of people who think they might be interested end up feeling the same way. I don't think what I feel is missing is even necessarily tutorials for the first steps, (not to say that more of those wouldn't be great) just like a gateway for the completely inexperienced person to see, yes, it is possible, no, it's not necessarily easy and it's a lot of work, but there are plenty of tools and techniques, here's what you need to know and consider before deciding if you want to go into this hobby, and here's where to go if you decide to do so. I dunno, I guess there's stuff like that, so I don't really know why I was complaining; maybe I just burnt myself out that day and got frustrated.
Quote:
Retro software development is a niche thing, it's not profitable, so there's obviously not gonna be as much material about it as there is for current technologies. Whatever is out there is the work of hobbyists, who don't always have a lot of free time.
Well if there's ever any way I can give back to the community and spend some time to do something that would help get more people involved, I'd like to do so.
Quote:
...and do things according to the book, with help from people in this forum, things will slowly fall into place as you go.
This is where the forum becomes invaluable. If "the book" are some of the beginner tutorials available, I've learned from some people in here that the practices in those aren't always the best. Still, even getting to a point to understand why something might not be the best way takes some work,
darryl.revok wrote:
If "the book" are some of the beginner tutorials available
I actually meant to say "by the book", which means following the most up to date documentation, which is the wiki. Of course the wiki alone is not very helpful for beginners, but whenever you come across a hardware interaction you're not familiar with when using tutorials or going through other peoples' codes, it's a good idea to check what the wiki has to say about it. If something seems off, just ask about it in the forums, that's what I meant.
Okay, so I've got to the point that I have a a very early functional prototype of my game engine, with SMB3 style four-way scrolling, object collision, background collision, rudimentary player controls and some basic sprite flickering. I'm to the point now that I need to add CHR bank switching for sprites in order to add attack moves for my player, more characters, and move forward. I hoped to come back to this thread to get some tips on implementation.
My program is currently set up to use the MMC3 although I'm not using it's features yet. I'm pretty sure I'll stick with the MMC3 and work within it's capabilities for this game. First I want to do CHR switching but I eventually plan to utilize the PRG switching, scanline interrupt, and mirror mode switching as well for this project.
So, I'd like to create a system that can bank switch each frame of an animation, and that will allow objects to share a bank if they use the same one. I think it's a little more complicated than just that though, because some object types will be cycling through CHR banks and only a few in my game might only use one. So, if an object judged whether or not it can be spawned just based on whether or not one of the current CHR banks was compatible, it would run into issues when the other enemy of the same type does a move requiring CHR switches.
So, if I'm correct, I'm thinking it's going to have to work a little like this:
Each object type will have to have a bit defining the number of CHR banks it uses. Any objects that can fit in one 1 KB bank can share a bank, but more than that, and there's no reason to share, even if they could share some frames. So, 0=1 bank and 1 = >1 banks
I believe I would need two bits somewhere to define the number of CHR banks used currently. This is assuming that one is always used, and the player character is always present when using this logic. To allow otherwise, I suppose I would need three bits to allow values 0-4.
Each object will have a byte defining the bank number that it's using, (0-255). When pulling a frame from metasprite data, it will first pull the bank number of that frame, and compare it to the value in the object's RAM. If that's not the same, run bank loading routine.
If the object type uses 1 bank, it could first check bank numbers of active objects and look for that bank. If not present, then check number of used banks for an open slot, if there are none, deny spawning of object.
If the object type uses more than 1 bank, check number of used banks for an open slot, and if there are none, deny spawning of object.
So, I don't know if that logic could be improved, but it seems like that would be a basic framework for determining if an object can access the proper bank, and preventing an object already on screen from losing access to it's sprite data. Now, there's more to do to actually get the bank switching functional, and I'd like to see if my line of thinking on this is correct:
The bank number will be stored in object RAM, but I believe the bank window being occupied will also have to be stored in object RAM since objects should be able to share windows. So, I'm thinking two bits in object data to define which CHR window that particular object is using. If these bits are stored in bits 6 and 7, I can AND out the rest of the byte and have the actual window address.
My metasprite tile numbers will have to change from $00-$FF to $00-$3F.
Then, my bankswitching code might look something like this:
Code:
ChangeCHRBank:
;A = bank number to switch in
PHA
LDA objectAnimationBankLocation, x
AND #%11000000
ASL
ROL
ROL
; CLC
ADC #$02
STA $8000
PLA
STA $8001
RTS
Then, my tile number loading changes from this:
Code:
DEY
LDA (currentFrameReadLo), y ; = 0-255
STA (currentSpriteTilePreloadSlotLo), y ; Store tile number
To this:
Code:
DEY
LDA objectAnimationBankLocation, x
AND #%11000000
CLC
ADC (currentFrameReadLo), y ; = 0-63
STA (currentSpriteTilePreloadSlotLo), y ; Store tile number
So, before I go further I wanted to ask if you guys think this is along the right track so far.
Well, I got basic CHR switching for sprites functioning.
I ran into one issue that I didn't anticipate, however. Due to the instantaneous nature of bank swapping, switching banks during game logic resulted in the existing sprites on screen being drawn with incorrect tiles momentarily. At first it looked like a delay in the bank swap, but after a little investigating I figured out what was really happening.
Currently I'm solving the issue by swapping my bank during NMI to the bank number saved in object RAM. Right now it's only set up for the player, but after I add functionality for other objects I'll just have to hope that I've still got the spare cycles in NMI for four sprite bank swaps and two background bank swaps.
Any thoughts on how other people have tackled this issue? Are CHR bank swaps often placed in NMI to avoid complications?
darryl.revok wrote:
Any thoughts on how other people have tackled this issue? Are CHR bank swaps often placed in NMI to avoid complications?
If you want the same CHR bank to be used to render the entire frame, NMI is the
only time you should bankswitch.
The only reason you should ever bankswitch CHR anywhere else is if you want it to change on a particular scanline.
Thank you for the response. I set it up to have 6 variables for bank numbers of the 6 CHR windows, and I just swap them in each NMI indiscriminately. Is that pretty typical?
That sounds fine to me. It's probably what I'd do.
I don't think there is a "typical". Every game has different needs, and I think a lot of games tend to have some of the CHR banks basically stay the same all game, or only change at menu screens and stuff like that. Just do what seems to work well for what you need.
I designed a second character, just curious to see what you guys think. He doesn't honestly have a specific role in the game yet. I don't know who he'll be at this time. I started out trying to draw some of the characters I have planned, and wasn't crazy about the results, but this guy just kind of came out in the process.
The animation surely has a few flaws. Namely he size of his sword isn't consistent. I think my main character has this problem here and there as well, but I feel like this is something that needs to be addressed at the time I start fitting everything into 8x8 tiles.
I'm not even going to lie, but I think that's a pretty large step backwards from what you've made in terms of quality. I can't exactly put my finger on the problem, but something is just off... It just looks more dull, kind of disproportioned, and jerky, not saying the animation isn't smooth, it's just that it's like their body is being held in place and there limbs are moving off of it, as if you where in zero gravity. I know you where just kind of fooling around though, so maybe I'm being a little harsh... I still think your other character looks excellent though.
darryl.revok wrote:
I designed a second character, just curious to see what you guys think.
I think it looks nice, but it certainly doesn't belong in the same game as the girl you made before. The girl is drawn in classic SD style, she's chubby and has a very detailed head. This guy is completely different, he doesn't have a face, the proportions are far from the typical SD, even though he still looks deformed in other ways (short legs, normal torso). The styles don't match a all, and would clash horribly if used together, IMO.
Quote:
Namely he size of his sword isn't consistent. I think my main character has this problem here and there as well, but I feel like this is something that needs to be addressed at the time I start fitting everything into 8x8 tiles.
One important thing to consider when making the sizes consistent is the pixel aspect ratio of the console. The NES doesn't have square pixels, so an object that's 8 pixels wide should not be 8 pixels tall when rotated 90 degrees. The NTSC NES has a PAR of 8:7, so everything looks 1.1428571 times wider. This means that an object that's 8 pixels wide will appear to be 9.14 pixels wide, so when you draw it rotated by 90 degrees you should make it 9 pixels tall.
Well, I sort of tried to make something that matches the original style. I didn't even attempt the head, because I had no clue as to how it was supposed to look. I kind of changed the armor because I thought it looked kind of funny in spots, like how small it is for the tops of the legs.
Attachment:
 Sprite.png [ 304 Bytes | Viewed 1643 times ]
A little piece of advice: Don't use dark blue as a darker shade for skin color. The gray works much better, because tan and blue might as well be opposites. I found it a little strange you used blue for the sword, but not gray...
Yeeeah... I suppose the proportions don't match my main character. It actually feels like it's going to be pretty limiting to keep every character in adherence to a certain aesthetic. I tried to do a few like that first, based on my main character, and I definitely wasn't crazy with what I came up with. I'll just have to give it another shot after a while.
Thank you for the honest feedback!
If your main character is a petit girl, there no way you'll be able to fit a tall guy in the same amount of tiles and have them look good together. The guy will need to use more sprites.
darryl.revok wrote:
Yeeeah... I suppose the proportions don't match my main character. It actually feels like it's going to be pretty limiting to keep every character in adherence to a certain aesthetic.
If it makes you feel better, I really like the art design of the main character. With resolutions and color depths as low as this, more "cartoony" like graphics often work best.
darryl.revok wrote:
I tried to do a few like that first, based on my main character, and I definitely wasn't crazy with what I came up with.
Did you not like what I did?

Yeah, I think I have one extra pixel for height by removing the ponytail, but that's all.
Probably the hardest part is making a bad guy with the same style head that doesn't look "cute".
Quote:
If it makes you feel better, I really like the art design of the main character.
Thank you, but I don't feel bad. It wouldn't be much help if you said you liked everything whether you actually did or not.
Quote:
Did you not like what I did?
It's pretty good. I think I can work with it. The new stance doesn't convey the arrogance that his old one did but I can change that.
Here's one of the newer animations for my main character. This is damaged/recover, and damaged/dead.
darryl.revok wrote:
Here's one of the newer animations for my main character. This is damaged/recover, and damaged/dead.
Cool, it looks like she's bleeding!

BTW, I'm sure SD characters can be drawn to look mean... I can't think of any references now, though.
Quote:
Cool, it looks like she's bleeding!
Play with swords too long and somebody's gonna get cut!
I thought about it for a bit, and being free of the censorship of NOA, I do think I'm going to put a little bit of blood in my game. More like Princess Mononoke than Ninja Scroll, but some nonetheless.
The biggest implementation of this that I have a plan for is cutting off heads. I'm thinking, that if the final blow is on the top 1/4 of an enemy's hitbox, and you deliver enough damage past the point to kill them, play a decapitated death animation and spawn a cosmetic object without collision detection of a spinning head flying up and then off the screen. I don't know if this sounds gory but I'm actually picturing more funny or fun. Like, you've got a hoard of ninjas jumping at you from the left and right and you're lobbing heads off as they come.
darryl.revok wrote:
Here's one of the newer animations for my main character. This is damaged/recover, and damaged/dead.
It looks good. I think the speed at which she falls could be increased though, or something.
tokumaru wrote:
Cool, it looks like she's bleeding!
Now we need gibs!

I played with your edit a bit, Espozo. I don't feel like I entirely converted the character of the original design, so he's like a somewhat different guy now in my opinion. The first guy I think is a bit more smug and casual than what the character ended up being. One of the weird parts is that the thing over the top of his chest in the first sketch is supposed to be like a cloak of sorts. I feel like it conveys okay except for the fact that gray is metal on other parts of the body, which is confusing. So, I just made the chest part metal and gave him a collar underneath it. I'm not sure how I feel about the gray outline for his skin and his sword though. It makes him not stand out as boldly as the main character.
I dunno. I'm not super set on having him as a character, but he's an option.
For mean SD characters, it's worth looking at the Neo Geo Pocket Color Fighting games.
Here's a sheet of Charlotte from Samurai Shodown! 2:
http://i.imgur.com/lGQJzRW.pngM. Bison from SNK vs. Capcom: Match of the Millennium:
http://i.imgur.com/gM6f3C8.gifIn fact just look at Neo Geo Pocket Color games in general. The Last Blade: Beyond the Destiny and Samurai Shodown! 2 in particular might be interesting to look at for you for many reasons. The average art quality for sprites is higher than on many consoles because of how doomed it was (no one looking to cash in on quick popularity), and for the same reason there aren't many games to look through. Some have more pixels to work with (Charlotte is 5 pixels taller than your girl, which wouldn't even be bad to create an imposing figure), but they're still good to look at.
Akuma tends to capture mean:


The second one obviously had a lot more to work with.
A quick edit to demonstrate something:
Attachment:
 DamagedDeadEdit2.gif [ 2.62 KiB | Viewed 3154 times ]
(Random before we start. I noticed this animation looks a bit like a sneeze.)
Her Ponytail warped on frame 13 in the original. Frame 11, it's to the left of her head. Frame 12 it moves behind her head (kind of a warp, but not jarring). Frame 13, it's to the right of her head which was a very large change from frame 12.
The way soft bits move is that they're pulled by the hard bits. So if she were standing somewhat upright (like frame 12), her head would move left, but the ponytail would stay still, until the head moves the ponytail's length away. Then it'd be pulled toward that movement. After she falls it's still in the air, with gravity being the last force acting on it because what its attached to is no longer moving. (Which you've done.) The reason hair bounces when walking, etc is because the head pulls the hair down, but the pulled-down-hair is pushed into by the head moving up into it. Repeat. This is why hair appears a few frames behind.
I also removed 2 frames to give a sense of acceleration while falling like Espozo mentioned. Here's one of my favorite images to demonstrate this:

The top and middle dot both take the same amount of time to reach the end line. The middle dot appears to be slowing down, because it's moving less distance each frame. Your falling had her move pretty much the same distance each frame, like the top dot, when you'd want something like the reverse of the middle dot. Always be mindful of how much distance things are moving in each frame, you don't want to fall into the even spacing trap.
The first frame I removed was from her body falling. The second was from the hair settling. A ponytail might fall slightly slower due to air resistance, but not by that much.
It wasn't the greatest edit, but hopefully the accompanying information helps.
Edit: Just as a general note, always look for times when removing a frame might be better. I realize good animation with high frame rate is the goal, but if frames are used differently sometimes you might get a better animation that would take up less space.
Kasumi wrote:
A quick edit to demonstrate something:
That's definitely the general idea, but it may just need to be redrawn to where some of the frames are "tweens", as lidnariq had said, so that it doesn't look choppy. Notice how when she's falling, she kind of speeds up for a millisecond mid fall. The pony tail also stays up and then kind of teleports onto the floor.
One could move the frames before the frames I removed closer to the frames after, so long as the spacing didn't end up even again.
Or to remove no frames, just retime it so that each frame falling frame gets less exposure time which is something games have the luxury of doing. Even if removing no frames, keep the ponytail thing in mind.
Well, I tried editing the newest version of this sprite. Do you think the shine on the metal works? It makes it look a bit more similar to what you originally created.
Attachment:
 Character.png [ 481 Bytes | Viewed 3117 times ]
Espozo wrote:
Well, I tried editing the newest version of this sprite. Do you think the shine on the metal works? It makes it look a bit more similar to what you originally created.
The shine isn't a bad idea, but move it to the center, and it'll work. Light contrast, and what-not.
Kasumi wrote:
For mean SD characters, it's worth looking at the Neo Geo Pocket Color Fighting games.
I feel like these are pretty impressive for the complexity of shapes they were able to define with such a limited palette. I feel like they're more impressive than what I've seen on NES, like Mighty Final Fight. Charlotte appears to be 1 palette, and M. Bison is usually one, occasionally two. I feel like using two palettes for an enemy would be fine, but using two on my main character would limit me to those palettes for the entire game.
I watched a video of Last Blade on Neo Geo Pocket. It's really impressive to see in motion, especially with the backgrounds. Something on NES that looked like that would be wicked.
Seeing this stuff kind of makes me wish my main character had more detail to her costume, but doing so would also make her feminine form less defined, so it's a trade off. One quirk about SD characters in pixel art is that it's often pretty hard to distinguish male from female characters.
Quote:
(Random before we start. I noticed this animation looks a bit like a sneeze.)
Yeah, it does kind of look like a sneeze. I'm not sure how to address that at the moment.
Quote:
Her Ponytail warped on frame 13 in the original. Frame 11, it's to the left of her head. Frame 12 it moves behind her head (kind of a warp, but not jarring). Frame 13, it's to the right of her head which was a very large change from frame 12.
I think a root problem for the ponytail issues may be in the damaged animation. With her body moving to the left, her ponytail should actually swing over to the right. That would make for a smoother transition into the fall.
I was thinking when I did the fall animation that centrifugal force would push the ponytail outward from her head, but I guess with the weight of it, it would be more likely to trail.
Yeah, acceleration of gravity is something that I neglected to take into too much consideration with the animation. I'm not sure though, if the sprite should actually move vertically, or if the object should move as it goes through it's death animation.
Another little issue that hasn't come up (because I haven't posted turning animations) is the highlight on the side of her head. Its looks fine, but when she turns, then the light source is now on the opposite side. I tried doing a highlight on the top so that the light source doesn't change, but it ultimately didn't look like a highlight to me then, just like a line. Still another matter I haven't solved.
Quote:
It wasn't the greatest edit, but hopefully the accompanying information helps.
Very helpful information, as always.
Quote:
Just as a general note, always look for times when removing a frame might be better.
Right. Like you pointed out how removing a frame on her attack animation made it look much more powerful.
Espozo wrote:
Notice how when she's falling, she kind of speeds up for a millisecond mid fall.
I think perhaps making the vertical movement of the animation actually be handled by the game engine may remedy this issue, whether or not I have to remove frames.
Kasumi wrote:
just retime it so that each frame falling frame gets less exposure time which is something games have the luxury of doing
I've been debating on whether or not this is something that I want to do in my game. Right now, I have it set so that each animation itself can have a different amount of exposure time, but not each frame within that animation. When I've been playing with GIFs on attack animations lately though, I've been making the swipe frames display for less time though, so I have been leaning toward implementing this feature.
Espozo wrote:
Well, I tried editing the newest version of this sprite. Do you think the shine on the metal works? It makes it look a bit more similar to what you originally created.
I edited your edit of my edit of your edit of my design.
Personally, I couldn't get the highlight to look good, in my opinion. I had tried something like that before but didn't like it.
I did like some of the minor tweaks that you did to the image though. I changed a few things.
I decided to change his raised collar to a scarf. It gets chilly hanging out down in evil dungeons. Also, like the main character's ponytail, it's something that helps to convey movement in animation.
I made his shoulders a little bit wider to make them wider than the main character's. Made his waist just a touch smaller. I moved his center line one pixel over which I feel works a lot better for the perspective.
I also thought, if you're going through all of the trouble to have armored plates on your thighs, you might want to protect your junk as well, so I gave him an armored cup.
Edit: I changed quite a few things but figured I'd edit my post instead of making a new one.
I added some more armor and changed the color scheme. I think I know where I'm going to use this guy, and there will be two of them, so probably blue and green.
Attachment:
 MaskMan.png [ 1.23 KiB | Viewed 3061 times ]
darryl.revok wrote:
armored cup.
Hell no! If you want to "protect his junk", then do something less awkward like this:
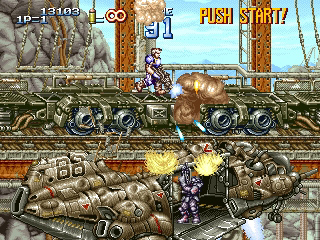
See the soldier on the plane?
Anyway, This is what I did:
Attachment:
![MaskMan[1].png](./download/file.php?id=4134) MaskMan[1].png [ 452 Bytes | Viewed 3032 times ]
MaskMan[1].png [ 452 Bytes | Viewed 3032 times ]
I'm just saying, whoever thinks that drawing artwork on the NES is harder then the SNES is full of sh*t, because that took me all of two minutes. On the SNES, it would have been more like twenty.
It depends on what it is you are trying to do. I take longer doing pixel art on nes format than I do for snes on top of that I work even faster spriting high res (guilty gear) or even hd (persona arena) nes ever got damn pixel counts. One missed place pixel can screw up the whole thing. Some people just don't care but to me it bothers me and I will sit there for hours to get it right even if I have to redraw the crap over and over.
I hate franken spriting and I hate spriting over something and calling it my own unless it was my own sprite to begin with. So yeah.
Fjamesfernandez wrote:
One missed place pixel can screw up the whole thing.
If you have bad OCD like I do, it doesn't matter if it's 2bpp or 4bpp. I still try to meticulously go through and make sure everything is perfect. It's especially bad if you're using a lot of shades of the same color instead of just multiple colors. Basically, for me, having 5x the amount of colors to work with (2bpp to 4bpp) takes 5x the amount of time, and that's not even including how SNES sprites are usually larger... It generally takes about 10x the amount of time for me.
You know, Fjamesfernandez, if you're not into programming and seem to prefer "16 bit" style artwork, why didn't you choose the SNES or something similar? I guess you knew not enough people are working on the SNES to be able to help...
Outlines are where the pixels
really have to be exactly right. Search
this page for "Here I start messing with two pixels" and look what the hand is doing.
Fjamesfernandez wrote:
One missed place pixel can screw up the whole thing.
Especially when you get into animation. I find that often when I'm playing the animation and I have a hitch or something, I only have a couple pixels that can be changed to fix the animation.
Quote:
I hate franken spriting
One thing you may find with NES is that sometimes you're limited in the ways you can draw something. For example, the head of my main character. I've tried a lot of different ways to draw it, but some just don't work. Like, I've tried tilting her head up and down while looking sideways, and it always looks like an alien head. Same if I try to turn her head just a little. So ultimately, I've come up with like 5 heads I can use. The hair gets animated every frame though. When I did her fall animation, I was able to completely redraw her body and head every time, but that was with her eyes closed, so I had more leeway in what would look okay.
Quote:
I hate spriting over something and calling it my own
Yeah, this bothers me too. I modified sprites from Moon Crystal to get a start but I'm going to change all of those. I changed the shape of my character's body so they have to be changed anyway. I think Espozo's just helping me edit this one, I don't think he's calling it "his own".
There are things that are easier about designing for NES and things that are easier about SNES, I imagine. It's definitely easier to create complex shapes with a bigger palette, but is it more time consuming? I guess it depends on your familiarity with the format.
Espozo wrote:
Anyway, This is what I did
You changed the shape of his cup and stomach plate, right? Anything else? I think I like what you did better. I feel like I've seen armor like this somewhere. Ronin Warriors, maybe?
Oh I don't mind Frankenstein spriting if it comes from my own image and I meant things in general lol I'm not pointing any fingers

but yeah it's a pain.
You know, I can already tell you and Metal Slug 4 wouldn't get along. (Then again, no one gets along with it because it sucks.)
darryl.revok wrote:
You changed the shape of his cup and stomach plate, right? Anything else? I think I like what you did better. I feel like I've seen armor like this somewhere. Ronin Warriors, maybe?
A bunch of random junk, like the leg that would be his right was really oddly attached to his body. (And a bunch of other stray pixels all over the place.) I don't intend for it to be a "cup", but rather just another flap thing that comes down, like what's on the legs.
Espozo wrote:
I'm just saying, whoever thinks that drawing artwork on the NES is harder then the SNES is full of sh*t, because that took me all of two minutes.
To be fair, what you made here is a cartoon sprite (black outlines all around, flat coloring), which is way easier than volume sprites for example. Also, there's no such thing as a "NES sprite" or a "SNES sprite"... there are way too many different art styles that can be used to draw sprites that you can't just pick up one particular frame of one particular character and say that it's representative of all sprites in that platform. On the NES you can go from
Gyromite to
Batman: Return of the Joker (which by the way looks MUCH better than the SNES and Genesis versions, go figure) in terms of sprites, and I would definitely not throw both in the same bag.
Having said that, I do agree with you that it's generally harder to draw sprites for the SNES, because more colors equals more possibilities and more chances to screw up. But if you decided to go with this same cartoon style on the SNES, that would be just as easy to draw, if not easier, since you would have more freedom when picking the flat colors.
In the end, the art style probably matters more than the platform you're drawing for. Sure, some styles work better on certain platforms than others, so it's a combination of both things, but I guess the style speaks louder.
I'd have though with what was drawn, something like the picture I showed earlier would be the logical next step. You aren't adding that many more colors, but are instead just adding more different shades to pre existing colors. I usually find myself going with something like 4 different colors, with the amount of shades being what's left over. Basically, 4 colors is divided like 4,4,4,3. Off course, there are plenty of exceptions for this. With explosions, I'm only going to use about 2 different colors, for the fire and for the smoke, with maybe some transition colors.
It's really pretty difficult to make a volume sprite on the NES and have more than one type of color, because you generally want 3 shades for something, which leaves you absolutely no room.
You know though, people always dismiss Mode 0 on the SNES as being garbage, but with all the inaccurate "retro" games that seem to be pretty popular, I imagine it wouldn't be too bad for that. If you take something like Shovel Knight, it uses about 4BG layers and somewhat follows 2bpp graphics. Sprites are usually more colorful, but that's been covered.
darryl.revok wrote:
an armored cup.
Espozo wrote:
No
Codpieces were a common element, and often quite ostentatious. But if you prefer tassets (草摺) [hanging plates] or faulds [armored skirts]...well, they were done too.
So I tried my hand at coming up with an animation for the new character, and here's what I came up with. This is just one attack out of an eventual many.
I borrowed your idea of putting the tasset on his armor, Espozo, but I applied it to the last sprite I drew. I liked the way the armor was shaped better.
Looks excellent - it remembers me the amazing Fire Emblem GBA fighting scenes.
Thank you! Interestingly, Marth in Smash Bros. is my biggest inspiration for how I want the control to feel.
Another idea I had for the fight with these guys is for the lights to go off at certain intervals. Fighting them in the dark would look something like this:
It's Rayman!
You know though, something about what is his left arm looks kind of awkward at the end of the animation. I think he should have his shoulder in a different place, because it's unlikely he'd finish that with his shoulder in the exact same position as earlier.
He lands with his shoulder in a different place, actually. I think there's something that looks weird about it too. I tried a lot of different things. Honestly I feel like there are too many frames of animation for the arm but it didn't feel right when I tried to remove some too. I guess I'll figure it out later.
Check this out. It's really rough, but I just put this together for a boss idea that I have. I'm going to need to condense it into 64 tiles, so I'm either going to have to make it a little smaller or keep the detail down so I can reuse tiles. The idea I have is for this tank to come out on a bridge, and you'd have to have the tank shoot out the bridge under it. The bridge would be in multiple sections, and I'm thinking I could do this with three bridge sections if I use my 1KB CHR windows for backgrounds in this scene. So one window would be the tank, and there would be one bank for each of the three bridges, and the non-animated tiles would be spread out between the bridge banks. Each bridge would have a few frames of animation for it taking damage and then getting destroyed. Unless SMB3 where each individual block has to be destroyed, in this instance I'm basically imagining the bridge would progress one level of damage for each tank shell it takes, until it collapses. So, that would be about 7 x 1KB banks for the tank, probably about 6 for each bridge, total of 25 KB. Most of the non-animated background would have to be black, especially the horizontal strip where the tank is, which would scroll independently.
I imagine the turret would be a sprite, and the rest of the second 2 KB sprite window would be for the tank shells and explosions.
I think it could be pretty cool if I could pull it off. What do you guys think?
Well, I was thinking about trying make my own tank to show you, but I don't think I'll be able to only use 64 tiles... This was it so far, and the green is a separate palette from the gray, as I imagine the gray could be used for the bridge. The green was just kind of to say where I couldn't put the gray, it's not meant to be pretty yet.
Attachment:
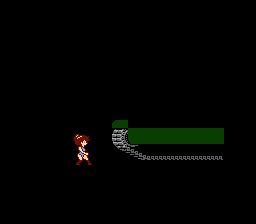 Tank.png [ 1.09 KiB | Viewed 2464 times ]
Edit: Okay, I'm sorry, but after seeing this, I just had to show it.
https://www.youtube.com/watch?v=SiR-T6eKGRg
Why do the bridge sections have to be so big that you need individual CHR slots for each one? Falling bridge sections will have nearly all 8 sprites of a scanline at their disposal, since there will probably be no other sprites down there... can't you simply use the good old "erase from name table and turn into sprite" method?
Here's one game that did this:
https://youtu.be/XPFTznI9yeE?t=16m41sThey screwed up a little though, as the sprites appear to not be properly synchronized with the background, and sometimes the floor disappears for a while before the sprite shows up and falls. Also, if you are willing to use all 8 sprites, the falling sections can be 64 pixels wide, or 1/4 of the screen.
Wow... That's actually a pretty good looking tank.
Espozo wrote:
Well, I was thinking about trying make my own tank to show you, but I don't think I'll be able to only use 64 tiles...
Did you do this from scratch? It's really cool.
I'm not sure if the perspective as it is would work though. Everything else is directly from the side, so I think the tread would have to be shown from a perspective more like the one in the Batman game tokumaru linked.
The aesthetic for the game would best be described as fantasy with a blend of 1800s and fantasy technology. That is essentially steampunk, but there are a lot of connotations to that term which may not fit so I at least wanted to go about saying it in a convoluted manner.
The player character, main villain, and the mentor are all Japanese inspired fantasy, but still fantasy. The area of the game will largely be a more european style castle with cannons and a tank and a flying machine. There will also be a large underground section which would bring the same fantasy/primitive technology vibe into a dungeon setting.
If you wanted to make stuff that I may put into this game, just don't get too modern or anything.
I actually modified the tank to be under 64 tiles. I'll probably still have it as a background object while fighting, so that I can have sprites for bullets and explosions, but one thing that I realized is that I couldn't make the tank fall into the pit if it's in the background nametable.
I made an animation of the turret turning but it needs work so I'm not going to post it yet. If you want to draw one, please feel free. If we do separate ideas not inspired by one another then maybe we'll both have cool elements and combine them. Anyway, try to keep the tank under 8 tiles wide. It's a small tank, but it'll still be effective. Mine is 8 tiles wide and 5 tall.
Quote:
Edit: Okay, I'm sorry, but after seeing this, I just had to show it.
https://www.youtube.com/watch?v=SiR-T6eKGRgLOL The Rook! I have a buddy that I've got to tease to get one of these. He wants a bullet proof truck.
tokumaru wrote:
can't you simply use the good old "erase from name table and turn into sprite" method?
I guess I didn't think about that. If I can manage to do the scene the way I have it planned, it's going to take some heavy consideration. I'll storyboard it out soon. Basically, for the boss of the level, I want to have the tank come out on the bridge, and after you defeat it, I want a flying machine to come from the top in the same area, with the bridges still destroyed. I'd also like to have the screen scroll in both directions during this battle, because after the bridges collapse you'd be able to fall down to the ground. If I figured out a way to work it like you're suggesting, and still keep my 1 KB windows for sprites, then I could still have enemies on the screen at the same time, which would be a benefit to keeping the challenge up without having to mount a bunch of rotating guns on the tank. I haven't done any scanline split scrolling yet, but I imagine this will be one of the hardest portions of my game to develop.
darryl.revok wrote:
one thing that I realized is that I couldn't make the tank fall into the pit if it's in the background nametable.
You definitely can't have a sprite that big either. I assume that in order for the tank to fall, most of the floor/bridge will have been destroyed, right? As long as you have 64 or less horizontal pixels worth of floor remaining, you can fake it using sprites and have the background tank fall. You can even do something à la Wile E. Coyote, and have enough of the floor/bridge fall or blow up to make sure that no more than 64 pixels remain, at which point you replace whatever is left with sprites, and then have the tank fall after a short comical delay.
Quote:
I haven't done any scanline split scrolling yet, but I imagine this will be one of the hardest portions of my game to develop.
A single split is usually pretty easy, but once you need more complex effects you need a more robust system, with a queue of effects that you have to process in order. If you need to modify the vertical scroll, that complicates things a bit too, since you need to use the $2006/5/5/6 trick, but as long as you time the final $2006 write correctly, it should work just fine.
darryl.revok wrote:
Did you do this from scratch? It's really cool.
Yes.
darryl.revok wrote:
I'm not sure if the perspective as it is would work though. Everything else is directly from the side, so I think the tread would have to be shown from a perspective more like the one in the Batman game tokumaru linked.
True. It would also probably use less tiles.
darryl.revok wrote:
If you wanted to make stuff that I may put into this game, just don't get too modern or anything.
Well, the tank was supposed to be. I guess you want more of a "WWI style" tank?

darryl.revok wrote:
LOL The Rook! I have a buddy that I've got to tease to get one of these. He wants a bullet proof truck.
I honestly thought is was a joke at first.
It's like a heavily armored forklift.
I fixed some of the lines that made the shape of your tank. I think I could had detail the crap out of it with the right reference but yeah
love the animation though.
Wow! You guys have done some cool stuff! I really appreciate it. I wanted to post what I did so far in case anyone was going to do any more edits. The animation has a couple issues but I won't have the time to get to them until tonight.
The most obvious thing is that I made the tank much smaller. This is primarily so that the tank could become a sprite object to fall into the pit if necessary. I'm curious what you guys think of the size. Is it still intimidating at this size?
Attachment:
 TankTurretTurn.gif [ 7.42 KiB | Viewed 3355 times ]
There are a lot of technical considerations to doing this scene, so I'm going to try to balance the best of all of the options. If the tank never had to fall into the pit, then it would be a lot easier and it would never have to be small. If the tank just say, blew up, that would be easier, but I feel less dramatic. Not to mention that the proposition of attacking a tank with a sword does not seem like a particularly fruitful one. One of the things that I want to do for the scene is to have it so that when you battle the flying machine, the terrain has changed depending on how much of the bridge you had to let get taken out in the fight with the tank. So it could be easier with more of the bridge or tougher if you have to jump over big gaps while fighting. I think I'll make at least a rough storyboard of this tonight to show what I have in mind.
tokumaru wrote:
As long as you have 64 or less horizontal pixels worth of floor remaining, you can fake it using sprites and have the background tank fall.
If I'm not mistaken, moving the tank downward while in background would also require moving downward basically all background tiles since I can't do a vertical split scroll, right? I think I need to storyboard it like I was saying so I can rectify my understanding of what's possible.
Espozo, I want to say that I really like the treads you drew. I don't know honestly if they're exactly right for this game but they're really cool. If I don't end up using them you should find somewhere to use them. I have a feeling you'll be good with mechanical sprite drawing. A benefit with the treads you drew is that they'll animate smoothly without many frames of animation. With the way mine is, and the treads spaced out so far, it takes a lot of frames to cycle. Having a shorter cycle for the animation would be beneficial.
Espozo wrote:
I guess you want more of a "WWI style" tank?
Exactly. but any number of liberties to make it fit better in a game or otherwise are fine, as long as they fit with the aesthetic. I guess what I'm saying is that historical accuracy is in no way a concern as it is a work of fantasy.
Quote:
I honestly thought is was a joke at first.
It's like a heavily armored forklift.
It's pretty ridiculous. A little more like a Bobcat than a forklift. I like the Ripsaw "Luxury Super Tank"
http://www.ripsawtank.com/Fjamesfernandez wrote:
I think I could had detail the crap out of it with the right reference but yeah
To be honest what I had in mind was the tank from Nausicaa and I wanted to make it at least a little different from that, but didn't have any super clear ideas for what would be different. The best image of the Nausicaa tank I could find is a 3D rendering:
The things I put at the bottom are supposed to be extra guns so that the tank will have other ways to shoot, but they look kind of silly. When I get back to working on this I'm going to adapt the changes you made. It improves the shape of it quite a bit.
darryl.revok wrote:
Is it still intimidating at this size?
Not really.
I personally didn't find it too intimidating to begin with.
Now, it's about as intimidating as this:

I think this would work better. It's pretty intimidating, but also very small.
...Now I know where the inspiration for this boss came from:
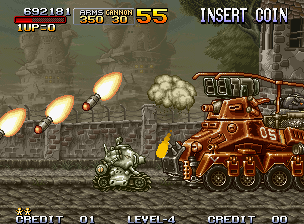
Quote:
didn't find it too intimidating
I'd have to agree. Kind of looks like a toy.
Throwing my two cents in, I think you could still make an intimidating-looking tank while still having it be very small sprite-wise.
In Blaster Master, didn't they have separate perspectives for the tank segments and on-foot segments? While you were in the tank, your character's sprite was only a few pixels tall compared to the tank. But on-foot, the character's size was much larger. This preserved the sense of scale while easing up on the number of tiles the tank needed. So my suggestion would be to have a very realistically-proportioned tank and shrink the size of the character sprite for those segments. And that flying machine? Make it a huge background object like Mecha Dragon from Mega Man 2.
Have you considered using the same ambiguous color for the background and the tank so you could represent the tank mostly with outlines on the left and right sides? You could throw some details in the middle, always minding the sprite limit, and have the top part fully detailed, since it's narrower.
Okay, so I made some simplistic storyboards. This is the first part:
Attachment:
 TankBattle.png [ 8.54 KiB | Viewed 3270 times ]
One concern I have is how I'll handle the animation if the tank ends up on one of the columns after destroying a bridge. Sure, the tank could still fall because it's not wide enough, but I'm not sure how to handle that without having an animation of the tank falling in at an angle. That doesn't seem particularly feasible.
To eliminate animating the tank falling into the pit would make a lot of things easier. I'd never have to consider making the tank a sprite object. I could make it as big as I want, and have a lot less concerns with the technical issues. However, I just can't picture this in a way that looks right. I can cut corners for something this large but I don't want the player to ultimately be confused as to what just happened.
Attachment:
 PlaneBattle.png [ 15.57 KiB | Viewed 3270 times ]
Doing this scene is probably a little easier than the last. The next hurdle is to have the top part of the playfield scroll in two directions to move the plane, kind of like the helicopter boss in Super C. This one wouldn't ever pass over the bridge, so it wouldn't have the same concerns about the scrolling. I'd like to have some animated fire at the bottom during this scene. Since there won't be too many tiles used on the bridges, I think I'd still have CHR space for this.
> PlaneBattle.png
At top right, is that supposed to be
Va-Jay-
Jay the
Va-Jet Plane?

The problem with having a sprite tank is that even if you make it only 64 pixels wide, there's still the girl, the sword, the hit effects... the tank will still flicker a lot.
There's one way you can have both the tank and the bridges as backgrounds: While the tank is moving left and right, you can normally rewrite the horizontal scroll mid-screen, but right before it's about to fall, you have to redraw it at the correct position relative to the bridge. Then you can scroll the whole screen vertically to make it fall, but switch the bridge/pillar tiles to vertically rotated versions that cancel the scroll, so they appear to be stationary. You'll have to redraw the top and bottom of the bridge every time a rotation cycle finishes. That's a whole lot of trouble for such a quick effect, though.
As for tilting the tank in case it's over one of the columns, that can be done if the tank is drawn with sprites, as long as the angle isn't too steep. You can achieve believable enough rotation on the NES if you arrange the sprites like this:
Attachment:
 sprite-rotation.png [ 1.4 KiB | Viewed 3255 times ]
tokumaru wrote:
As for tilting the tank in case it's over one of the columns, that can be done if the tank is drawn with sprites, as long as the angle isn't too steep. You can achieve believable enough rotation on the NES if you arrange the sprites like this:
Attachment:
sprite-rotation.png
Which is related to the
shearing technique I mentioned a couple years ago. But if you're using it for actual rotation, not just shearing, you have to overlap the rotated rows slightly. And that's a pain.
You could also decide that the pillar would shatter and break out from underneath the tank if the tank were on it without the associated bridge.
Well if you think about it. I would think that the weight is still in the center, so you shouldn't have to tilt it at all. the tank is more top heavy than anything else.
the bridge should shatter rather than doing the rag doll tilting. if you just shatter it all at once in a straight line the tank would just fall straight down as it is. saving you the headache of tilting it. now the question is WTH blew up the bridge
Or having the tank being blown up which causes the bridge to shatter, but then you have the other bridge (either left or right) in place which it looks like you want both of them be be gone.
Espozo wrote:
Now, it's about as intimidating as this
That Metal Slug tank is so cute. Especially the way it's animated. Almost as cute as this:
Quote:
I think this would work better.
That's not bad. It needs to have a heavier main cannon though. Enough to take out a bridge.
DragonDePlatino wrote:
...to have a very realistically-proportioned tank and shrink the size of the character sprite for those segments.
Since this is the only scene in the game where it would happen, I think the effect would just be disorienting. If I could actually do a smooth zoom in and out, that could be cool, but it can't feasibly be done with NES hardware.
tokumaru wrote:
...so you could represent the tank mostly with outlines on the left and right sides?
I thought about doing this but it seems like it would be difficult to make it look good. I'm a little stumped on how I'm going to make the tank look graphically anyway. The only thing I've changed are the treads and I animated them:
Attachment:
 TankNewTreads.gif [ 9.55 KiB | Viewed 3210 times ]
tepples wrote:
is that supposed to be Va-Jay-Jay the Va-Jet Plane?
Lol I had no idea what to think of this. Jay Jay is news to me. I just pulled this image off Google as a joke since everybody said my tank was non-threatening, but I don't think it's Mr. Va-Jay Jay since he has a terrifying flesh face.
tokumaru wrote:
The problem with having a sprite tank is that even if you make it only 64 pixels wide, there's still the girl, the sword, the hit effects... the tank will still flicker a lot.
Yeah, during the combat, having the tank as a sprite object is pretty much a non-option, but when it's falling, it doesn't matter if it flickers quite a bit.
Quote:
There's one way you can have both the tank and the bridges as backgrounds
I thought about doing something along these lines, but after consideration, it seemed impractical.
Quote:
You can achieve believable enough rotation on the NES if you arrange the sprites like this:
That looks about as good as rotating the sprite anyway, for small increments. Now if I could just avoid the necessity of using sprites, I could make the tank large, but it doesn't seem like that is highly possible without MMC5 vertical split scrolling. Even then it would be a pain because you'd have to slice out a vertical section where the tank is at the time that it falls.
lidnariq wrote:
You could also decide that the pillar would shatter and break out from underneath the tank if the tank were on it without the associated bridge.
This is probably the best way to go to handle the pillar situation. If I do have to turn the tank into a sprite object I could still add the shearing effect just to make it more pronounced.
Fjamesfernandez wrote:
if you just shatter it all at once in a straight line the tank would just fall straight down as it is. saving you the headache of tilting it.
That's what I was thinking about doing for the bridge, but the issue with the tilting was for how to kill the tank if it is sitting on one of the remaining columns after the bridges fall.
Quote:
now the question is WTH blew up the bridge
The idea would be to dodge the tank shells until it tanks out the bridge underneath itself.
Quote:
Or having the tank being blown up which causes the bridge to shatter
Perhaps, to avoid needing to limit the size of my tank, but this would completely change the way this fight would play out. The majority of my game will be sword combat with evenly matched opponents, so I had intended to make the challenge for this one part a bit different.