This Week: Time to learn how to do horizontal background scrolling, like Super Mario Bros. Hopefully it is explained with the most easy to understand code. There is no compression, no buffers, and no metatiles, so only the ideas of scrolling are presented. Once you understand the scrolling part you should look into those other topics to save code/data space and increase performance if needed.
Nametable Review
Before starting the scrolling you must fully understand how nametables work. One nametable is 32x30 background tiles, which covers exactly one visible screen. Including the attribute table, each screen needs 1KB of PPU RAM. The NES PPU has the address space for 4 nametables ($2000, $2400, $2800, $2C00) in a 2x2 grid:
       +-----------+-----------+
       |           |           |
       |           |           |
       |   $2000   |   $2400   |
       |           |           |
       |           |           |
       +-----------+-----------+
       |           |           |
       |           |           |
       |   $2800   |   $2C00   |
       |           |           |
       |           |           |
       +-----------+-----------+
However the NES only has 2KB of PPU RAM inside the console, so there are only two actual nametables. The other two nametables are copies of those actual ones. Your mirroring settings determine the layout of the actual nametables and which ones are copies.
Vertical mirroring means the nametables stacked vertically are the same data. 0 ($2000) is a mirror of 2 ($2800), and 1 ($2400) is a mirror of 3 ($2C00). 0 and 1 are next to each other and have different data. This is what we want for horizontal scrolling. When you are looking at nametable 0 and scroll to the right, nametable 1 will be in view. Typically your mirroring setting is the opposite of the scrolling direction. To set the iNES header:
.inesmir 1 ;;VERT mirroring for HORIZ scrolling
Scroll registers
Before scrolling we will fill both nametables 0 ($2000) and 1 ($2400). The same data will be copied into both, except the attribute table will be different. By setting the second nametable attributes to another color palette the two screens will have a very visible difference.
FillNametables:
  LDA $2002             ; read PPU status to reset the high/low latch
  LDA #$20
  STA $2006             ; write the high byte of $2000 address (nametable 0)
  LDA #$00
  STA $2006             ; write the low byte of $2000 address
  LDY #$08
  LDX #$00              ; fill 256 x 8 bytes = 2KB, both nametables all full
  LDA #$7F
FillNametablesLoop:
  STA $2007
  DEX
  BNE FillNametablesLoop
  DEY
  BNE FillNametablesLoop
FillAttrib0:
  LDA $2002             ; read PPU status to reset the high/low latch
  LDA #$23
  STA $2006             ; write the high byte of $23C0 address (nametable 0 attributes)
  LDA #$C0
  STA $2006             ; write the low byte of $23C0 address
  LDX #$40              ; fill 64 bytes
  LDA #$00              ; palette group 0
FillAttrib0Loop:
  STA $2007
  DEX
  BNE FillAttrib0Loop
FillAttrib1:
  LDA $2002             ; read PPU status to reset the high/low latch
  LDA #$27
  STA $2006             ; write the high byte of $27C0 address (nametable 1 attributes)
  LDA #$C0
  STA $2006             ; write the low byte of $27C0 address
  LDX #$40              ; fill 64 bytes
  LDA #$FF              ; palette group 3
FillAttrib1Loop:
  STA $2007
  DEX
  BNE FillAttrib1Loop
The scroll registers are at $2005. Like some other PPU registers you need to write to it twice. The first write is the horizontal scroll count, the second write is the vertical scroll count. The scroll sets which pixel of the nametable for the start of the left side of the screen. Previously we have set the scroll to 0 so the left side of the screen is aligned with the left edge of the nametable. The scroll registers are both 8 bit registers, making the scroll range 0 to 255. The screen is 256 pixels wide so the horizontal scroll register covers one full screen wide.
This sample code just increments the horizontal scroll register ($2005) by 1 on every frame. You can see when the first nametable scrolls off the screen, the second one comes on screen. The previously set colors make the split between nametables obvious. As the scroll register wraps from 255 to 0 the first nametable becomes completely visible again. You can also see the sprites are not affected by the scroll registers. They have their own separate x and y position data.
NMI:
  LDA #$00
  STA $2003
  LDA #$02
  STA $4014       ; sprite DMA from $0200

  ; run other game graphics updating code here

  LDA #$00
  STA $2006        ; clean up PPU address registers
  STA $2006

  INC scroll       ; add one to our scroll variable each frame
  LDA scroll
  STA $2005        ; write the horizontal scroll count register

  LDA #$00         ; no vertical scrolling
  STA $2005

  ;;This is the PPU clean up section, so rendering the next frame starts properly.
  LDA #%10010000   ; enable NMI, sprites from Pattern Table 0, background from Pattern Table 1
  STA $2000
  LDA #%00011110   ; enable sprites, enable background, no clipping on left side
  STA $2001

  ; run normal game engine code here
  ; reading from controllers, etc

  RTI              ; return from interrupt
The full code and compiled .NES file is available from the download link at the bottom of this tutorial. scrolling1.asm includes everything up to this point.
Nametable Register
The problem with just the scroll register is that it isn't big enough. In the previous example the scroll wrapped from 255 to 0, so the second nametable is never shown on the left side. Both nametables together is 512 pixels wide but the scroll can only count 256 pixels. The solution is to switch which nametable is on the left side of the screen at the same time the scroll register wraps to 0.

Vertical mirroring means nametables are arranged horizontally
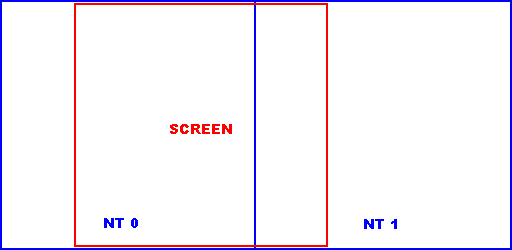
Scrolling shows nametable 0 and 1 (blue) on the screen (red)
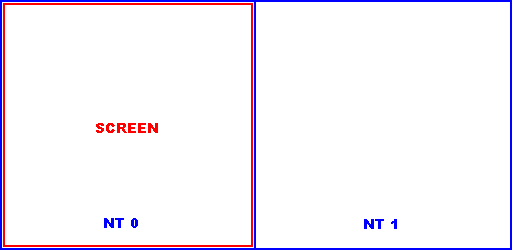
When the scroll register wraps, nametable 0 is displayed again
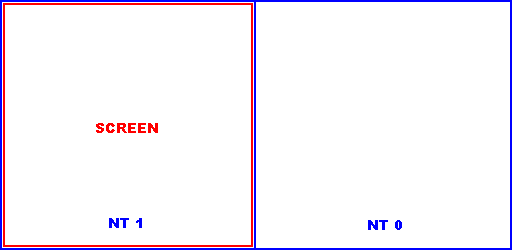
Swap which nametable is on the left when the wrap happens to display nametable 1
To set the starting nametable, change bit 0 of the PPU control register at $2000. Clearing it to 0 will put nametables 0 and 2 on the left side of the screen with 1 and 3 to the right. Setting it to 1 will put 1 and 3 on the left, and 0 and 2 on the right.
This sample code has the same scroll incrementing, but swaps the nametables at the same time the scroll wraps from 255 to 0. Instead of the background jumping it continuously scrolls from one nametable to the next. When the scroll wraps again the nametables are swapped again and the scrolling keeps going.
NMI:

  INC scroll       ; add one to our scroll variable each frame
NTSwapCheck:
  LDA scroll       ; check if the scroll just wrapped from 255 to 0
  BNE NTSwapCheckDone

NTSwap:
  LDA nametable    ; load current nametable number (0 or 1)
  EOR #$01         ; exclusive OR of bit 0 will flip that bit
  STA nametable    ; so if nametable was 0, now 1
                   ;    if nametable was 1, now 0
NTSwapCheckDone:

  LDA #$00
  STA $2003
  LDA #$02
  STA $4014       ; sprite DMA from $0200

  ; run other game graphics updating code here

  LDA #$00
  STA $2006        ; clean up PPU address registers
  STA $2006

  LDA scroll
  STA $2005        ; write the horizontal scroll count register

  LDA #$00         ; no vertical scrolling
  STA $2005

  ;;This is the PPU clean up section, so rendering the next frame starts properly.
  LDA #%10010000   ; enable NMI, sprites from Pattern Table 0, background from Pattern Table 1
  ORA nametable    ; select correct nametable for bit 0
  STA $2000

  LDA #%00011110   ; enable sprites, enable background, no clipping on left side
  STA $2001

  ; run normal game engine code here
  ; reading from controllers, etc

  RTI              ; return from interrupt
The full code and compiled .NES file is available from the download link at the bottom of this tutorial. scrolling2.asm includes everything up to this point.
Drawing New Columns
For just two screens of graphics the code above is fine. Games like Super Dodgeball use this method. Both nametables are filled and scrolled between. For games like SMB where the levels are wider than two screens some new background data will have to be inserted. The solution is to draw a new vertical column of tiles somewhere off the visible screen, before it is scrolled into the visible area. As long as the new column is drawn ahead of the visible area, calculated by the current scroll and nametable, it will appear continuous. The tricky part is figuring out which column to draw, and where it is to be placed. If we always use the opposite nametable and the same scroll point we will be drawing the column that is about to come on screen.
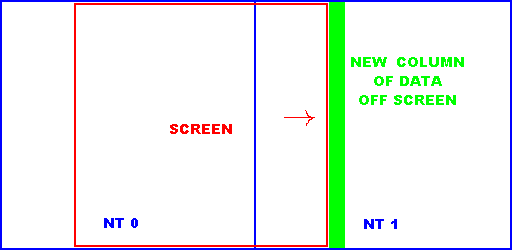
>
When to Draw
We will draw a new column anytime the scroll register becomes a multiple of 8, meaning the scroll is aligned to the tiles. Some bit masking and testing can calculate when this happens. First any part of the scroll not 0 to 7 is thrown away. Then if the result equals 0 the scroll count is a multiple of 8.
  LDA scroll
  AND #%00000111     ; throw away higher bits
  BEQ DrawNewColumn  ; see if lower bits = 0
Where to Draw
Now that we know when to draw, we need to calculate the starting PPU address of the new column. The scroll register counts in pixels, but we want to count in tiles for which column to draw. Each tile is 8 pixels wide, so we divide the scroll by 8 to get the tile number. That number is the low bits of the address.
  LDA scroll
  LSR A
  LSR A
  LSR A            ; shift right 3 times = divide by 8
  STA columnLow    ; $00 to $1F, screen is 32 tiles wide
The high bits of the address will come from the current nametable. First the low bit is inverted, to get the off screen nametable number. Then the number is shifted up and added to the base address.
  LDA nametable
  EOR #$01          ; invert low bit, A = $00 or $01
  ASL A             ; shift up, A = $00 or $02
  ASL A             ; $00 or $04
  CLC
  ADC #$20          ; add high byte of nametable base address ($2000)
  STA columnHigh    ; now address = $20 or $24 for nametable 0 or 1
Now the scroll count and nametable have been used to make the full column address to start copying new background data. It will be at the top of the nametable that is off screen. As the scroll and nametable are changed, that calculation will still give the correct starting address.
How to Draw
Previously when we have been copying data to the background the PPU is set to auto increment the address by 1. That helps with the copying because a whole row of data can be copied while only writing the PPU address once. Incrementing by 1 goes to the next horizontal tile. In this case we want to go to the next vertical tile because we are copying a column instead of a row. We want it to increment by 32 which will jump down instead of across. There are 32 tiles per row, so adding 32 will always go down to the next row in the same column. The PPU has an increment 32 mode, set using bit 2 in the PPU control register at $2000. When bit 2 is set to 0 the increment mode is +1. When bit 2 is set to 1 the increment mode is +32. By setting the increment mode to +32 and copying 30 bytes of background tiles we can draw one column at a time.
DrawColumn:
  LDA #%00000100        ; set to increment +32 mode, don't care about other bits
  STA $2000

  LDA $2002             ; read PPU status to reset the high/low latch
  LDA columnHigh
  STA $2006             ; write the high byte of column address
  LDA columnLow
  STA $2006             ; write the low byte of column address
  LDX #$1E              ; copy 30 bytes
  LDY #$00
DrawColumnLoop:
  LDA columnData, y
  STA $2007
  INY
  DEX
  BNE DrawColumnLoop
By using the when/where/how we can draw a new column of data off screen before it becomes visible. The full code and compiled .NES file is available from the download link at the bottom of this tutorial. scrolling3.asm includes everything up to this point. It will be best to watch in an emulator where you can see everything that is off screen. First open the scrolling3.nes file in the FCEUXDSP emulator. Then choose "Name Table Viewer..." from the "Tools" menu. Reset the emulator and watch the new columns being drawn off the visible screen area.
Drawing Real Background Data
The last example drew new columns, but it wasn't any real data. This example adds another counter to keep track of how far along into the level a player is. By incrementing this counter every time a new column is drawn the correct next column is easy to find. The DrawNewColumn function has been updated to use the counter to load real background data. It can also be used at the beginning of the game initialization to populate the starting nametable data instead of using the fill loops.
The full code and compiled .NES file is available from the download link at the bottom of this tutorial. scrolling4.asm includes 4 screens (128 columns) of real background ripped from SMB.
Updating the Attributes
The final piece of the scrolling puzzle is the attribute table. Updating it is the same process as the background, where the attributes are updated while they are off screen. Again the scroll and nametable registers will be used to calculate the correct attribute bytes to update. Each attribute byte covers a 4x4 tile area. 4 tiles wide is 32 pixels, so the attributes must be updated anytime the scroll register is a multiple of 32. The column numbers already calculated could be used instead of the scroll variables to do the calculations.
  LDA scroll
  AND #%00011111     ; check for multiple of 32
  BEQ NewAttrib      ; if low 5 bits = 0, time to write new attribute bytes
Only 8 attribute bytes will need to be changed each time. However they are not sequential, so the PPU increment +1 or +32 modes will not work. The PPU address needs to be changed for every attribute byte updated. The starting address is the base attribute table at $20C0. Like the background address the nametable bit is shifted up and added in. Then the scroll register is divided by 32 to get the attribute byte offset. All that is calculated together to find the PPU address of the first attribute byte. After that 8 is added to the address for each of the next bytes.
  LDA nametable
  EOR #$01          ; invert low bit, A = $00 or $01
  ASL A             ; shift up, A = $00 or $02
  ASL A             ; $00 or $04
  CLC
  ADC #$20          ; add high byte of attribute base address ($20C0)
  STA columnHigh    ; now address = $20 or $24 for nametable 0 or 1

  LDA scroll
  LSR A
  LSR A
  LSR A
  LSR A
  LSR A
  CLC
  ADC #$C0
  STA columnLow     ; attribute base + scroll / 32
The full code and compiled .NES file is available from the download link at the bottom of this tutorial. scrolling5.asm has the same incrementing scroll, but now draws the new column and attribute bytes. Use the Name Table Viewer again to check out the attributes being updated. You can see the attribute update change the color of the off screen clouds before that column of tiles is changed. The same thing is why you see graphical glitches on the sides of SMB3 while it is scrolling. To use this in your own game you will need to expand columnNumber to a bigger value.
Once you have understood everything here, there are some more advanced concepts to check out:
Meta Tiles - This idea is to store your backgrounds as bigger blocks instead of individual tiles. Things like the question blocks would be stored as one byte in the ROM and then decoded into the 4 tiles when it is being drawn. Mostly this saves huge amounts of data space and could make updating attributes easier.
Buffers - A section of RAM can be reserved to act as a buffer for the data to draw to the PPU later. Outside of vblank where the is more processing time the next graphics updates would be calculated and stored in a buffer. Then during vblank those buffers can be dumped right to the PPU, saving time.
Compression - Packing the background data into simple compression formats like RLE can save even more data space. Combine that with meta tiles and buffers to have a full scrolling engine.
Putting It All Together
Download and unzip the
scrolling.zip sample files. Each of them adds a small step, so go through them one at a time. Try expanding the background data to add more columns, making the scroll speed variable, or making the scrolling controlable.


