Skip navigation
NintendoAge
Welcome, Guest! Please Login or Join
Loading...

Nerdy Nights week 4 Color Palettes, Sprites, second app

Feb 23, 2008 at 9:44:23 PM
bunnyboy (81)
avatar
(Funktastic B) < Master Higgins >
Posts: 7704 - Joined: 02/28/2007
California
Profile
Previous Week - 6502 ASM

This Week: now that you can make and run a program, time to put something on screen!

Palettes 

Before putting any graphics on screen, you first need to set the color palette. There are two separate palettes, each 16 bytes. One palette is used for the background, and the other for sprites. The byte in the palette corresponds to one of the 64 base colors the NES can display. $0D is a bad color and should not be used. These colors are not exact and will look different on emulators and TVs.


The palettes start at PPU address $3F00 and $3F10. To set this address, PPU address port $2006 is used. This port must be written twice, once for the high byte then for the low byte:
  LDA $2002    ; read PPU status to reset the high/low latch to high
LDA #$3F
STA $2006 ; write the high byte of $3F10 address
LDA #$10
STA $2006 ; write the low byte of $3F10 address
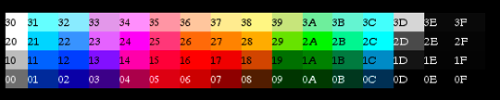
That code tells the PPU to set its address to $3F10. Now the PPU data port at $2007 is ready to accept data. The first write will go to the address you set ($3F10), then the PPU will automatically increment the address ($3F11, $3F12, $3F13) after each read or write. You can keep writing data and it will keep incrementing. This sets the first 4 colors in the palette:
  LDA #$32   ;code for light blueish
STA $2007 ;write to PPU $3F10
LDA #$14 ;code for pinkish
STA $2007 ;write to PPU $3F11
LDA #$2A ;code for greenish
STA $2007 ;write to PPU $3F12
LDA #$16 ;code for redish
STA $2007 ;write to PPU $3F13
You would continue to do writes to fill out the rest of the palette. Fortunately there is a smaller way to write all that code. First you can use the .db directive to store data bytes:
PaletteData:
.db $0F,$31,$32,$33,$0F,$35,$36,$37,$0F,$39,$3A,$3B,$0F,$3D,$3E,$0F ;background palette data
.db $0F,$1C,$15,$14,$0F,$02,$38,$3C,$0F,$1C,$15,$14,$0F,$02,$38,$3C ;sprite palette data
Then a loop is used to copy those bytes to the palette in the PPU. The X register is used as an index into the palette, and used to count how many times the loop has repeated. You want to copy both palettes at once which is 32 bytes, so the loop starts at 0 and counts up to 32.
  LDX #$00                ; start out at 0
LoadPalettesLoop:
LDA PaletteData, x ; load data from address (PaletteData + the value in x)
; 1st time through loop it will load PaletteData+0
; 2nd time through loop it will load PaletteData+1
; 3rd time through loop it will load PaletteData+2
; etc
STA $2007 ; write to PPU
INX ; X = X + 1
CPX #$20 ; Compare X to hex $20, decimal 32
BNE LoadPalettesLoop ; Branch to LoadPalettesLoop if compare was Not Equal to zero
; if compare was equal to 32, keep going down


Once that code finishes, the full color palette is ready. One byte or the whole thing can be changed while your program is running.


Sprites

Anything that moves separately from the background will be made of sprites. A sprite is just an 8x8 pixel tile that the PPU renders anywhere on the screen. Generally objects are made from multiple sprites next to each other. Examples would be Mario and any of the enemies like Goombas and Bowser. The PPU has enough internal memory for 64 sprites. This memory is separate from all other video memory and cannot be expanded.

Sprite DMA
The fastest and easiest way to transfer your sprites to the sprite memory is using DMA (direct memory access). This just means a block of RAM is copied from CPU memory to the PPU sprite memory. The on board RAM space from $0200-02FF is usually used for this purpose. To start the transfer, two bytes need to be written to the PPU ports:
  LDA #$00
STA $2003 ; set the low byte (00) of the RAM address
LDA #$02
STA $4014 ; set the high byte (02) of the RAM address, start the transfer
Once the second write is done the DMA transfer will start automatically. All data for the 64 sprites will be copied. Like all graphics updates, this needs to be done at the beginning of the VBlank period, so it will go in the NMI section of your code.

Sprite Data
Each sprite needs 4 bytes of data for its position and tile information in this order:

1 - Y Position - vertical position of the sprite on screen. $00 is the top of the screen. Anything above $EF is off the bottom of the screen.

2 - Tile Number - this is the tile number (0 to 256) for the graphic to be taken from a Pattern Table.

3 - Attributes - this byte holds color and displaying information:
  76543210
||| ||
||| ++- Color Palette of sprite. Choose which set of 4 from the 16 colors to use
|||
||+------ Priority (0: in front of background; 1: behind background)
|+------- Flip sprite horizontally
+-------- Flip sprite vertically
4 - X Position - horizontal position on the screen. $00 is the left side, anything above $F9 is off screen.

Those 4 bytes repeat 64 times (one set per sprite) to fill the 256 bytes of sprite memory. If you want to edit sprite 0, you change bytes $0200-0203. Sprite 1 is $0204-0207, sprite 2 is $0208-020B, etc

Turning NMI/Sprites On
The PPU port $2001 is used again to enable sprites. Setting bit 4 to 1 will make them appear. NMI also needs to be turned on, so the Sprite DMA will run and the sprites will be copied every frame. This is done with the PPU port $2000. The Pattern Table 0 is also selected to choose sprites from. Background will come from Pattern Table 1 when that is added later.
  PPUCTRL ($2000)
76543210
| ||||||
| ||||++- Base nametable address
| |||| (0 = $2000; 1 = $2400; 2 = $2800; 3 = $2C00)
| |||+--- VRAM address increment per CPU read/write of PPUDATA
| ||| (0: increment by 1, going across; 1: increment by 32, going down)
| ||+---- Sprite pattern table address for 8x8 sprites (0: $0000; 1: $1000)
| |+----- Background pattern table address (0: $0000; 1: $1000)
| +------ Sprite size (0: 8x8; 1: 8x16)
|
+-------- Generate an NMI at the start of the
vertical blanking interval vblank (0: off; 1: on)
And the new code to set up the sprite data:
  LDA #$80
STA $0200 ;put sprite 0 in center ($80) of screen vertically
STA $0203 ;put sprite 0 in center ($80) of screen horizontally
LDA #$00
STA $0201 ;tile number = 0
STA $0202 ;color palette = 0, no flipping

LDA #%10000000 ; enable NMI, sprites from Pattern Table 0
STA $2000

LDA #%00010000 ; no intensify (black background), enable sprites
STA $2001
Putting It All Together
Download and unzip the sprites.zip sample files. All the code above is in the sprites.asm file. Make sure sprites.asm, mario.chr, and sprites.bat are all in the same folder as NESASM3, then double click sprites.bat. That will run NESASM3 and should produce the sprites.nes file. Run that NES file in FCEUXD SP to see your sprite! Tile number 0 is the back of Mario's head and hat, can you see it? Edit sprites.asm to change the sprite position (0 to 255), or to change the color palette for the sprite (0 to 3). You can choose the PPU viewer in FCEUXD SP to see both Pattern Tables, and both Palettes.

Next Week: multiple sprites, reading controllers


Edited: 02/23/2008 at 10:37 PM by NintendoAge Moderator

Feb 23, 2008 at 9:51:58 PM
bunnyboy (81)
avatar
(Funktastic B) < Master Higgins >
Posts: 7704 - Joined: 02/28/2007
California
Profile
Edited: Dain fixed formatting below!


Edited: 02/24/2008 at 02:57 AM by bunnyboy

Feb 23, 2008 at 10:38:07 PM
EVIL OVERLORD
Dain (226)
avatar
(Dain Anderson) < Founder >
Posts: 12134 - Joined: 08/14/2006
North Carolina
Profile
Not sure why... I just re-saved and it fixed it. I'll take a look at the Apply-generated goulash.

Feb 24, 2008 at 1:23:09 AM
Sivak (44)
avatar
(Sivak -) < Kraid Killer >
Posts: 2370 - Joined: 05/04/2007
Ohio
Profile
Seeing that palette again...  Is there any way of knowing if $1D is black or a very dark grey?  The whole XD range of the palette actually isn't clear.

-------------------------
My website: Here

Battle Kid 2 demo videos: Playlist
Battle Kid demo videos: Playlist

Check out my current: Want list
Check out my current: Extras list

Feb 24, 2008 at 2:56:55 AM
bunnyboy (81)
avatar
(Funktastic B) < Master Higgins >
Posts: 7704 - Joined: 02/28/2007
California
Profile
That palette isn't very accurate, it will be better to look at emulators like Nintendulator. PAL and NTSC will also be slightly different. Having 2 colors next to each other can blur them together or create new colors. And of course RF vs composite will be different too. Basically you have to test on a real NES and TV to see what it really looks like

Feb 24, 2008 at 10:49:22 AM
NationalGameDepot (279)
avatar
(Dr. NGD) < Bonk >
Posts: 15286 - Joined: 08/16/2006
Tennessee
Profile
I gave up on the last Nerdy Nights... I just don't have the know how for this kinda stuff. If you teach once person though Brian it is worth it to have just 1 new game.
~~NGD

-------------------------
Proud replier of post #1000 in the infamous Joel thread

Feb 11, 2010 at 5:42:48 PM
rizz (9)
avatar
(Frank Westphal) < Eggplant Wizard >
Posts: 317 - Joined: 06/29/2007
Wisconsin
Profile
Could someone explain the need for loading $2002 before the accessing $2006? Is it because vblank flag needs to be reset manually? Also, during the memory clear, is there any reason putting sprites outside the visible area? Or could the loop simply set everything to 0?

-------------------------

My Development Blog


Feb 11, 2010 at 6:01:01 PM
udisi (88)
avatar
< King Solomon >
Posts: 3270 - Joined: 11/15/2006
United States
Profile
You can use a loop to set the sprites offscreen, or clear them. It's actually done that way in the reset code. Took me a long time till I noticed that myself.

Feb 11, 2010 at 9:20:55 PM
bunnyboy (81)
avatar
(Funktastic B) < Master Higgins >
Posts: 7704 - Joined: 02/28/2007
California
Profile
$2006 is a 16 bit address. You write to it twice, once for the high byte of the address and once for the low byte. But at reset or when your code is running you may not know if the PPU is expecting the high or the low byte. If you write low but the PPU is expecting high then the address will be wrong. So reading $2002 resets the PPU to expect the high byte first.

After the initial setup you will almost entirely ignore the vblank flag.  Instead you will use NMI.

Sprites go outside the visible area to cure some of confusion.  If they are left at 0 all 64 sprites will be in the upper left corner.  Because of the 8 sprites per scanline limit anything else you put on that top row will be invisible, possibly causing you to spend hours debugging for nothing  


Edited: 02/11/2010 at 09:26 PM by bunnyboy

Feb 12, 2010 at 1:29:14 PM
rizz (9)
avatar
(Frank Westphal) < Eggplant Wizard >
Posts: 317 - Joined: 06/29/2007
Wisconsin
Profile
Ah, so the 8 sprites per scanline even counts sprites that are turned off.

So, is it necessary to read $2002 as a precaution every time you are writing addresses to the PPU registers? Or are there only specific times?

Is it best (or is it necessary) to turn off sprites & background (using $2001) during all palette, sprite, and background updates?

Thanks!

-------------------------

My Development Blog


Feb 12, 2010 at 3:21:08 PM
KHAN Games (89)
avatar
(Kevin Hanley) < Master Higgins >
Posts: 8124 - Joined: 06/21/2007
Florida
Profile
I'd say yes yes and yes.

-------------------------

gauauu: look, we all paid $10K at some point in our lives for the privilege of hanging out with Kevin


Feb 12, 2010 at 5:24:55 PM
udisi (88)
avatar
< King Solomon >
Posts: 3270 - Joined: 11/15/2006
United States
Profile
Originally posted by: rizz

Ah, so the 8 sprites per scanline even counts sprites that are turned off.

So, is it necessary to read $2002 as a precaution every time you are writing addresses to the PPU registers? Or are there only specific times?

Is it best (or is it necessary) to turn off sprites & background (using $2001) during all palette, sprite, and background updates?

Thanks!


The 8 sprites per scanline does count offscreen, but it doesn't really matter since you'll never see them. You can set them all offscreen.

Feb 12, 2010 at 5:57:15 PM
MetalSlime (0)
avatar
(Thomas Hjelm) < Crack Trooper >
Posts: 140 - Joined: 08/14/2008
Japan
Profile
Originally posted by: rizz

Ah, so the 8 sprites per scanline even counts sprites that are turned off.

So, is it necessary to read $2002 as a precaution every time you are writing addresses to the PPU registers? Or are there only specific times?

Is it best (or is it necessary) to turn off sprites & background (using $2001) during all palette, sprite, and background updates?

Thanks!


You don't have to read $2002 if you know for a fact that $2006 is already expecting a high byte.  If you don't know, or are unsure, it's best to read it as a precaution.  An example of when you would know might be a case like this:

lda $2002 ;reset hi/lo latch
lda #$20
sta $2006
lda #$00
sta $2006
sta $2007

lda #$23   ;look, we didn't need to read $2002 here
sta $2006
lda #$C0
sta $2006
lda #$00
sta $2007

We don't need to read $2002 here because we know $2006 is expecting a high byte since we wrote to $2006 exactly two times since we read $2002.

As for turning off sprites/bg, you definitely don't want to do it everytime you update something or your screen will black out every update (turning off BG blacks out the screen).

You do want to make sure all your graphics updates are done during vblank (in your NMI routine) though.  This includes writing palettes, updating nametables and performing sprite DMA.

The only time you'd need to turn sprites/bg off would be if you need to draw an entire screen all in one go, like redrawing the title screen after the game is over, or drawing the first screen at the beginning of a new level or something like that.  In these cases you need more drawing time than vblank allows, and a black transition screen is usually desirable.

-------------------------
MetalSlime runs away

My nesdev blog: http://tummaigames.com/blog...

Aug 27, 2010 at 10:05:21 AM
steamx (0)

(Kevin P) < Cherub >
Posts: 5 - Joined: 07/26/2010
Germany
Profile
edit: This is based on this tutorial number 4. You can try it with the next one (that is 5) too, but be sure to understand what i did. It will help you to understand ASM. It is very simple though.)
If someone wants multiple sprites (max 8) but has problems you can try this code:
  LDA #$80
STA $0200 ; put sprite 0 in center ($80) of screen vert
STA $0203 ; put sprite 0 in center ($80) of screen horiz
LDA #$00
STA $0201 ; tile number = 0
STA $0202 ; color = 0, no flipping

LDA #$80
STA $0204
LDA #$88
STA $0207
LDA #$01
STA $0205
LDA #$00
STA $0206

LDA #$88
STA $0208
LDA #$80
STA $020B
LDA #$02
STA $0209
LDA #$00
STA $020A

LDA #$88
STA $020C
LDA #$88
STA $020F
LDA #$03
STA $020D
LDA #$00
STA $020E

LDA #$90
STA $0210
LDA #$80
STA $0213
LDA #$04
STA $0211
LDA #$00
STA $0212

LDA #$90
STA $0214
LDA #$88
STA $0217
LDA #$05
STA $0215
LDA #$00
STA $0216

LDA #$98
STA $0218
LDA #$80
STA $021B
LDA #$06
STA $0219
LDA #$00
STA $021A

LDA #$98
STA $021C
LDA #$88
STA $021F
LDA #$07
STA $021D
LDA #$00
STA $021E

LDA #%10000000 ; enable NMI, sprites from Pattern Table 0
STA $2000

LDA #%00010000 ; enable sprites
STA $2001

Replace it with the original code and you'll get a full Mario who is prepared to jump
Oh by the way a question. How did they include the enemies and other sprites? With a mapper or did they use tiles?

P.S.: Replace the first 4 numbers of your sprite palette with $0F,$16,$27,$18 and you'll get a Mario that is as close as possible to the original (they do have a small color difference. Maybe because of PAL and NTSC. I don't know)

-------------------------


Edited: 08/27/2010 at 10:12 AM by steamx

Aug 27, 2010 at 10:25:02 AM
Mario's Right Nut (352)
avatar
(Cunt Punch) < Bowser >
Posts: 6634 - Joined: 11/21/2008
Texas
Profile
Originally posted by: steamx

edit: This is based on this tutorial number 4. You can try it with the next one (that is 5) too, but be sure to understand what i did. It will help you to understand ASM. It is very simple though.)
If someone wants multiple sprites (max 8) but has problems you can try this code:
  LDA #$80
STA $0200 ; put sprite 0 in center ($80) of screen vert
STA $0203 ; put sprite 0 in center ($80) of screen horiz
LDA #$00
STA $0201 ; tile number = 0
STA $0202 ; color = 0, no flipping

LDA #$80
STA $0204
LDA #$88
STA $0207
LDA #$01
STA $0205
LDA #$00
STA $0206

LDA #$88
STA $0208
LDA #$80
STA $020B
LDA #$02
STA $0209
LDA #$00
STA $020A

LDA #$88
STA $020C
LDA #$88
STA $020F
LDA #$03
STA $020D
LDA #$00
STA $020E

LDA #$90
STA $0210
LDA #$80
STA $0213
LDA #$04
STA $0211
LDA #$00
STA $0212

LDA #$90
STA $0214
LDA #$88
STA $0217
LDA #$05
STA $0215
LDA #$00
STA $0216

LDA #$98
STA $0218
LDA #$80
STA $021B
LDA #$06
STA $0219
LDA #$00
STA $021A

LDA #$98
STA $021C
LDA #$88
STA $021F
LDA #$07
STA $021D
LDA #$00
STA $021E

LDA #%10000000 ; enable NMI, sprites from Pattern Table 0
STA $2000

LDA #%00010000 ; enable sprites
STA $2001

Replace it with the original code and you'll get a full Mario who is prepared to jump
Oh by the way a question. How did they include the enemies and other sprites? With a mapper or did they use tiles?

P.S.: Replace the first 4 numbers of your sprite palette with $0F,$16,$27,$18 and you'll get a Mario that is as close as possible to the original (they do have a small color difference. Maybe because of PAL and NTSC. I don't know)


That's a lot of hard coding right there.  I'd do something like this:

data:
  .db $80,$00,$00,$80,$80,$01,$00,$88, etc.


load_sprite_data:

  LDX #$00

.loop:
  LDA data,x
  STA $0200,x
  INX
  CPX #$??
  BNE .loop

RTS

Cleaner and easier to read.


-------------------------

This is my shiny thing, and if you try to take it off me, I may have to eat you.

Check out my dev blog.


Aug 27, 2010 at 10:30:22 AM
steamx (0)

(Kevin P) < Cherub >
Posts: 5 - Joined: 07/26/2010
Germany
Profile
I know its in the next tutorial. But i wanted to try it with doing it again and again by my self to understand it better. Because this is what the loop does.
Btw i didn't read the scanline thing so the question with the enemies is solved....

-------------------------
 

Sep 23, 2010 at 6:11:22 AM
-Basti- (0)
avatar
(Sebastian D) < Little Mac >
Posts: 67 - Joined: 04/21/2010
Germany
Profile
how can I expand the memory space for sprites? I need 356 (#$164 bytes of space.

-------------------------
Looking for NES prototypes!!! Please offer any proto you want to get rid of!

Sep 23, 2010 at 10:39:41 AM
bunnyboy (81)
avatar
(Funktastic B) < Master Higgins >
Posts: 7704 - Joined: 02/28/2007
California
Profile
You don't, it is a fixed space inside the PPU.

Sep 23, 2010 at 10:49:41 AM
-Basti- (0)
avatar
(Sebastian D) < Little Mac >
Posts: 67 - Joined: 04/21/2010
Germany
Profile
Damn! So there is no way to display more than 63 tiles at once?

-------------------------
Looking for NES prototypes!!! Please offer any proto you want to get rid of!

Sep 23, 2010 at 12:03:34 PM
KHAN Games (89)
avatar
(Kevin Hanley) < Master Higgins >
Posts: 8124 - Joined: 06/21/2007
Florida
Profile
Nope, 64 sprites is the limit. Other than that you're going to have to do tricks with backgrounds.

I can't imagine needing more than 64 sprites at a time though.

-------------------------

gauauu: look, we all paid $10K at some point in our lives for the privilege of hanging out with Kevin


Feb 24, 2011 at 10:42:48 PM
Jemoozu (0)
avatar
(James Morrow) < Tourian Tourist >
Posts: 32 - Joined: 07/12/2010
Washington
Profile
Yikes! This is gonna make my head explode! Which address(es) indicates the position of the sprite? How do I do that?

-------------------------


Edited: 02/24/2011 at 10:43 PM by Jemoozu

Feb 24, 2011 at 10:48:03 PM
removed04092017 (0)
This user has been banned -- click for more information.
< Bowser >
Posts: 7316 - Joined: 12/04/2010
Other
Profile
  LDA #$00
STA $2003 ; set the low byte (00) of the RAM address
LDA #$02
STA $4014 ; set the high byte (02) of the RAM address, start the transfer

That piece of code tells the PPU's internal sprite RAM to point to the first sprite RAM spot (#$00) to start uploading sprites. $02 tells it to put the sprites from $200-$2FF inside the NES to that memory. (Called sprite DMA. Uploads faster then a LDA STA loop which is why we use the special pointer. Can also point to $300, $400, and so on. Uploading bytes $X00-$XFF to the sprite RAM, but $200 is used consistently for sprite data, so that's why it's used. Pretty much a "standard" spot.)


So locations $200-$2FF of the RAM inside the NES holds 64 sprites. 256/64=4, so every 4 bytes is a new sprite. The 4 bytes used for the sprite data are called the attributes.
Byte $200 (1st sprite, 1st attribute)
Y position on screen. Moves the sprite up/down. 0=top, Higher number, more down is goes.

Byte $201 (1st sprite, 2nd attribute)
Tile number. whatever bank is switched on, the tile number from that bank will be put on the screen. In most programs, the 2nd 4K "page" of CHR-ROM are the sprites.

Byte $202 (1st sprite, 3rd attribute)
Other misc. attributes. Each bit does this function in this byte:
  76543210
||| ||
||| ++- Color Palette of sprite. Choose which set of 4 from the 16 colors to use
|||
||+------ Priority (0: in front of background; 1: behind background)
|+------- Flip sprite horizontally
+-------- Flip sprite vertically

Byte $203 (1st sprite, 4th attribute)
X position on the screen. Moves player character left/right. 0=far left. Higher the number, more right it goes.

Bytes $204-$207, $208-$20B, $20C-$20F, $210-$213 of Sprite RAM are different sprites, but each follows the same attributes. For unused sprites, just write #$FF to the Y locaion and they will be put off the screen. If you write #$FF to the X, It may cause sprite overflow on some scanlines and cause sprites not to show up. (There can only be 8 sprites per scanline. Any sprite after the first 8 will be left out. The ones that come first in RAM will be shown on top/in priority to other sprites if there's overflow/overlap.)

Hope this helps you understand, I simplified it a lot for the sake of making it easier to understand, but if you get this, understanding the technicalities behind it isn't so hard. Any questions, just PM me.


Edited: 02/25/2011 at 03:40 PM by removed04092017

Feb 24, 2011 at 11:39:04 PM
Jemoozu (0)
avatar
(James Morrow) < Tourian Tourist >
Posts: 32 - Joined: 07/12/2010
Washington
Profile
Here's what I did, I don't know if this is correct or not.

The original code:

LDA #$80
STA $0200 ; put sprite 0 in center ($80) of screen vert
STA $0203 ; put sprite 0 in center ($80) of screen horiz
LDA #$00
STA $0201 ; tile number = 2
STA $0202 ; color = 2, no flipping

Newer code:

LDA #$C0
STA $0200 ; put sprite 0 in center ($80) of screen vert
STA $0203 ; put sprite 0 in center ($80) of screen horiz
LDA #$00
STA $0201 ; tile number = 2
STA $0202 ; color = 2, no flipping

I only changed the value of #$80, because when I messed with $#00 and $#80, the sprite was translated to a different part of the screen, but it changed. By changing only $#80, the sprite moved, but it retained its original form.

-------------------------


Edited: 02/24/2011 at 11:52 PM by Jemoozu

Feb 25, 2011 at 12:01:56 AM
KHAN Games (89)
avatar
(Kevin Hanley) < Master Higgins >
Posts: 8124 - Joined: 06/21/2007
Florida
Profile
Not sure what the question is.

Yes, changing the value you are storing to $0200 and $0203 will change the horizontal and vertical positioning.

I'm not sure what color = 2 means. You're writing 0 to the color, so it would take the first palette. And also, the tile number you're writing is 0, and not 2.

-------------------------

gauauu: look, we all paid $10K at some point in our lives for the privilege of hanging out with Kevin


Feb 25, 2011 at 12:12:08 AM
Jemoozu (0)
avatar
(James Morrow) < Tourian Tourist >
Posts: 32 - Joined: 07/12/2010
Washington
Profile
Originally posted by: KHAN Games

Not sure what the question is.

Yes, changing the value you are storing to $0200 and $0203 will change the horizontal and vertical positioning.

I'm not sure what color = 2 means. You're writing 0 to the color, so it would take the first palette. And also, the tile number you're writing is 0, and not 2.


Oops! I completely forgot that I changed 0 to 2 in the comments area thinking it would do something (silly me ). My concern was how I can change the position of the sprite with out altering sprite 0.

Speaking of color, what address do I need to go to to change the color or palette of the sprite?

-------------------------